Manuals
/
AKG Acoustics
/
Home Audio
/
Headphones
AKG Acoustics
HEARO 888
specifications
Audio and Power Connections, Operating Notes
Models:
HEARO 888
1
17
66
66
Download
66 pages
30.15 Kb
14
15
16
17
18
19
20
21
Troubleshooting
Specifications
Errori e rimedi
Oplossen van problemen
SOUND Settings
Safety
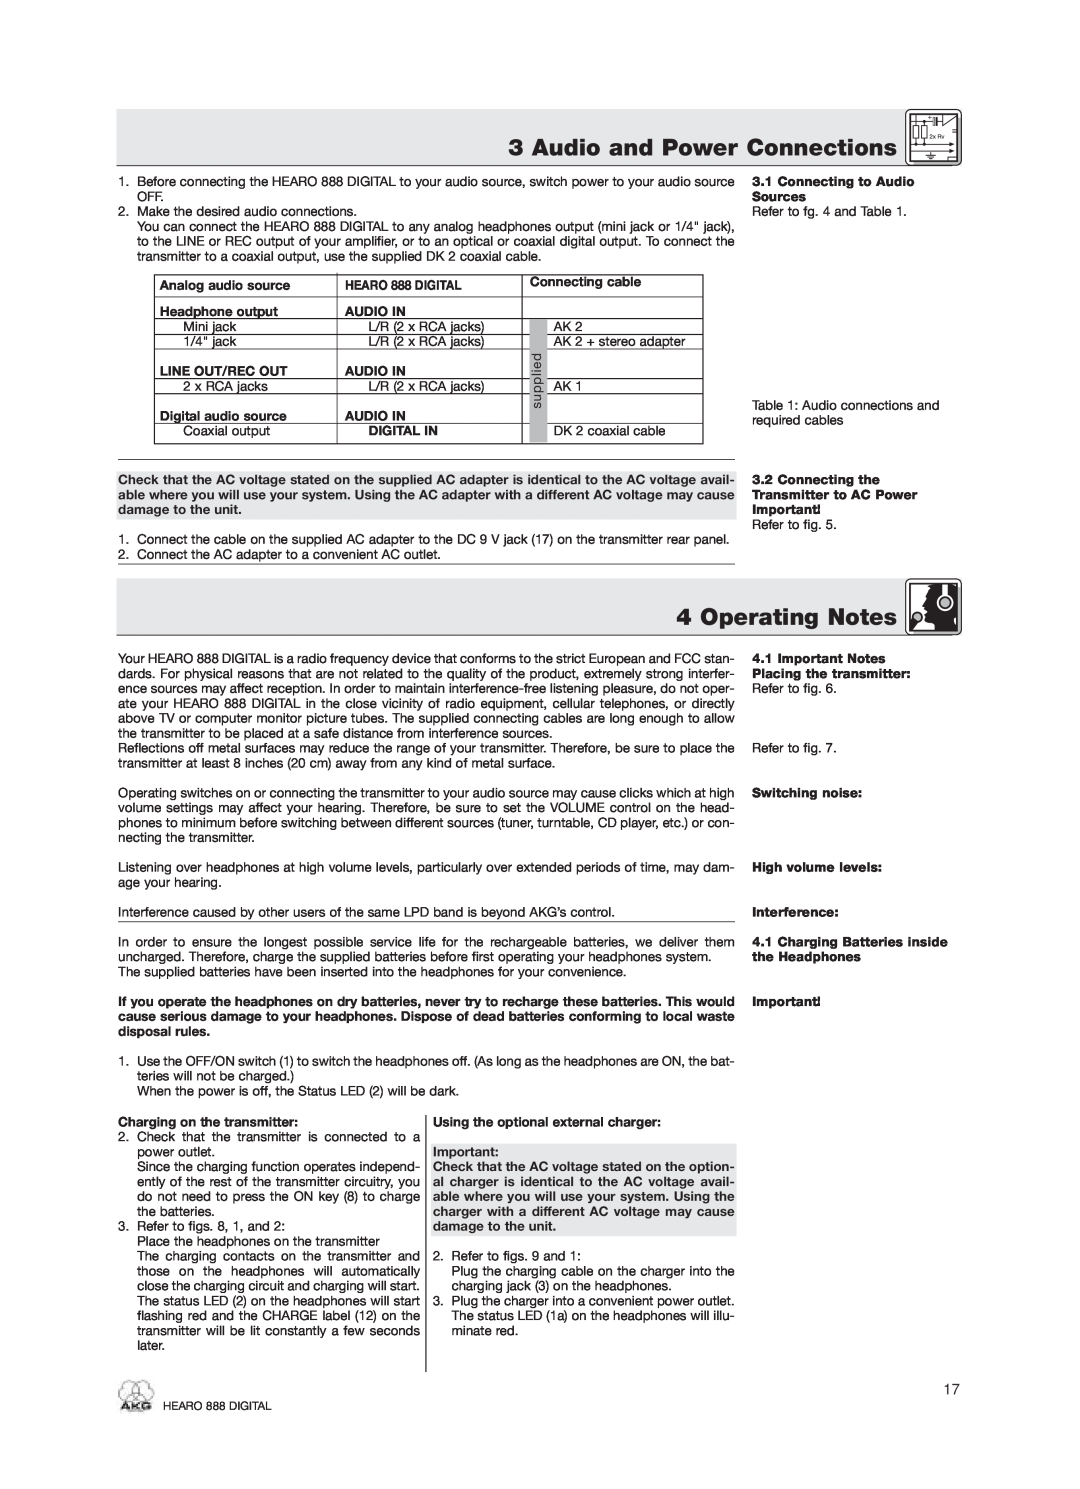
Audio and Power Connections
Page 17
Image 17
Page 16
Page 18
Page 17
Image 17
Page 16
Page 18
Contents
Bedienungsanleitung . . . . . . . . . . . . S.
HEARO 888 DIGITAL
User Instructions . . . . . . . . . . . . . . p
Mode d’emploi . . . . . . . . . . . . . . . . p.
Kurzanleitung
Inhaltsverzeichnis
2 Beschreibung
1 Sicherheit und Umwelt
nehmbar ist
2 Beschreibung
2.6 Dolby Surround Pro Logic
2 Beschreibung
Betriebsart
2 Beschreibung
Anzeige
Rückseite
2 Beschreibung
3 Anschluss
4 Betriebshinweise
4.6 Digitaleingang
4 Betriebshinweise
4 Betriebshinweise
5 Reinigung
4.7 Wiedergabemodi
Hinweis
Fehler
6 Fehlerbehebung
Mögliche Ursache
Behebung
7.1 Systemdaten
7 Technische Daten
7.2 Sender
7.3 Kopfhörer
Getting Started Quickly
Table of Contents
2 Description
1 Safety and Environment
2 Description
diagram A. This restores natural, spatial hearing
LH FILTER
RH FILTER
2.6 Dolby Surround Pro Logic
2 Description
Rear Panel
2 Description
Mode
Label
4 Operating Notes
3 Audio and Power Connections
4.6 Digital Input
4 Operating Notes
4.8 SOUND Settings
5 Cleaning
4 Operating Notes
4.9 HEARO 888 DIGITAL Card
Problem
6 Troubleshooting
Possible Cause
Remedy
7.3 Headphones
7 Specifications
7.1 System Performance
7.2 Transmitter
Mode d’emploi abrégé
Table des matières
2 Description
1 Sécurité et écologie
ou sources aussi bien analogiques que numériques
2 Description
2.6 Décodeur Dolby Surround
2 Description
Mode
2 Description
Affichage
Face arrière
2 Description
3 Raccordement
4 Fonctionnement
4.4Remplacement des accus Voir Fig
4 Fonctionnement
4.5Mise en service de la chaîne
4.3Déchargement des accus
4 Fonctionnement
5 Nettoyage
4.7 Modes d’écoute Remarque
4.8Réglages de sonorité Remarque
Erreur
6 Dépannage
Cause possible
Intervention
7.1 Système
7 Caractéristiques techniques
7.2 Emetteur
7.3 Casque
Brevi istruzioni per l’uso
Indice
2 Descrizione
1 Sicurezza ed ambiente
gresso analogici che con quelli digitali
2 Descrizione
2.6 Dolby Surround Pro Logic
2 Descrizione
Indicazione
2 Descrizione
Stato
Retro
4 Indicazioni per l’esercizio
3 Collegamenti
l’impianto
4 Indicazioni per l’esercizio
4.6 Ingresso digitale
un lettore DVD
4 Indicazioni per l’esercizio
5 Pulizia
Avvertenza
4.8 Regolazioni SOUND
Errore
6 Errori e rimedi
Possibile causa
Rimedio
7.1 Dati sistemici
7 Dati tecnici
7.2 Trasmettitore
7.3 Cuffia
Indice
Instrucciones de servicio resumidas
2 Descripción
1 Seguridad y medio ambiente
imagen y el sonido
2 Descripción
2.6 Decodificador Dolby
2 Descripción
Régimen
2 Descripción
Indicador
Régimen
2 Descripción
3 Conexión
Cargar en el transmisor
4 Instrucciones de manejo
Cargar con un cargador externo opcional
¡Importante
4 Instrucciones de manejo
5 Limpieza
un reproductor CD
Nota
Falla
6 Reparación de fallas
Causa posible
Reparación
7.1 Datos del sistema
7 Datos técnicos
7.2 Transmisor
7.3 Auriculares
Korte handleiding
Inhoud
2 Beschrijving
1 Veiligheid en milieu
en ruimtelijk
2 Beschrijving
2.6 Dolby Surround Pro-Logic
2 Beschrijving
Instelling
2 Beschrijving
Markeringen
Achterkant
4 Gebruiksaanwijzing
3 Aansluiten
4.4Batterijen vervangen Zie Fig.
4 Gebruiksaanwijzing
4 Gebruiksaanwijzing
5 Reiniging
Advies
4.8 SOUND-instellingen
Probleem
6 Oplossen van problemen
Mogelijke oorzaak
Oplossing
7.1 Systeemgegevens
7 Technische gegevens
7.2 Zender
7.3 Hoofdtelefoon
Page
Page
3,5 mm
Fig.
2 3 Fig.
Fig.
AKG Acoustics GmbH
AKG Acoustics GmbH
AKG ACOUSTICS, U.S
04/04/9100 U
Top
Page
Image
Contents