C:INSTALLING THE OPERATOR 
STEP 2: Raise the Tee Rail so that the Front Idler Bracket and |
| |
Front Mounting Bracket align. Insert bolt and tighten nut loosely for |
| |
now. Later in the installation, this nut must be tightened securely. |
| |
STEP 3 — Sectional Doors and One Piece Doors with Track: |
| |
Raise the Opener and rest the Power Unit on a ladder or other sturdy |
| |
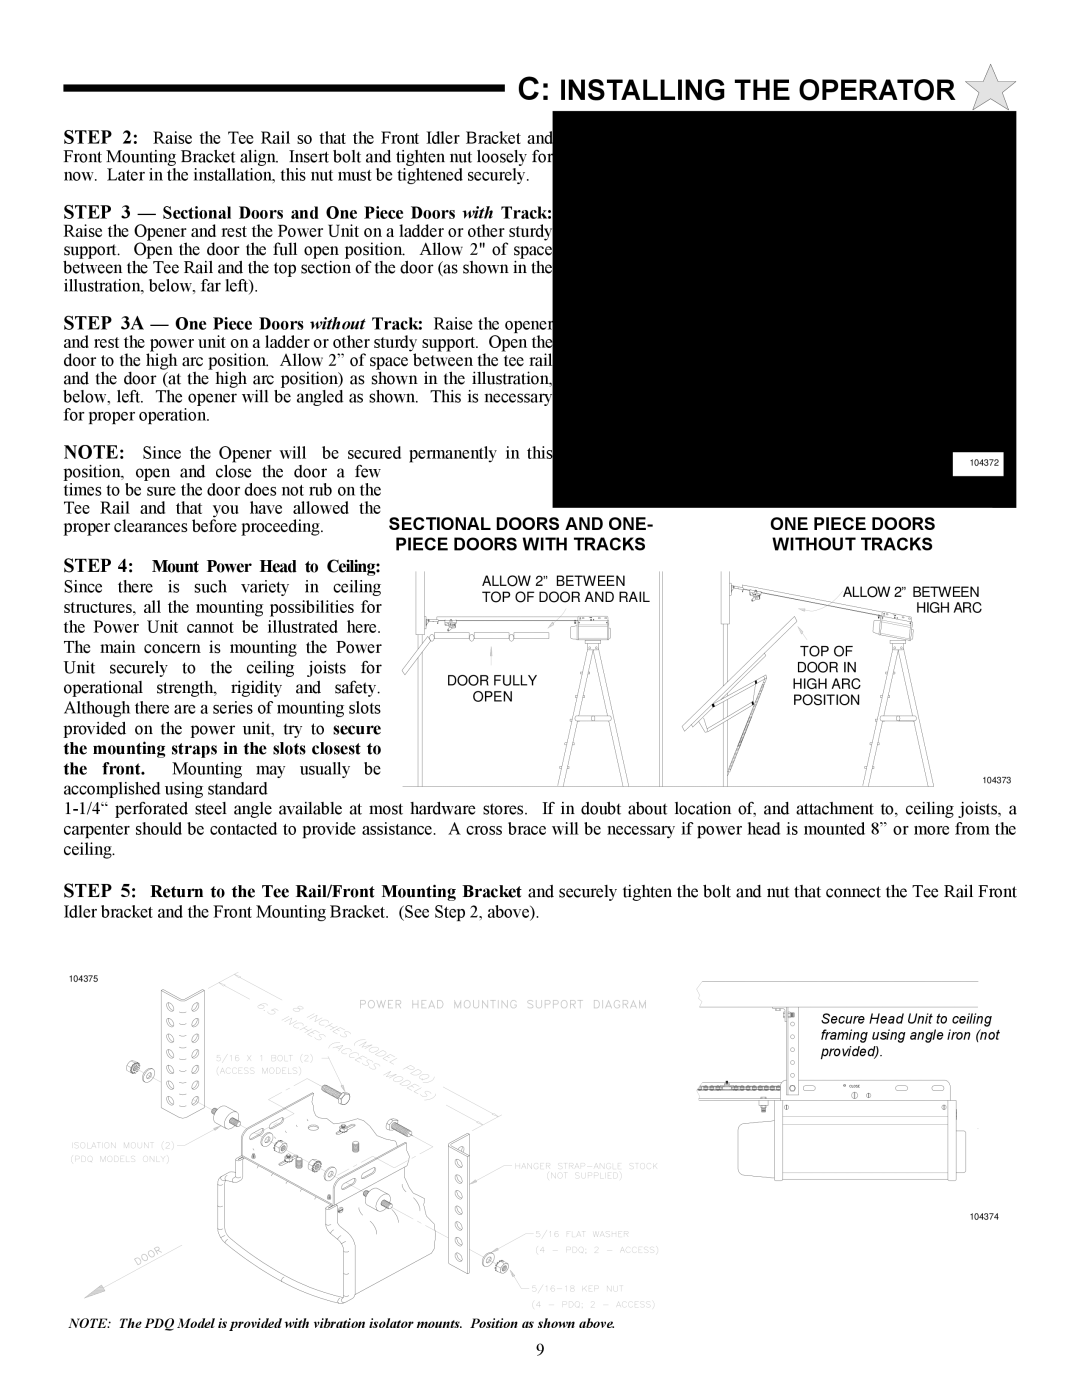
support. Open the door the full open position. Allow 2" of space |
| |
between the Tee Rail and the top section of the door (as shown in the |
| |
illustration, below, far left). |
|
|
STEP 3A — One Piece Doors without Track: Raise the opener |
| |
and rest the power unit on a ladder or other sturdy support. Open the |
| |
door to the high arc position. Allow 2” of space between the tee rail |
| |
and the door (at the high arc position) as shown in the illustration, |
| |
below, left. The opener will be angled as shown. This is necessary |
| |
for proper operation. |
|
|
NOTE: Since the Opener will be secured permanently in this | 104372 | |
position, open and close the door a few |
| |
|
| |
times to be sure the door does not rub on the |
|
|
Tee Rail and that you have allowed the | SECTIONAL DOORS AND ONE- | ONE PIECE DOORS |
proper clearances before proceeding. | ||
| PIECE DOORS WITH TRACKS | WITHOUT TRACKS |
STEP 4: Mount Power Head to Ceiling:
Since there is such variety in ceiling | ALLOW 2” BETWEEN | ALLOW 2” BETWEEN | ||
TOP OF DOOR AND RAIL | ||||
structures, all the mounting possibilities for | HIGH ARC | |||
| ||||
the Power Unit cannot be illustrated here. |
|
| ||
The main concern is mounting the Power |
| TOP OF | ||
Unit securely to the ceiling joists for | DOOR FULLY | DOOR IN | ||
operational | strength, rigidity and safety. | HIGH ARC | ||
Although there are a series of mounting slots | OPEN | POSITION | ||
|
| |||
provided on the power unit, try to secure |
|
| ||
the mounting straps in the slots closest to |
|
| ||
the front. | Mounting may usually be |
| 104373 | |
accomplished using standard |
| |||
|
| |||
STEP 5: Return to the Tee Rail/Front Mounting Bracket and securely tighten the bolt and nut that connect the Tee Rail Front Idler bracket and the Front Mounting Bracket. (See Step 2, above).
104375
Secure Head Unit to ceiling framing using angle iron (not provided).
104374
NOTE: The PDQ Model is provided with vibration isolator mounts. Position as shown above.
9
