Installation

Caution

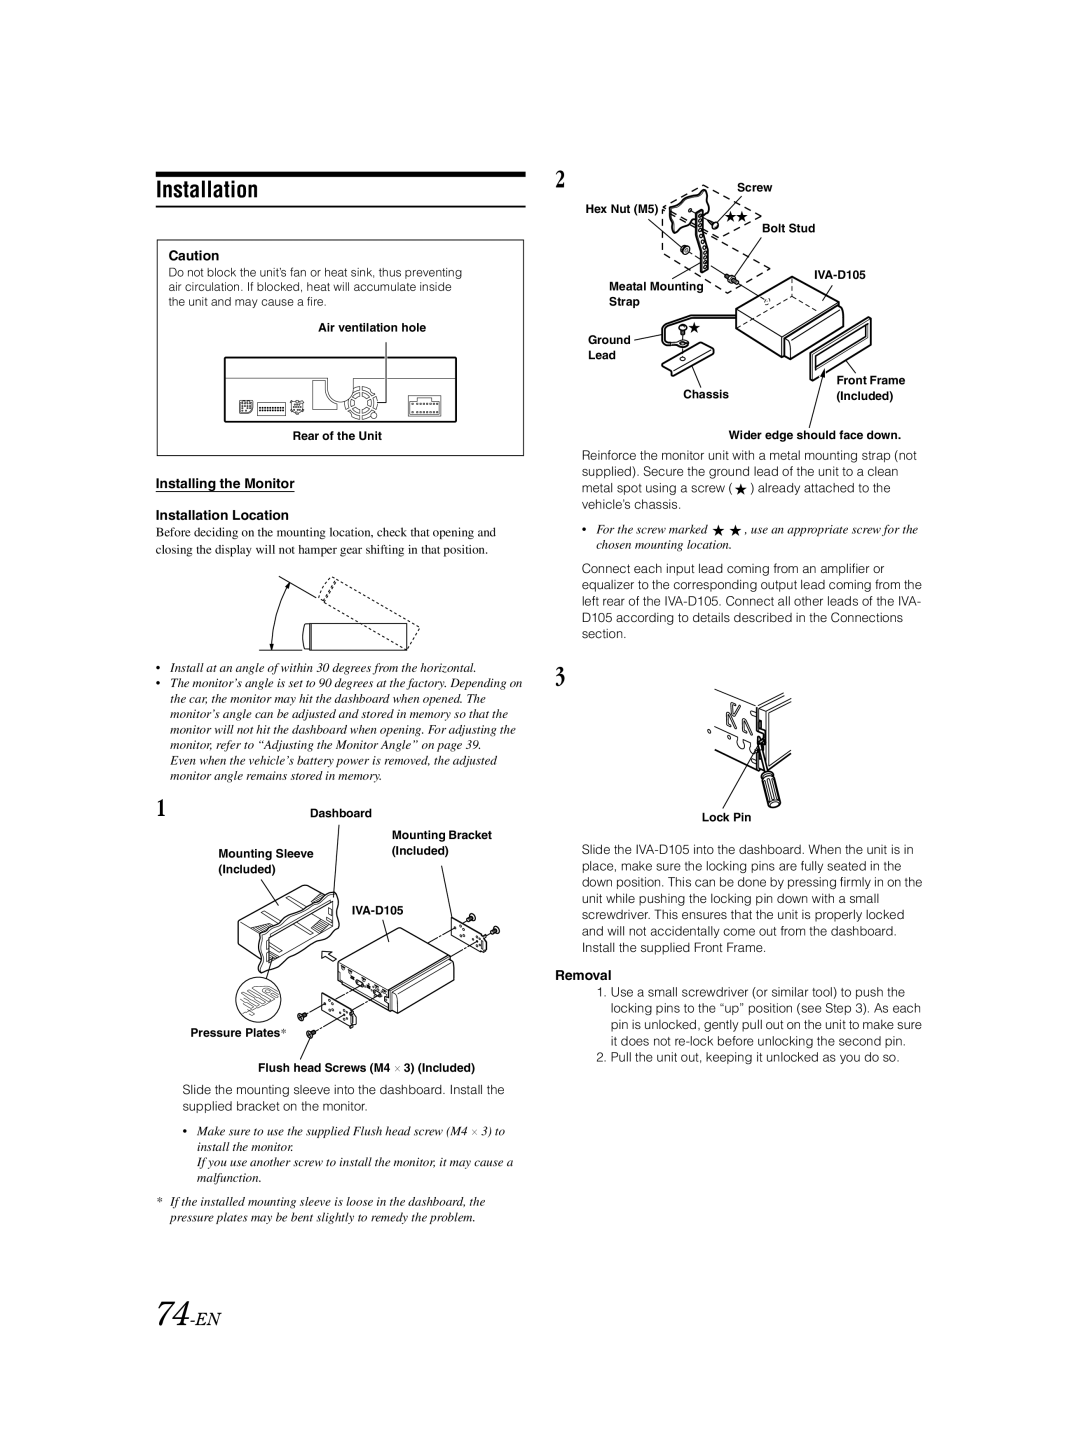
Do not block the unit’s fan or heat sink, thus preventing air circulation. If blocked, heat will accumulate inside the unit and may cause a fire.

Air ventilation hole

Rear of the Unit

Installing the Monitor

Installation Location

Before deciding on the mounting location, check that opening and closing the display will not hamper gear shifting in that position.

Install at an angle of within 30 degrees from the horizontal.

The monitor’s angle is set to 90 degrees at the factory. Depending on the car, the monitor may hit the dashboard when opened. The monitor’s angle can be adjusted and stored in memory so that the monitor will not hit the dashboard when opening. For adjusting the monitor, refer to “Adjusting the Monitor Angle” on page 39.

Even when the vehicle’s battery power is removed, the adjusted monitor angle remains stored in memory.

1 Dashboard

Mounting Bracket

Mounting Sleeve(Included) (Included)

IVA-D105

Pressure Plates*

Flush head Screws (M4 3) (Included)

Slide the mounting sleeve into the dashboard. Install the supplied bracket on the monitor.

Make sure to use the supplied Flush head screw (M4 3) to install the monitor.

If you use another screw to install the monitor, it may cause a malfunction.

*If the installed mounting sleeve is loose in the dashboard, the pressure plates may be bent slightly to remedy the problem.

2

Screw

Hex Nut (M5)

Bolt Stud

IVA-D105

Meatal Mounting

Strap

Ground

Lead

Front Frame

Chassis(Included)

Wider edge should face down.

Reinforce the monitor unit with a metal mounting strap (not supplied). Secure the ground lead of the unit to a clean metal spot using a screw ( ) already attached to the vehicle’s chassis.

For the screw marked , use an appropriate screw for the chosen mounting location.

Connect each input lead coming from an amplifier or equalizer to the corresponding output lead coming from the left rear of the IVA-D105. Connect all other leads of the IVA- D105 according to details described in the Connections section.

3

Lock Pin

Slide the IVA-D105 into the dashboard. When the unit is in place, make sure the locking pins are fully seated in the down position. This can be done by pressing firmly in on the unit while pushing the locking pin down with a small screwdriver. This ensures that the unit is properly locked and will not accidentally come out from the dashboard. Install the supplied Front Frame.

Removal

1.Use a small screwdriver (or similar tool) to push the locking pins to the “up” position (see Step 3). As each pin is unlocked, gently pull out on the unit to make sure it does not re-lock before unlocking the second pin.

2.Pull the unit out, keeping it unlocked as you do so.

74-EN

Page 76
Image 76
Alpine IVA-D105 owner manual 74-EN, Installing the Monitor Installation Location, Removal

IVA-D105 specifications

The Alpine IVA-D105 is an advanced in-dash multimedia receiver designed to enhance the driving experience with its cutting-edge features and technologies. Notably, this model integrates a large, high-resolution LCD touchscreen display, which is intuitive to use and supports a visually appealing interface. The screen's size and clarity make it easy for drivers to navigate through its various functions without taking their focus off the road.

One of the standout features of the IVA-D105 is its multimedia playback capabilities. It supports a wide range of formats including CDs, DVDs, and various digital audio formats, allowing users to enjoy their favorite music and videos effortlessly. Additionally, the unit is equipped with USB connectivity, which enables direct playback from USB flash drives, providing convenience for users who want to access a vast library of music files.

Moreover, the Alpine IVA-D105 is compatible with Bluetooth technology, allowing for hands-free calling and audio streaming from compatible mobile devices. This feature promotes safety while driving, as it minimizes distractions and keeps the driver's hands on the wheel.

In terms of connectivity, the IVA-D105 also features multiple inputs and outputs, including AV inputs for connecting external devices such as gaming consoles or additional media players. With built-in support for steering wheel controls, drivers can easily manage their audio and navigation without needing to take their eyes off the road.

The unit’s customizable sound settings are another highlight. Users can fine-tune their audio experience by adjusting bass, treble, and balance settings to achieve the perfect sound profile that suits their preferences. The built-in equalizer allows for further personalization, making it a versatile option for audiophiles.

Moreover, the Alpine IVA-D105 is designed with a sleek aesthetic that fits seamlessly into the dashboards of many vehicles. Its modern design and user-friendly interface make it a desirable upgrade for those looking to enhance their vehicle's entertainment system.

Overall, the Alpine IVA-D105 delivers exceptional multimedia performance with a blend of advanced technologies, user-friendly features, and great sound quality, making it a notable choice for anyone looking to elevate their in-car experience.