
SPX-F17M specifications
The Alpine SPX-F17M is a premium component speaker system that caters to car audio enthusiasts seeking superior sound quality and performance. Renowned for its innovative features and cutting-edge technologies, this system brings an immersive listening experience to any vehicle.At the heart of the SPX-F17M are its meticulously engineered components. The system includes a pair of 6.5-inch mid-bass drivers, a 1-inch silk dome tweeter, and high-quality crossover units, which together deliver unparalleled sound fidelity. The mid-bass drivers utilize a high-strength cone material, ensuring durability and enhanced bass response. This construction allows for a richer and deeper low-frequency output, allowing listeners to feel the music rather than simply hear it.
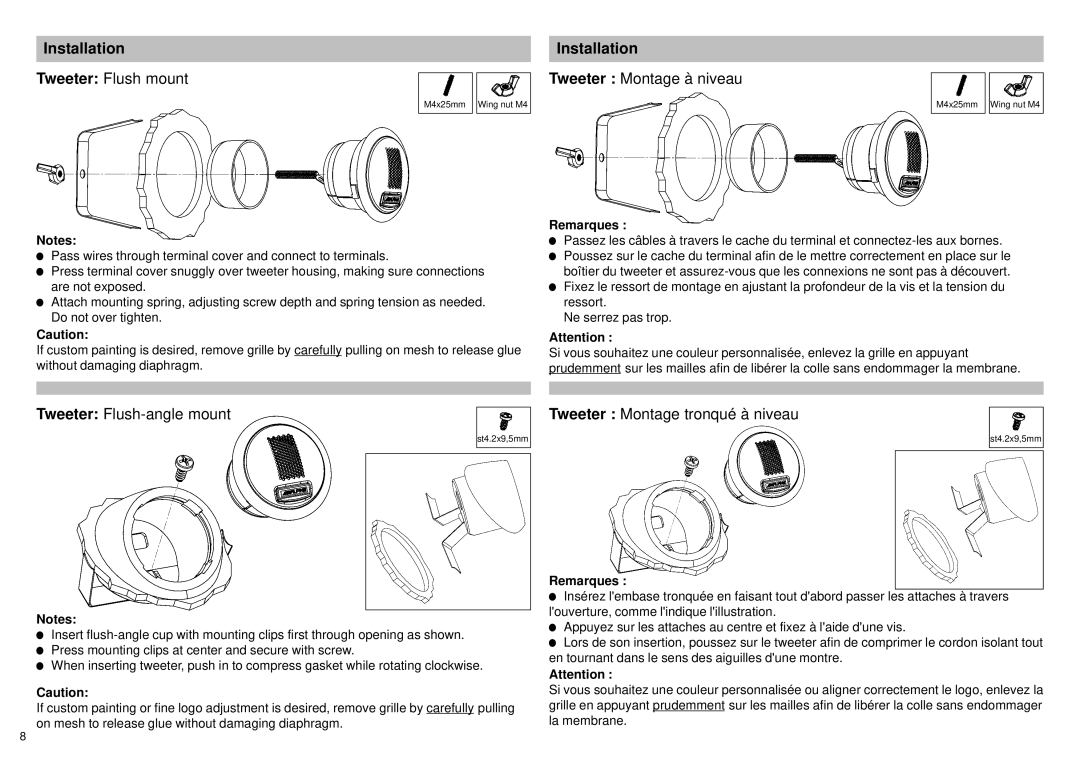
The silk dome tweeter is designed to reproduce higher frequencies with remarkable clarity and precision, providing a smooth, natural sound signature. Its ability to reach high frequencies allows it to deliver shimmering highs, which are essential for a balanced soundstage. The tweeter can be mounted in various configurations, offering flexibility in installation and helping to optimize sound distribution within the vehicle.
One of the standout features of the SPX-F17M is its sophisticated crossover network. This network is engineered to divide the audio signal effectively between the woofer and the tweeter, resulting in a seamless transition of frequencies. Moreover, the adjustable crossover points enable users to fine-tune the sound experience according to personal preferences or vehicle acoustics.
In addition to its exceptional audio performance, the Alpine SPX-F17M boasts a sleek design with premium finishing touches. The speakers feature a stylish grille that integrates well with a variety of vehicle interiors, ensuring that aesthetics do not take a back seat to audio engineering.
Installation of the SPX-F17M is straightforward, thanks to its user-friendly design and comprehensive mounting hardware. The included instructions make it accessible for experienced DIY enthusiasts, while professional installers appreciate its compatibility with various vehicles.
Overall, the Alpine SPX-F17M encapsulates a blend of innovation, quality, and performance. Whether you’re a daily commuter or a dedicated audiophile, this speaker system promises an elevated audio experience, making every drive a pleasure. With its high-quality components and advanced technology, the SPX-F17M is a top choice for those serious about their car audio setup.