Operating Instructions
STEP 1. Installing the Battery:
The battery is not fully charged and must be fully charged before first use. It is recommended to charge the battery for a minimum of 2 hours.
1.Open the battery cover.
2.Insert the
3.Replace the battery cover.
STEP 2. Inserting a Memory Card (not included)
Follow the instructions below to insert the optional SD / SDHC memory card into the camera.
1.Turn off the camera.
2.Insert the SD card into the camera.
Note: There is only one correct direction to insert the SD memory card into the slot. Do not force the card into the slot, or else it may damage both the camera and the SD memory card.
STEP 3. Setting the Resolution:
AHDVC03F can be set to different resolutions.
VIDEO
1.Power on AHDVC03F and make sure it is in the DV Mode.
2.Press SET (Menu) Button and press the
3.Press
STILL IMAGE RESOLUTION
1.Power on AHDVC03F and make sure it is in the DSC Mode.
2.Press SET (Menu) Button and move the
3.Press
STEP 4. Taking Video or Photographs:
SHOOTING A VIDEO CLIP
1.Power on AHDVC03F and make sure it is in the DV Mode.
2.Press the Recording button to start or stop recording.
3.The Digital Video Camera will store the Video clip automatically.
4.LCD screen ratio will be different depending on the setting of Video Clip resolution.
TAKING A PICTURE
1.Power on AHDVC03F and adjust the Mode Button to DSC Mode.
2.Press Shutter Button to capture images.
STEP 5. Playback Photographs / Videos Clips:
1.In Video/Voice Recording Mode, press Playback Button to display recently stored file on the LCD screen.
2.Press
3.To pause the Playback of file, press the Recording button or touch the
screen icon ( ![]()
![]()
![]() /
/ ![]()
![]()
![]() ).
).
4.Press the Playback Button to return to Video/Voice Recording Mode.
5.You can also playback the video clip in different speed by touching (ON/OFF)
the screen icon ( ![]()
![]()
![]() ).
).
STEP 6. Delete Video Clips:
1.Power on AHDVC03F and make sure it is in the Video/Voice Playback Mode.
2.Press SET (Menu) Button and move the
3.Use
4.Press
Note: The file cannot be recovered once it is deleted. Therefore, please make sure you have backed up the file before Delete. Protect files cannot be deleted. Before delete, you must unlock the file.
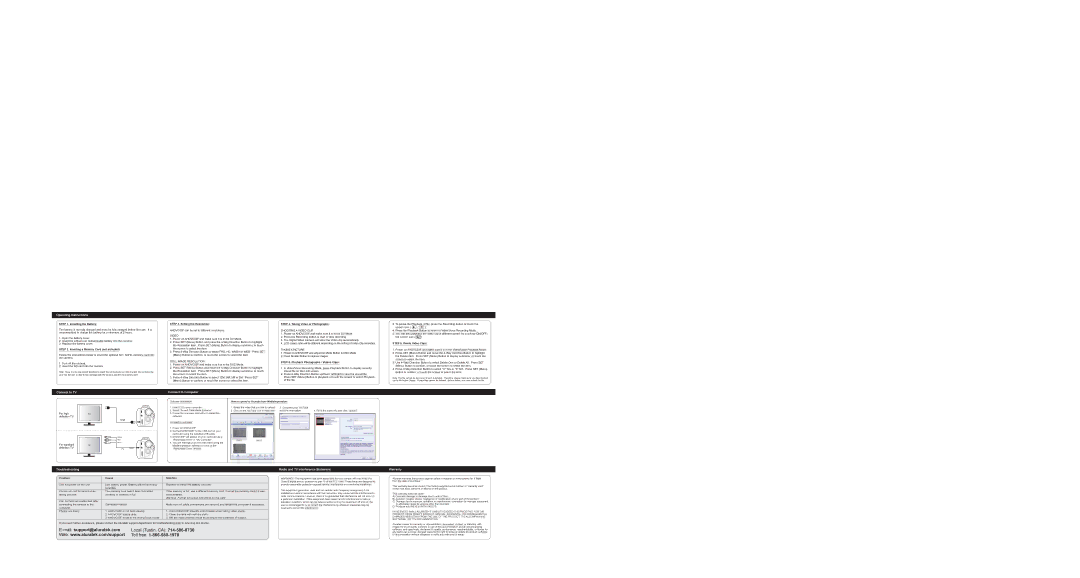
Connect to TV
For high definition TV
For standard definition TV
TV
TV
HDMI
Yellow
Red
White
TV
Connect to Computer
Software Installation:
1.Insert CD to your computer.
2.Select “Arcsoft Total Media Extreme”
3.Follow the onscreen instruction to install the software.
Connect to computer:
1.Power on AHDVC03F.
2.Connect AHDVC03F to the USB port on your computer using the included USB cable.
3.AHDVC03F will appear on your computer as a
“Removable Drive” in “My Computer”.
4.You can manage your pictures/videos using the
MediaImpression software or click on the
“Removable Drive” directly.
How to upload to Youtube from MediaImpression:
1. Select the video that you like to upload | 3. Complete your YouTube |
|
|
|
|
| |
2. Click on the YouTube icon in menu bar | account information | 4. Fill in the video info and click “Upload” |
| ||||
|
|
|
|
|
|
|
|
|
|
|
|
|
|
|
|
|
|
|
|
| AHDVC02F |
| |
|
|
|
|
|
|
|
|
|
|
|
|
| AHDVC02F |
| |
|
|
|
|
|
|
| |
|
|
|
|
|
|
|
|
|
|
|
|
| AHDVC02F |
|
|
|
|
|
|
|
|
|
|
Troubleshooting
Problem | Cause | Solution | |
|
|
| |
Can not power on the unit | Low battery power. Battery placed at wrong | Replace or install the battery correctly. | |
| polarities. |
|
|
Photos can not be saved when | The memory card hasn’t been formatted | If the memory is full, use a different memory card. Format the memory card if it was | |
taking pictures. | correctly or memory is full. | not formatted. | |
|
| Warning: Format will erase everything on the card. | |
Can not find removable disk after |
|
|
|
connecting the camera to the | Connection failure. | Make sure all cable connections are secured and restart the computer if necessary. | |
computer. |
|
|
|
Photos are blurry | 1. AHDVC03F is not held steadily | 1. | Hold AHDVC03F steadily until it beeps when taking video photo. |
| 2. AHDVC03F lens is dirty. | 2. | Clean the lens with soft dry cloth. |
| 3. AHDVC03F is set to the wrong focus mode. | 3. | Set the macro/normal mode according to the distances of subject. |
If you need further assistance, please contact the Aluratek support department for troubleshooting prior to returning this device.
Local (Tustin, CA): | |
Web: www.aluratek.com/support | Toll free: |
Radio and TV Interference Statement
WARNING!!! This equipment has been tested and found to comply with the limits of a Class B digital device, pursuant to part 15 of the FCC rules. These limits are designed to provide reasonable protection against harmful interference in a residential installation.
This equipment generates, uses and can radiate radio frequency energy and, if not installed and used in accordance with the instruction, may cause harmful interference to radio communications. However, there is no guarantee that interference will not occur in a particular installation. If this equipment does cause harmful interference to radio or television reception, which can be determined by turning the equipment off and on, the user is encouraged to try to correct the interference by whatever measures may be required to correct the interference.
Warranty
Aluratek warrants this product against defect in material or workmanship for 1 Year from the date of purchase.
This warranty becomes invalid if the
This warranty does not cover:
A)Cosmetic damage or damage due to acts of God
B)Accident, misuse, abuse, negligence or modification of any part of the product.
C)Damage due to improper operation or maintenance, connection to improper equipment, or attempted repair by anyone other than Aluratek.
D)Products sold AS IS or WITH FAULTS.
IN NO EVENT SHALL ALURATEK'S LIABILITY EXCEED THE PRICE PAID FOR THE PRODUCT FROM DIRECT, INDIRECT, SPECIAL, INCIDENTAL, OR CONSEQUENTIAL DAMAGES RESULTING FROM THE USE OF THE PRODUCT, IT'S ACCOMPANYING SOFTWARE, OR IT'S DOCUMENTATION.
Aluratek makes no warranty or representation, expressed, implied, or statutory, with respect to it's products, contents or use of this documentation and all accompanying software, and specifically disclaims it's quality, performance, merchantability, or fitness for any particular purpose. Aluratek reserves the right to revise or update it's product, software or documentation without obligation to notify any individual or entity.