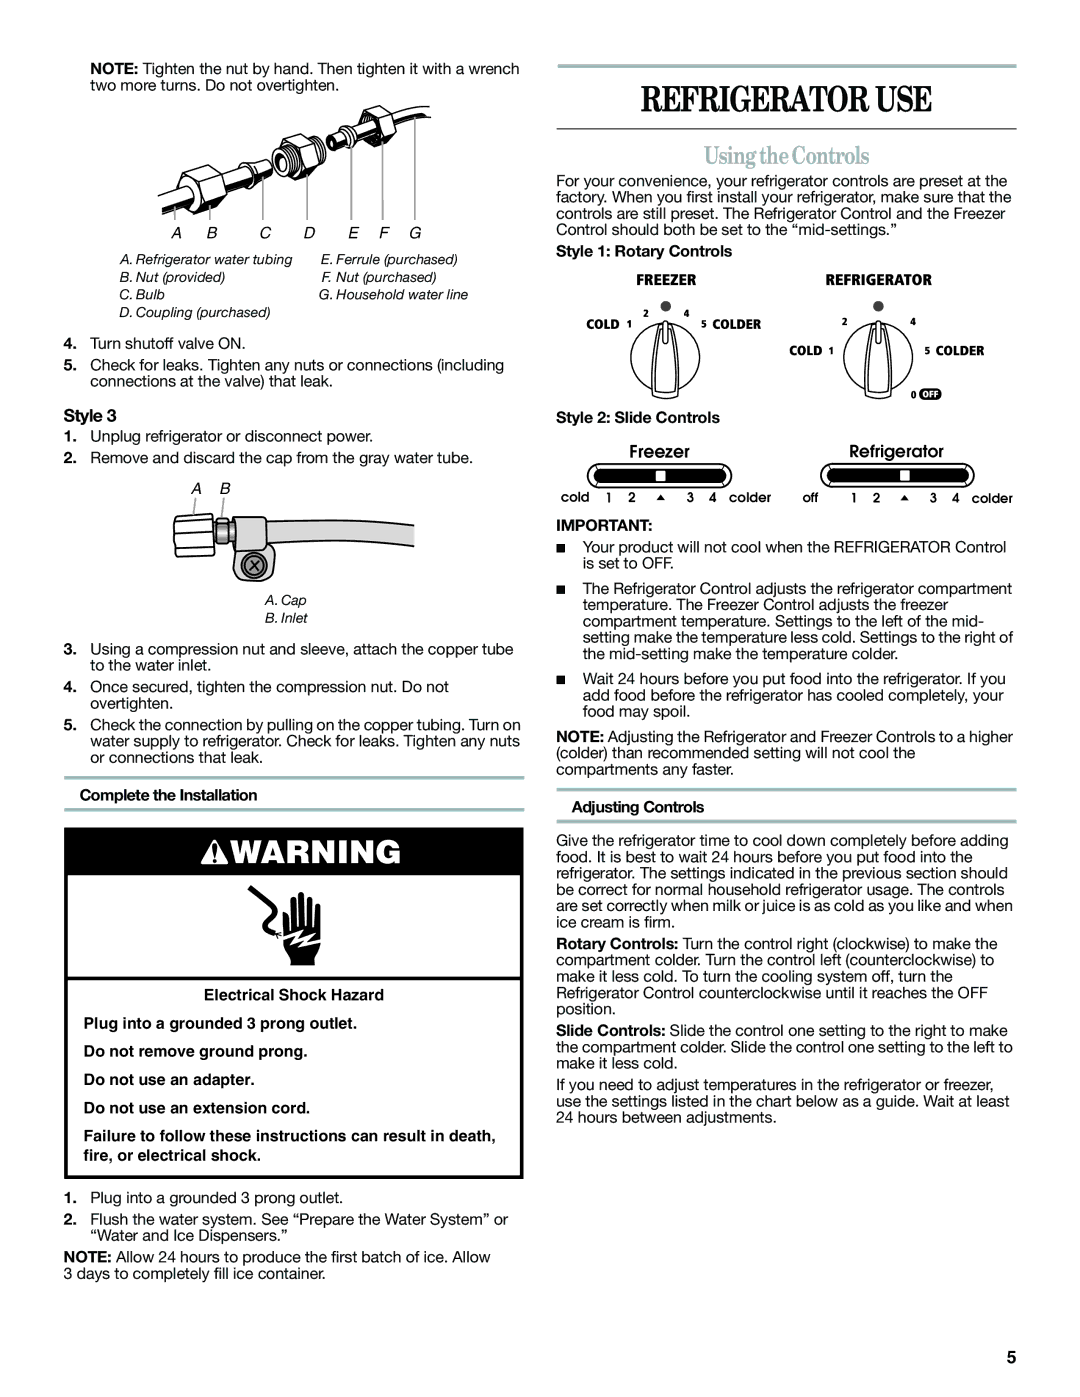
NOTE: Tighten the nut by hand. Then tighten it with a wrench two more turns. Do not overtighten.

A

B

C

D

E F G

A. Refrigerator water tubing


E. Ferrule (purchased)

B. Nut (provided)


F. Nut (purchased)

C. Bulb


G. Household water line

D. Coupling (purchased)


4.Turn shutoff valve ON.

5.Check for leaks. Tighten any nuts or connections (including connections at the valve) that leak.

Style 3

1.Unplug refrigerator or disconnect power.

2.Remove and discard the cap from the gray water tube.

A B

A.Cap

B.Inlet

3.Using a compression nut and sleeve, attach the copper tube to the water inlet.

4.Once secured, tighten the compression nut. Do not overtighten.

5.Check the connection by pulling on the copper tubing. Turn on water supply to refrigerator. Check for leaks. Tighten any nuts or connections that leak.

Complete the Installation

WARNING

Electrical Shock Hazard

Plug into a grounded 3 prong outlet.

Do not remove ground prong.

Do not use an adapter.

Do not use an extension cord.

Failure to follow these instructions can result in death, fire, or electrical shock.

1.Plug into a grounded 3 prong outlet.

2.Flush the water system. See “Prepare the Water System” or “Water and Ice Dispensers.”

NOTE: Allow 24 hours to produce the first batch of ice. Allow 3 days to completely fill ice container.

REFRIGERATOR USE

Using theControls

For your convenience, your refrigerator controls are preset at the factory. When you first install your refrigerator, make sure that the controls are still preset. The Refrigerator Control and the Freezer Control should both be set to the “mid-settings.”

Style 1: Rotary Controls

Style 2: Slide Controls


Freezer


Refrigerator

cold 1 2

3 4 colder

off

1 2

3 4 colder

IMPORTANT:

Your product will not cool when the REFRIGERATOR Control is set to OFF.

The Refrigerator Control adjusts the refrigerator compartment temperature. The Freezer Control adjusts the freezer compartment temperature. Settings to the left of the mid- setting make the temperature less cold. Settings to the right of the mid-setting make the temperature colder.

Wait 24 hours before you put food into the refrigerator. If you add food before the refrigerator has cooled completely, your food may spoil.

NOTE: Adjusting the Refrigerator and Freezer Controls to a higher (colder) than recommended setting will not cool the compartments any faster.

Adjusting Controls

Give the refrigerator time to cool down completely before adding food. It is best to wait 24 hours before you put food into the refrigerator. The settings indicated in the previous section should be correct for normal household refrigerator usage. The controls are set correctly when milk or juice is as cold as you like and when ice cream is firm.

Rotary Controls: Turn the control right (clockwise) to make the compartment colder. Turn the control left (counterclockwise) to make it less cold. To turn the cooling system off, turn the Refrigerator Control counterclockwise until it reaches the OFF position.

Slide Controls: Slide the control one setting to the right to make the compartment colder. Slide the control one setting to the left to make it less cold.

If you need to adjust temperatures in the refrigerator or freezer, use the settings listed in the chart below as a guide. Wait at least 24 hours between adjustments.

5

Page 5
Image 5
Amana W10321485A Refrigerator USE, Using theControls, Style 1 Rotary Controls Style 2 Slide Controls, Adjusting Controls

W10321485A specifications

The Amana W10321485A is a remarkable appliance that epitomizes functionality and modern design in the world of home laundry. Engineered with cutting-edge technology, it offers homeowners a plethora of features that simplify the laundry process while ensuring efficiency and effectiveness.

One of the standout characteristics of the Amana W10321485A is its spacious capacity, which allows for larger loads of laundry. This feature is particularly beneficial for families or individuals with a busy lifestyle, as it reduces the number of cycles needed to complete laundry tasks. By accommodating bulkier loads, the appliance not only saves time but also conserves water and energy, making it an eco-friendly choice.

Another notable technology integrated into this model is its use of advanced wash cycles. The Amana W10321485A comes equipped with various washing options that cater to different fabric types and soiling levels. With presets for delicate items, heavy-duty fabrics, and standard loads, users can customize each cycle for optimal cleaning results. Moreover, the appliance boasts a high spin speed that extracts more moisture from clothes, thus reducing drying time and saving energy in the process.

The machine also features a user-friendly control panel. This intuitive interface allows users to easily select cycles, adjust settings, and monitor progress with just a few taps. Additionally, the inclusion of a delay-start option adds further convenience, enabling individuals to set the washer to run at a more convenient time.

Durability and design are also key attributes of the Amana W10321485A. Constructed with high-quality materials, it is designed to withstand the rigors of daily use. The sleek exterior not only enhances the aesthetic appeal of any laundry room but also ensures easy maintenance and cleaning.

Furthermore, Amana is known for its commitment to energy efficiency. The W10321485A model is designed to meet strict energy consumption standards, which means lower utility bills for homeowners without compromising on performance. This makes it an excellent investment for those looking to reduce their environmental footprint while enjoying the benefits of modern washing technology.

In summary, the Amana W10321485A combines a spacious capacity, versatile wash cycles, user-friendly controls, durability, and energy efficiency. These features make it an ideal choice for anyone seeking a dependable laundry solution that meets the demands of contemporary living while promoting eco-conscious practices.