Lens Focusing
1.Hang fixture in its final position
2.If no controller is used set Function DIP switch 10 to on and turn sensitivity to minimum.
3.Projector shutter will open and Pan and Tilt will be set to center and a Gobo will be selected.
4.Lightly tap on mic until desired position is achieved.
5.Adjust lens until sharp focus is obtained.
.
Section 2
DMX512 Operation
I. Connect The MAX™ fixture to a DMX Controller with a minimum 8 channels.
2.Continue to connect together all the fixtures using 3 pin XLR data cables.
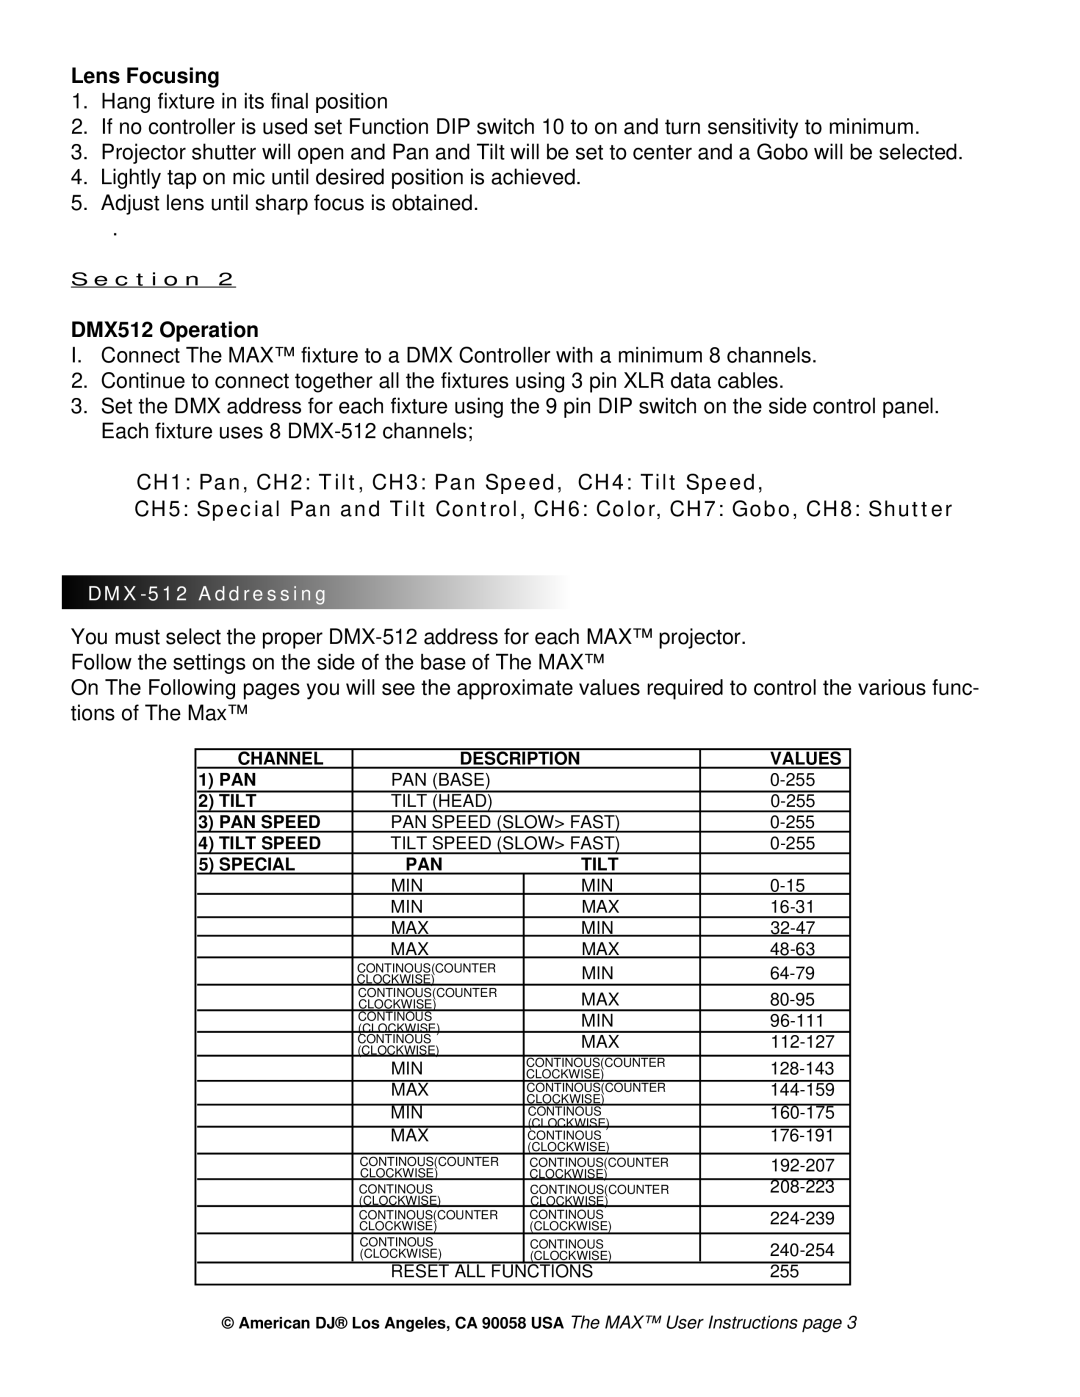
3.Set the DMX address for each fixture using the 9 pin DIP switch on the side control panel. Each fixture uses 8
CH1: Pan, CH2: Tilt, CH3: Pan Speed, CH4: Tilt Speed,
CH5: Special Pan and Tilt Control, CH6: Color, CH7: Gobo, CH8: Shutter
DMX-512 Addressing
You must select the proper
On The Following pages you will see the approximate values required to control the various func- tions of The Max™
CHANNEL | DESCRIPTION | VALUES | |
1) PAN | PAN (BASE) |
| |
2) TILT | TILT (HEAD) |
| |
3) PAN SPEED | PAN SPEED (SLOW> FAST) | ||
4) TILT SPEED | TILT SPEED (SLOW> FAST) | ||
5) SPECIAL | PAN | TILT |
|
| MIN | MIN | |
| MIN | MAX | |
| MAX | MIN | |
| MAX | MAX | |
| CONTINOUS(COUNTER | MIN | |
| CLOCKWISE) | ||
| CONTINOUS(COUNTER | MAX | |
| CLOCKWISE) | ||
| CONTINOUS | MIN | |
| (CLOCKWISE) | ||
| CONTINOUS | MAX | |
| (CLOCKWISE) | CONTINOUS(COUNTER |
|
| MIN | ||
| CLOCKWISE) | ||
| MAX | CONTINOUS(COUNTER | |
| MIN | CLOCKWISE) | |
| CONTINOUS | ||
| MAX | (CLOCKWISE) | |
| CONTINOUS | ||
|
| (CLOCKWISE) |
|
| CONTINOUS(COUNTER | CONTINOUS(COUNTER | |
| CLOCKWISE) | CLOCKWISE) | |
| CONTINOUS | CONTINOUS(COUNTER | |
| (CLOCKWISE) | CLOCKWISE) |
|
| CONTINOUS(COUNTER | CONTINOUS | |
| CLOCKWISE) | (CLOCKWISE) |
|
| CONTINOUS | CONTINOUS | |
| (CLOCKWISE) | (CLOCKWISE) | |
| RESET ALL FUNCTIONS | 255 | |
© American DJ® Los Angeles, CA 90058 USA The MAX™ User Instructions page 3
