INSTALLATION AND FRAMING INSTRUCTIONS

The variety of installations possible for this whirlpool may require framing procedures other than those shown. Locate studs as needed. Ensure roughing-in dimensions are proper, plumb and square. Provisions must be made in all installations for an access opening for servicing the pump and controls. It is strongly recommended that an additional opening be provided for access to the drain components. The apron should not be used as the primary access opening.

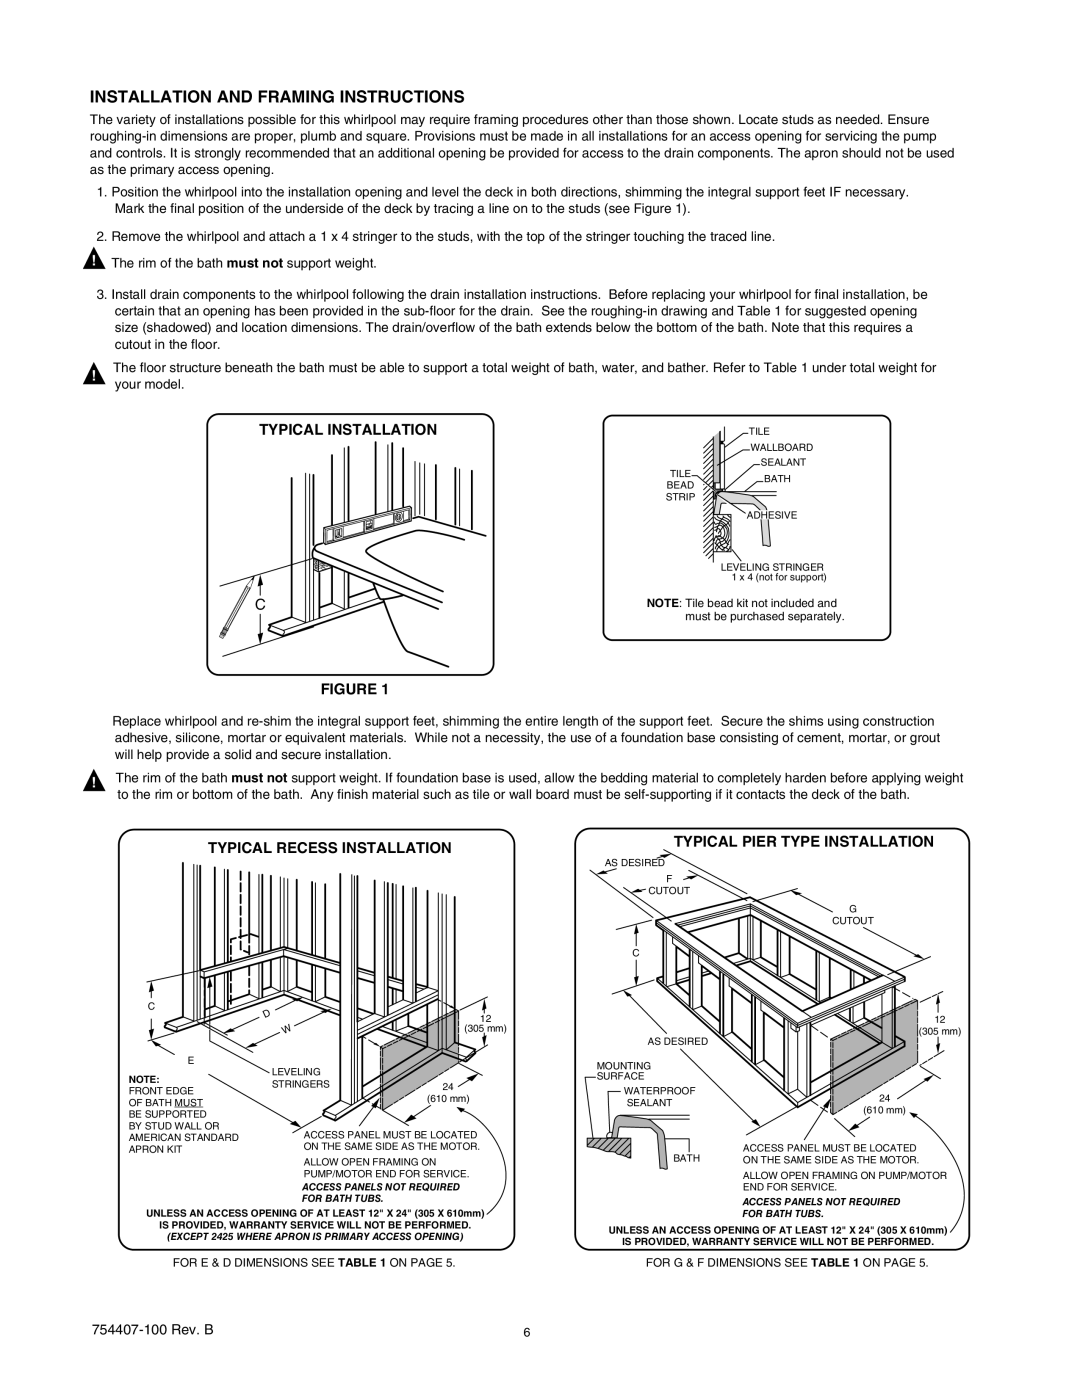
1.Position the whirlpool into the installation opening and level the deck in both directions, shimming the integral support feet IF necessary. Mark the final position of the underside of the deck by tracing a line on to the studs (see Figure 1).

. Remove the whirlpool and attach a 1 x 4 stringer to the studs, with the top of the stringer touching the traced line.

!The rim of the bath must not support weight.

. Install drain components to the whirlpool following the drain installation instructions. Before replacing your whirlpool for final installation, be certain that an opening has been provided in the sub-floor for the drain. See the roughing-in drawing and Table 1 for suggested opening size (shadowed) and location dimensions. The drain/overflow of the bath extends below the bottom of the bath. Note that this requires a cutout in the floor.

!The floor structure beneath the bath must be able to support a total weight of bath, water, and bather. Refer to Table 1 under total weight for your model.

TYPICAL INSTALLATION

C

FIGURE 1


TILE


WALLBOARD

TILE

SEALANT

BATH

BEAD


STRIP


ADHESIVE


LEVELING STRINGER


1 x 4 (not for support)

NOTE: Tile bead kit not included and must be purchased separately.

Replace whirlpool and re-shim the integral support feet, shimming the entire length of the support feet. Secure the shims using construction adhesive, silicone, mortar or equivalent materials. While not a necessity, the use of a foundation base consisting of cement, mortar, or grout will help provide a solid and secure installation.

!The rim of the bath must not support weight. If foundation base is used, allow the bedding material to completely harden before applying weight to the rim or bottom of the bath. Any finish material such as tile or wall board must be self-supporting if it contacts the deck of the bath.

TYPICAL RECESS INSTALLATION

TYPICAL PIER TYPE INSTALLATION

AS DESIRED

F

CUTOUT

C

G

CUTOUT

C

E

NOTE:

FRONT EDGE

OF BATH MUST

BE SUPPORTED BY STUD WALL OR AMERICAN STANDARD APRON KIT

D

1


W

(05 mm)

LEVELING

STRINGERS4 (10 mm)

ACCESS PANEL MUST BE LOCATED

ON THE SAME SIDE AS THE MOTOR.

ALLOW OPEN FRAMING ON

PUMP/MOTOR END FOR SERVICE.

ACCESS PANELS NOT REQUIRED

FOR BATH TUBS.

AS DESIRED

MOUNTING

SURFACE

WATERPROOF SEALANT

BATH

1

(05 mm)

4

(10 mm)

ACCESS PANEL MUST BE LOCATED ON THE SAME SIDE AS THE MOTOR.

ALLOW OPEN FRAMING ON PUMP/MOTOR END FOR SERVICE.

ACCESS PANELS NOT REQUIRED

UNLESS AN ACCESS OPENING OF AT LEAST 12" X 24" (305 X 610mm)

IS PROVIDED, WARRANTY SERVICE WILL NOT BE PERFORMED. (EXCEPT 2425 WHERE APRON IS PRIMARY ACCESS OPENING)

FOR BATH TUBS.

UNLESS AN ACCESS OPENING OF AT LEAST 12" X 24" (305 X 610mm)

IS PROVIDED, WARRANTY SERVICE WILL NOT BE PERFORMED.

FOR E & D DIMENSIONS SEE TABLE 1 ON PAGE 5.

FOR G & F DIMENSIONS SEE TABLE 1 ON PAGE 5.

754407-100 Rev. B


Page 6
Image 6
American Standard 2466, 2383, 2371, 2351 manual Installation and Framing Instructions, Typical Installation

2351, 2371, 2466, 2383 specifications

American Standard is renowned for its commitment to innovative plumbing solutions, especially in the realm of bathroom fixtures. Among their extensive range, models 2383, 2466, 2371, and 2351 stand out, each showcasing unique features and advanced technologies designed to enhance user experience while prioritizing water efficiency and durability.

The American Standard 2383 model is a one-piece toilet that combines elegance with practicality. It features a streamlined design making it easy to clean and maintain. Engineered with a powerful siphon jet flushing system, the 2383 ensures effective waste removal while using just 1.6 gallons per flush, making it both environmentally friendly and cost-efficient.

The 2466 model is a two-piece toilet that emphasizes comfort with its elongated bowl design. It incorporates the innovative EverClean surface, which prevents the growth of stain and odor-causing bacteria, promoting a cleaner, fresher bathroom environment. The Toilet also features an efficient flushing system that delivers a strong and reliable performance, while the soft-close seat adds an extra touch of comfort.

Model 2371 is known for its aesthetic appeal and exceptional functionality. This model features a sleek, compact design ideal for smaller bathrooms without sacrificing comfort. The 2371 employs a design that optimizes water flow for maximum efficiency, ensuring effective waste clearance while using minimal water. Its high-performance flapper reduces water wastage, making it an excellent choice for eco-conscious consumers.

Lastly, the American Standard 2351 model offers a perfect combination of innovation and style. Designed for performance, it features a unique PowerWash rim that cleans the bowl effectively with every flush, ensuring cleanliness. Furthermore, the 2351 is equipped with a WaterSense-certified flushing system, which uses 1.28 gallons per flush, maintaining efficiency without compromising performance.

Overall, American Standard's toilet models 2383, 2466, 2371, and 2351 embody the brand's dedication to creating aesthetically pleasing, efficient, and easy-to-maintain products. They utilize advanced technologies aimed at conserving water, while their designs ensure maximum comfort and usability. With these models, American Standard continues to set a high standard for bathroom fixtures in homes across America.