9.Press the optional Host Name field to open an on-screen Keyboard and enter the Host Name information.

10.Press Done after you are finished assigning the alpha-numeric string of the host name.

11.Press the Primary DNS field to open an on-screen Keyboard, enter the Primary DNS Address (provided by your System Administrator) and press Done when compete. Repeat this process for the Secondary DNS field.

12.Press the Domain field to open a Keyboard, enter the resolvable domain Address (this is provided by your System Administrator and equates to a unique Internet name for the panel), and press Done when complete.

13.Setup the security and communication parameters between the wireless card and the target WAP by configuring the Wireless Settings section on this page (Step 2).

Step 2: Configure a Secure Connection to your WAP250G

Since the code key generator on Modero panels use the same key generation formula, all panels generate identical keys for the same Passphrase. The generators used on WAPs will not produce the same key as the Modero generator even if you use the same Passphrase.

For this reason, we recommend FIRST creating the Current Key on the Modero and then entering that information into the appropriate WAP250G fields.

1.Repeat the first four actions from the preceding Step 1 to open the Wireless Settings page and then locate the Wireless Settings section (FIG. 12).

Wireless card communication settings (for use with a target WAP)

FIG. 12 Wireless Security section

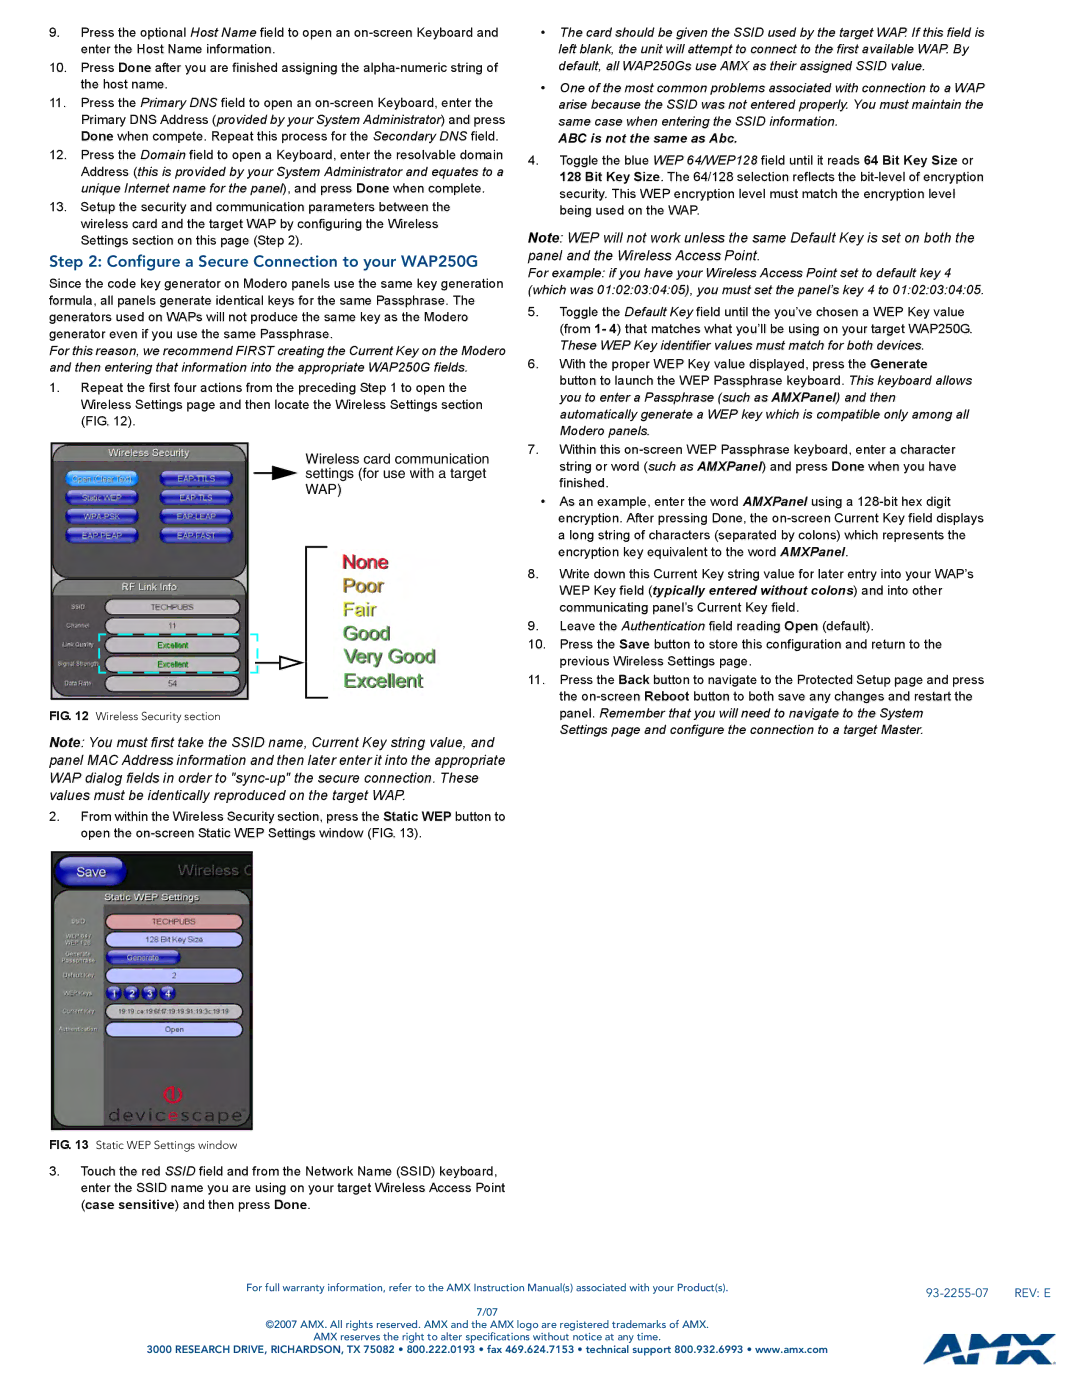
Note: You must first take the SSID name, Current Key string value, and panel MAC Address information and then later enter it into the appropriate WAP dialog fields in order to "sync-up" the secure connection. These values must be identically reproduced on the target WAP.

2.From within the Wireless Security section, press the Static WEP button to open the on-screen Static WEP Settings window (FIG. 13).

FIG. 13 Static WEP Settings window

The card should be given the SSID used by the target WAP. If this field is left blank, the unit will attempt to connect to the first available WAP. By default, all WAP250Gs use AMX as their assigned SSID value.

One of the most common problems associated with connection to a WAP arise because the SSID was not entered properly. You must maintain the same case when entering the SSID information.

ABC is not the same as Abc.

4.Toggle the blue WEP 64/WEP128 field until it reads 64 Bit Key Size or 128 Bit Key Size. The 64/128 selection reflects the bit-level of encryption security. This WEP encryption level must match the encryption level being used on the WAP.

Note: WEP will not work unless the same Default Key is set on both the panel and the Wireless Access Point.

For example: if you have your Wireless Access Point set to default key 4 (which was 01:02:03:04:05), you must set the panel’s key 4 to 01:02:03:04:05.

5.Toggle the Default Key field until the you’ve chosen a WEP Key value (from 1- 4) that matches what you’ll be using on your target WAP250G. These WEP Key identifier values must match for both devices.

6.With the proper WEP Key value displayed, press the Generate

button to launch the WEP Passphrase keyboard. This keyboard allows you to enter a Passphrase (such as AMXPanel) and then automatically generate a WEP key which is compatible only among all Modero panels.

7.Within this on-screen WEP Passphrase keyboard, enter a character string or word (such as AMXPanel) and press Done when you have finished.

As an example, enter the word AMXPanel using a 128-bit hex digit encryption. After pressing Done, the on-screen Current Key field displays a long string of characters (separated by colons) which represents the encryption key equivalent to the word AMXPanel.

8.Write down this Current Key string value for later entry into your WAP’s WEP Key field (typically entered without colons) and into other communicating panel’s Current Key field.

9.Leave the Authentication field reading Open (default).

10.Press the Save button to store this configuration and return to the previous Wireless Settings page.

11.Press the Back button to navigate to the Protected Setup page and press the on-screen Reboot button to both save any changes and restart the panel. Remember that you will need to navigate to the System Settings page and configure the connection to a target Master.

3.Touch the red SSID field and from the Network Name (SSID) keyboard, enter the SSID name you are using on your target Wireless Access Point (case sensitive) and then press Done.

For full warranty information, refer to the AMX Instruction Manual(s) associated with your Product(s).

93-2255-07

REV: E


7/07

©2007 AMX. All rights reserved. AMX and the AMX logo are registered trademarks of AMX.

AMX reserves the right to alter specifications without notice at any time.

3000 RESEARCH DRIVE, RICHARDSON, TX 75082 • 800.222.0193 • fax 469.624.7153 • technical support 800.932.6993 • www.amx.com

Page 6
Image 6
AMX NXA-WC80211GCF specifications Configure a Secure Connection to your WAP250G, ABC is not the same as Abc

NXA-WC80211GCF specifications

The AMX NXA-WC80211GCF is a powerful wireless controller designed specifically for enhancing and managing Wi-Fi networks in commercial environments. This device is engineered to support the demanding requirements of businesses, allowing them to deploy scalable wireless networks with ease and efficiency.

One of the standout features of the NXA-WC80211GCF is its ability to support 802.11g wireless standards, offering data rates of up to 54 Mbps. This makes it suitable for a range of applications, from simple web browsing to more intensive data transfer needs. Additionally, it is backward compatible with older standards, ensuring that legacy devices can still connect without issues.

The controller provides centralized management for multiple access points, allowing IT administrators to streamline the deployment and maintenance of their wireless networks. With its user-friendly interface, the NXA-WC80211GCF enables easy configuration, monitoring, and troubleshooting of the entire system. The ability to manage multiple access points enhances overall network performance and ensures consistent connectivity throughout the facility.

Security is a top priority with the NXA-WC80211GCF. It supports WPA2 encryption, providing a robust layer of protection against unauthorized access. The device can also be configured to implement guest networking options, allowing businesses to offer internet access to visitors without compromising the security of the internal network.

The AMX NXA-WC80211GCF is designed with scalability in mind. It can support multiple SSIDs, enabling different network types for diverse user groups, such as employees, guests, and devices requiring IoT support. This flexibility ensures that enterprises can adapt their network configurations as their needs evolve.

Moreover, the controller is equipped with quality of service (QoS) features, which prioritize bandwidth allocation for mission-critical applications. This ensures that essential services maintain optimal performance, even during peak usage times.

In summary, the AMX NXA-WC80211GCF is a robust wireless controller that combines user-friendly management, strong security protocols, and scalability in a single solution. With its support for the 802.11g standard, it addresses the connectivity requirements of businesses looking to provide reliable wireless access to their users. By choosing the NXA-WC80211GCF, organizations can optimize their network performance and enhance their operational efficiency.