
AN-1000X specifications
The Anchor Audio AN-1000X is a portable sound system designed for professionals who require powerful audio solutions on the go. This versatile system excels in a variety of applications including presentations, events, classrooms, and outdoor gatherings. Its remarkable features and technologies make it a popular choice among educators, corporate professionals, and event coordinators.One of the standout characteristics of the AN-1000X is its impressive sound quality. Equipped with a 100-watt amplifier, this system delivers clear and loud audio, ensuring that every word is heard even in large areas. The frequency response ranges from 60Hz to 15kHz, enabling it to produce rich bass and crisp highs. This audio clarity is essential for effective communication and engagement with audiences.
Portability is another key feature of the AN-1000X. Weighing just 12 pounds, it is easy to transport using the built-in handle. The system is also battery-powered, allowing up to 12 hours of continuous use on a single charge, making it an ideal choice for outdoor events or locations without power supply. Its lightweight and mobile design enable users to easily set up and take down the system in different environments.
The AN-1000X is designed with user-friendly controls, featuring an intuitive interface that facilitates volume adjustment, tone control, and wireless microphone connectivity. This flexibility allows users to customize their sound settings to suit specific environments or audience sizes. Notably, it includes a built-in wireless receiver compatible with Anchor Audio's wireless microphone systems, providing seamless integration for presenters.
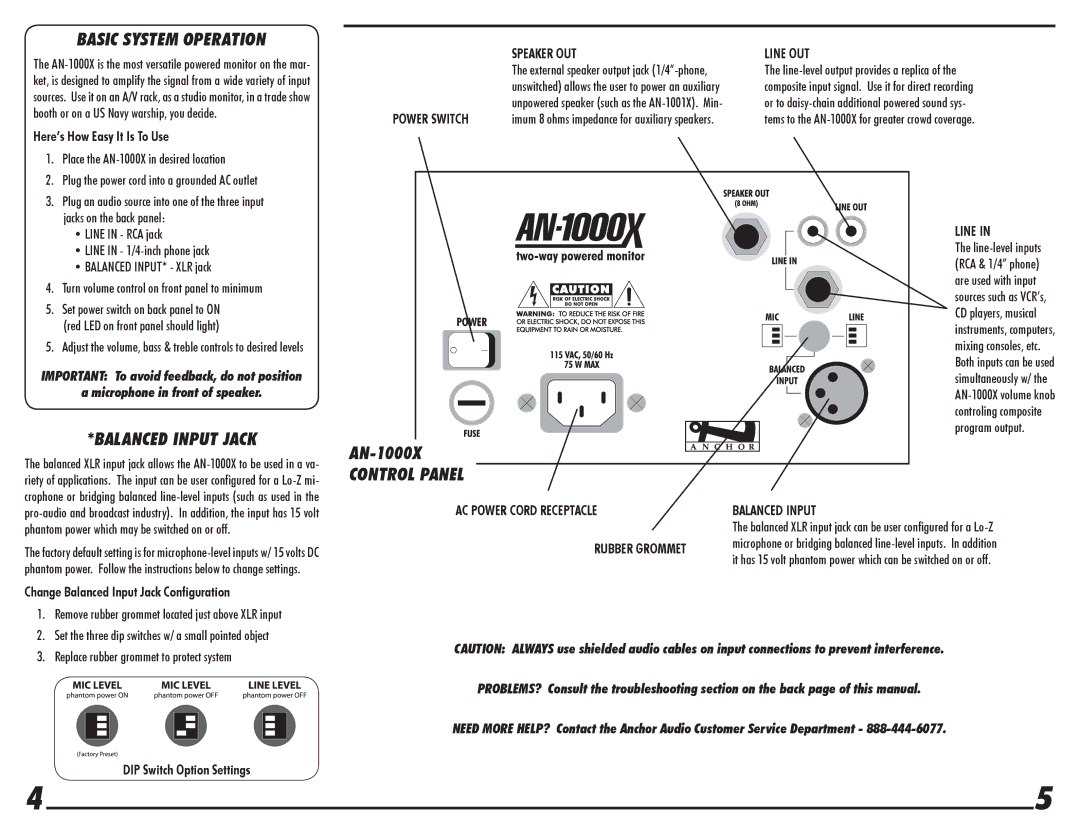
In addition to its audio capabilities, the AN-1000X supports multiple input options. It comes with an aux-in for connecting audio devices such as smartphones, tablets, or laptops, along with an RCA input. The system also features a line-out capability for connecting to additional speakers, expanding its audio projection capabilities.
Durability is equally important, and the AN-1000X is constructed with rugged materials designed to withstand the rigors of transportation and use in various settings. Its robust build ensures reliable performance over time, making it well-suited for frequent usage.
In conclusion, the Anchor Audio AN-1000X portable sound system combines powerful audio quality, portability, user-friendly design, and durability. Its versatility makes it an exceptional choice for anyone seeking a reliable amplification solution for presentations, events, and other applications where quality sound is essential. With its Array of features and robust configuration, the AN-1000X stands out as a leading option in portable audio solutions.