Getting Started
Apple Inc Apple Inc. All rights reserved
Contents
Using Key Commands
Using the Channel Strip Controls
Using Screensets
Using Control Surfaces
Welcome to Logic
Conventions of This Manual
Key Commands
Menu Functions
Important Entries
To launch Logic, open and save a new project
1Starting Your Project Importing Media Files
Starting Your Project and Importing Media Files
Getting to Know the Arrange Window
Quick Note About Templates
To create a few new tracks
Creating Tracks
You should be looking at something like this
Insert slot Channel strip settings Instrument slot
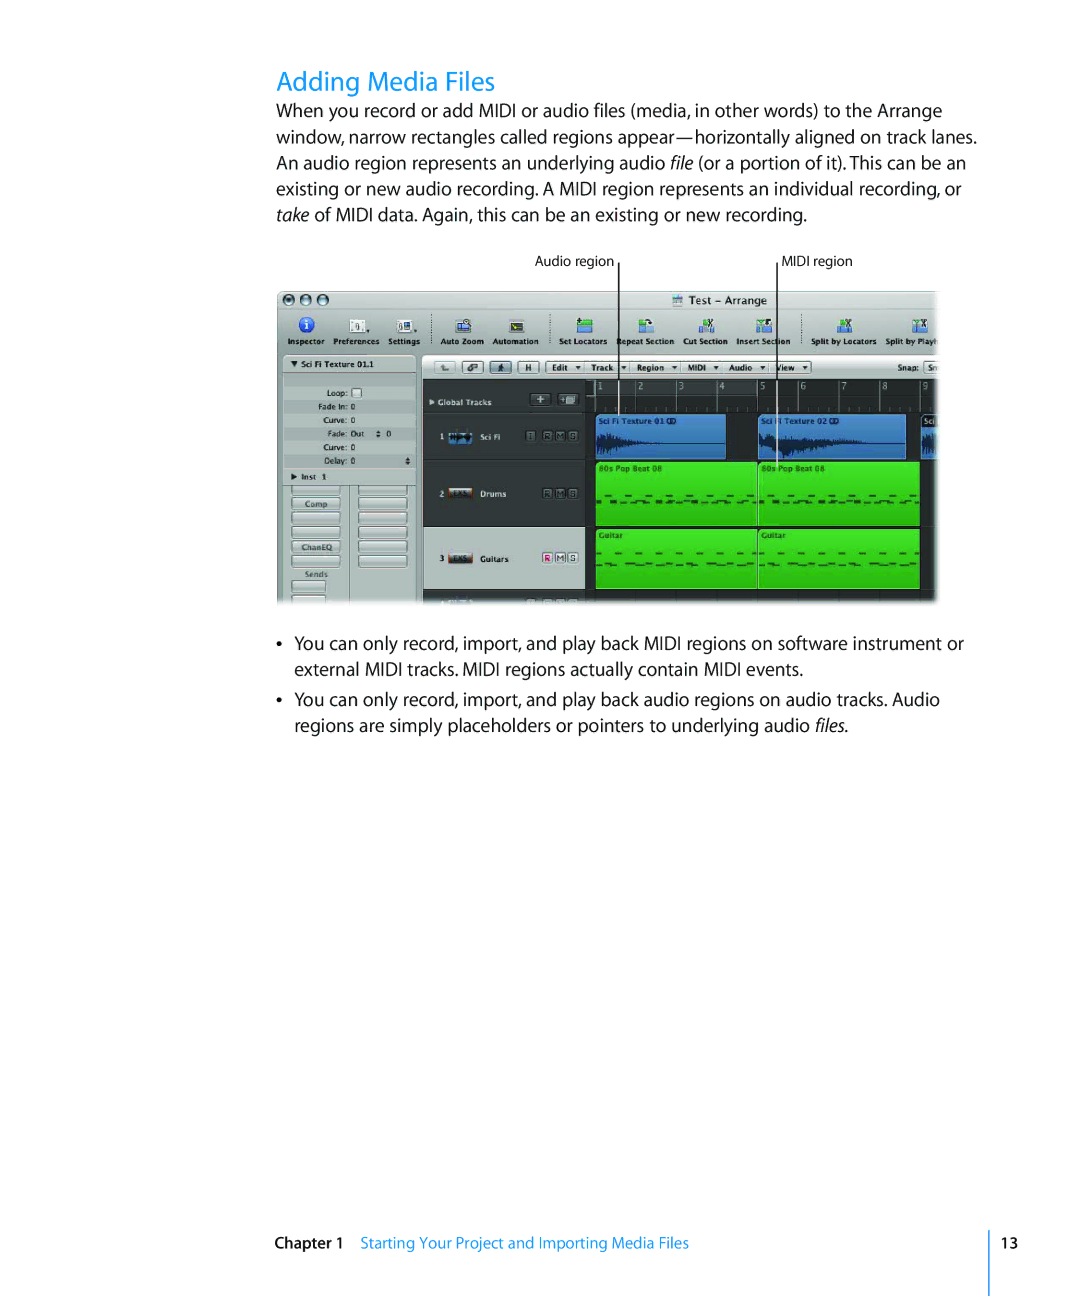
Adding Media Files
Column View button
To add other audio file types with the Browser
To switch between List and Browser view
Automatic Track Creation From Media Area Windows
Apple Loop Types
To create a track and import a loop in one step
Navigating Your Project
Using the Transport Bar
To start and stop playback
To move the playhead to any position
Using the Bar Ruler
To start or stop playback at any project position
To move the cycle
To activate or deactivate the cycle, do one of the following
Undoing Operations
To undo the last operation, command, or function
To change the cycle length
Selecting Tracks and Regions
To reverse a number of operations, commands, or functions
Selecting Tracks
To undo or redo an isolated step
To select a region
Selecting Regions
To select several regions, do one of the following
Page
2Recording
To set the project sample rate
Importance of the Sample Rate
To set the basic project tempo, do one of the following
To set the count-in time
To alter the metronome settings
To make a standard audio recording
Recording Audio Regions
To open a take folder, do one of the following
Recording Takes
Recording an Instrument Part
To select different takes when viewing an open take folder
To record an instrument region
To correct the timing of your recording
Page
3Creating Your Arrangement
Choosing Tools
About the Tools
Effective Range of the Tools
Pointer
Muting Regions
Muting and Soloing Tracks and Regions
To mute several regions with the Mute tool
Soloing Regions
To solo a region with the Solo tool
To solo several regions with the Solo tool
Muting Tracks
Editing Regions
Soloing Tracks
To mute multiple tracks
Changing the Length of Regions
Moving Regions
To move a region
To move several selected regions
Cutting Regions
Dividing Regions
To divide a region
To cut a region
To copy a region, do one of the following
Copying Regions
To paste a cut or copied region from the Clipboard
To delete a region, do one of the following
Deleting Regions
To loop a region, do one of the following
Looping Regions
To remove one or more loops
To remove all loops
Region Parameters
Using the Inspector
To view or hide the Region Parameter box
Track Parameters
Using the Track/Channel Parameters
To change a parameter value
To undo any parameter changes
Arrange Channel Strips
To open or close the Piano Roll, Score or Hyper Editor
Getting to Know the Midi Editors
Editing Midi Events
To edit a note event position, do one of the following
To open or close the Event List
To create new note events in the Piano Roll Editor
Editing and Creating Events
To change the velocity of a note in the Piano Roll Editor
To quantize one or more selected notes
Page
Using Instruments and Effects
Using Instruments and Effects
To directly insert an effect into a channel strip
To directly insert an EQ into a channel strip
Using the Library
To replace an inserted plug-in effect or instrument
To remove an inserted plug-in effect or instrument
To quickly change loaded effect or instrument settings
Using the Library to load complete channel strip settings
To open or close the Library
To edit plug-in parameters
Editing Instruments and Effects
To open the ES E plug-in window if it isn’t open
Editing Audio Files
6Working With Audio Files
To open the Sample Editor, do one of the following
To export an audio file as an MP3 file
Managing Your Audio Files
Page
To open or close the Mixer window
7Mixing and Exporting Your Project
To change the Mixer view
Using the Channel Strip Controls
To select a different track/channel
To adjust the panning or balance of a channel strip
To adjust the level of a channel strip
Changing the Routing of Channel Strips
To send a channel to a bus
Automating Your Mix
To choose an automation parameter
To edit the volume automation track
To write volume automation to an automation track
To bounce your mix
Exporting Your Project
8Speeding Up Your Workflow
Using Key Commands
To set up a screenset
Using Screensets
To set up more than nine screensets
To recall a screenset, do one of the following
Using Control Surfaces
Page
Midi Language
AAudio and Midi Basics
Midi Connection
Audio
Digital and Analog Recording
About Bits and Sampling Rates
Digital Conversions
Core Audio
This chapter covers the audio and Midi facilities of Mac OS
Sound Preference Pane
Core Midi
Audio Midi Setup AMS
Midi Page of AMS
Memory
Hardware
Hard Drive
Software
Backup
Troubleshooting
Preferences and Parameter RAM
If Disaster Strikes
Hard Disk Checking and File Structure Repair
Viruses
Appendix C Optimizing Your Computer Audio System
Page
Glossary
Glossary
Beats per minute See bpm
Broadcast Wave See Wave
Glossary
Glossary
Glossary
Glossary
Glossary
Glossary
Glossary
100
101
102
103
ES M
105
106
Index
108
109
110
111