3.2 Recording Operations

This section details the way to record video into hard-disk drives. Before commencing with the recording function, please configure the recording setting properly according to your needs.

3.2.1 Manual Recording

Take the following steps to start and stop recording:

(1)Press the REC button 6 to record video into a hard disk drive with the corresponding programmed recording settings. The REC

button 6 will light up indicating the DVR is in the recording status.

(2)Press the REC button 6 for 3 seconds to stop recording any time.

(3)To access just recorded video, please refer to section 3.4 for more details.

3.2.2 Timer Recording

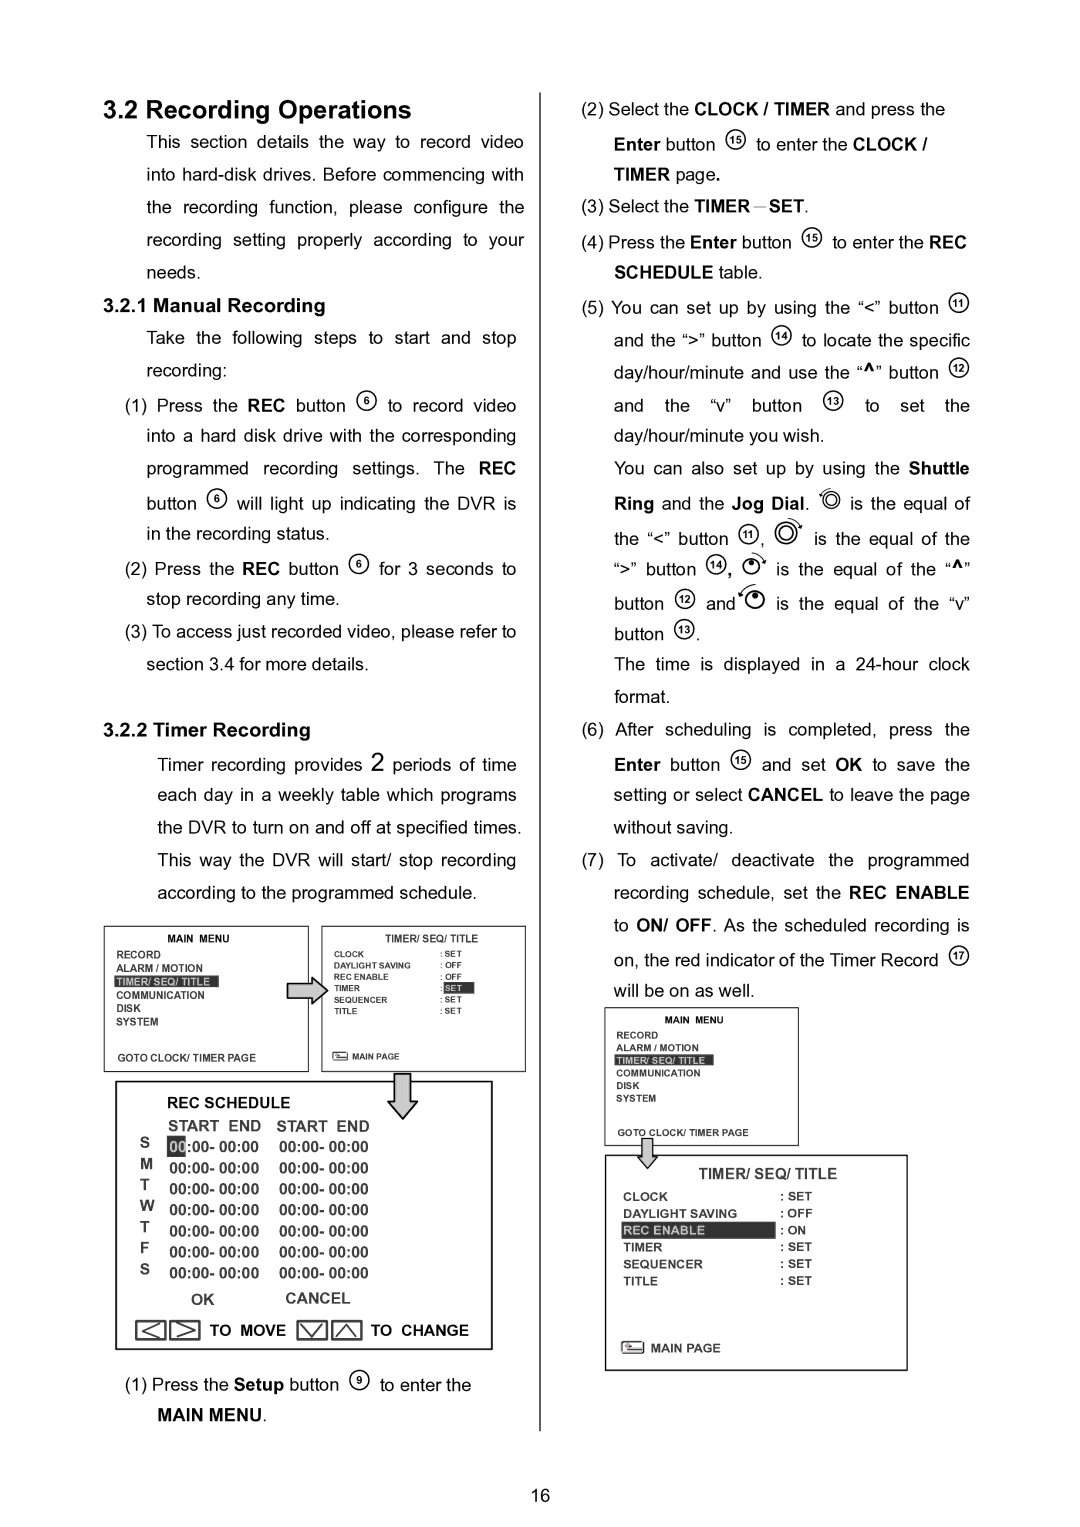
Timer recording provides 2 periods of time each day in a weekly table which programs the DVR to turn on and off at specified times. This way the DVR will start/ stop recording according to the programmed schedule.


MAIN MENU


TIMER/ SEQ/ TITLE


RECORD


CLOCK

: SET


ALARM / MOTION


DAYLIGHT SAVING

: OFF


REC ENABLE

: OFF


TIMER/ SEQ/ TITLE


TIMER

:

SET


COMMUNICATION


SEQUENCER

: SET


DISK


TITLE

: SET


SYSTEM


GOTO CLOCK/ TIMER PAGE


MAIN PAGE


REC SCHEDULE

START END START END

S00:00- 00:00 00:00- 00:00

M00:00- 00:00 00:00- 00:00 T 00:00- 00:00 00:00- 00:00 W 00:00- 00:00 00:00- 00:00

T 00:00- 00:00 00:00- 00:00

F00:00- 00:00 00:00- 00:00 S 00:00- 00:00 00:00- 00:00

OK CANCEL

TO MOVE TO CHANGE

(1) Press the Setup button 9 to enter the

MAIN MENU.

16

(2) Select the CLOCK / TIMER and press the Enter button 15 to enter the CLOCK / TIMER page.

(3)Select the TIMERSET.

(4)Press the Enter button 15 to enter the REC SCHEDULE table.

(5)You can set up by using the “<” button 11 and the “>” button 14 to locate the specific day/hour/minute and use the “^” button 12

and the “v” button 13 to set the day/hour/minute you wish.

You can also set up by using the Shuttle

Ring and the Jog Dial.

is the equal of

the “<” button 11 ,


is the equal of the

“>” button

14 ,

is

the equal of the “^

button

12

and

is

the

equal of the “v”

button

13 .


The time is displayed in a 24-hour clock format.

(6)After scheduling is completed, press the Enter button 15 and set OK to save the setting or select CANCEL to leave the page without saving.

(7)To activate/ deactivate the programmed recording schedule, set the REC ENABLE to ON/ OFF. As the scheduled recording is

on, the red indicator of the Timer Record 17 will be on as well.

MAIN MENU

RECORD

ALARM / MOTION

TIMER/ SEQ/ TITLE

COMMUNICATION

DISK

SYSTEM

GOTO CLOCK/ TIMER PAGE

TIMER/ SEQ/ TITLE

CLOCK

: SET

DAYLIGHT SAVING

: OFF

REC ENABLE

: ON

TIMER

: SET

SEQUENCER

: SET

TITLE

: SET


MAIN PAGE


Page 18
Image 18
Approach Tech DVR-3024 manual Recording Operations, Manual Recording, Timer Recording, Main Menu, Ring and the Jog Dial

DVR-3024 specifications

The Approach Tech DVR-3024 is a cutting-edge digital video recorder that excels in providing high-quality surveillance solutions for both residential and commercial applications. Packed with advanced technologies and features, it sets a new standard in video security systems.

One of the standout features of the DVR-3024 is its impressive video recording capabilities. Supporting up to 24 channels, this device allows users to monitor multiple areas simultaneously, ensuring comprehensive coverage of any environment. Each channel can record in high-definition, with resolutions reaching up to 1080p, which guarantees crystal-clear video footage. The DVR utilizes H.264 video compression technology, which not only preserves the quality of the recordings but also optimizes storage space, allowing for longer retention periods without compromising on video quality.

Another significant characteristic of the DVR-3024 is its robust storage options. The device can accommodate large capacity hard drives, enabling extended recording times. Users have the flexibility to configure storage settings based on their specific needs, whether they require continuous recording or motion-detection recording for efficient space management.

Networking capabilities are another critical aspect of the DVR-3024. With built-in Ethernet support, users can remotely access their surveillance feeds from anywhere in the world. This real-time viewing feature is particularly useful for business owners who want to keep an eye on their premises or for homeowners monitoring their property while away. Additionally, the DVR can send alerts and notifications directly to users via mobile devices, enhancing security responsiveness.

The user interface of the DVR-3024 is designed with simplicity in mind. It includes an intuitive menu system that makes navigating through settings and retrieved footage seamless, even for those with limited technical expertise. Furthermore, the device supports multiple output formats, including HDMI and VGA, allowing for versatile integration with display systems.

The Approach Tech DVR-3024 is not just about recording; it also includes advanced playback features. Users can easily search for specific footage through various filtering options, such as date and time, making it efficient to retrieve critical information when needed.

In summary, the Approach Tech DVR-3024 emerges as a powerful surveillance tool, combining high-definition recording, expansive storage, real-time access, and user-friendly features. Whether safeguarding a home or a business, the DVR-3024 proves to be an invaluable asset in enhancing security measures.