(2) OPEN THE THERMOSTAT
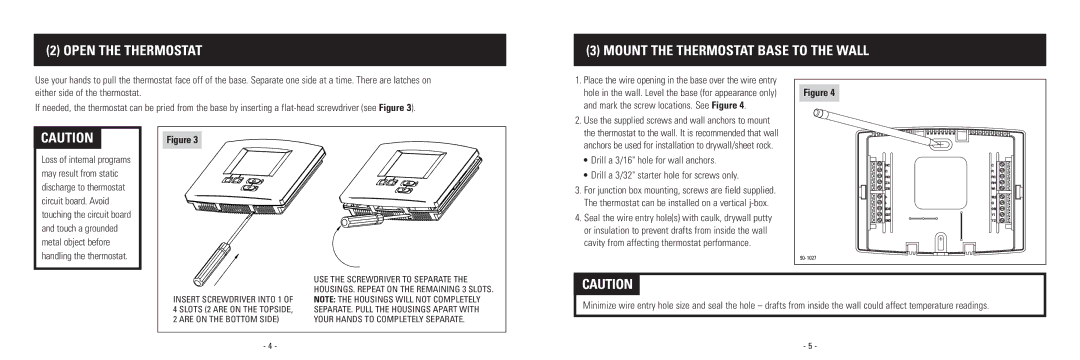
Use your hands to pull the thermostat face off of the base. Separate one side at a time. There are latches on either side of the thermostat.
If needed, the thermostat can be pried from the base by inserting a
(3)MOUNT THE THERMOSTAT BASE TO THE WALL
1.Place the wire opening in the base over the wire entry
hole in the wall. Level the base (for appearance only) | Figure 4 |
and mark the screw locations. See Figure 4. |
|
2. Use the supplied screws and wall anchors to mount |
|
the thermostat to the wall. It is recommended that wall |
|
CAUTION
Loss of internal programs may result from static discharge to thermostat circuit board. Avoid touching the circuit board and touch a grounded metal object before handling the thermostat.
Figure 3
| anchors be used for installation to drywall/sheet rock. |
| • Drill a 3/16" hole for wall anchors. |
| • Drill a 3/32" starter hole for screws only. |
3. | For junction box mounting, screws are field supplied. |
| The thermostat can be installed on a vertical |
4. | Seal the wire entry hole(s) with caulk, drywall putty |
| or insulation to prevent drafts from inside the wall |
| cavity from affecting thermostat performance. |
|
INSERT SCREWDRIVER INTO 1 OF 4 SLOTS (2 ARE ON THE TOPSIDE, 2 ARE ON THE BOTTOM SIDE)
USE THE SCREWDRIVER TO SEPARATE THE HOUSINGS. REPEAT ON THE REMAINING 3 SLOTS. NOTE: THE HOUSINGS WILL NOT COMPLETELY SEPARATE. PULL THE HOUSINGS APART WITH YOUR HANDS TO COMPLETELY SEPARATE.
CAUTION
Minimize wire entry hole size and seal the hole – drafts from inside the wall could affect temperature readings.
- 4 - | - 5 - |
