Enjoy Perfect Music
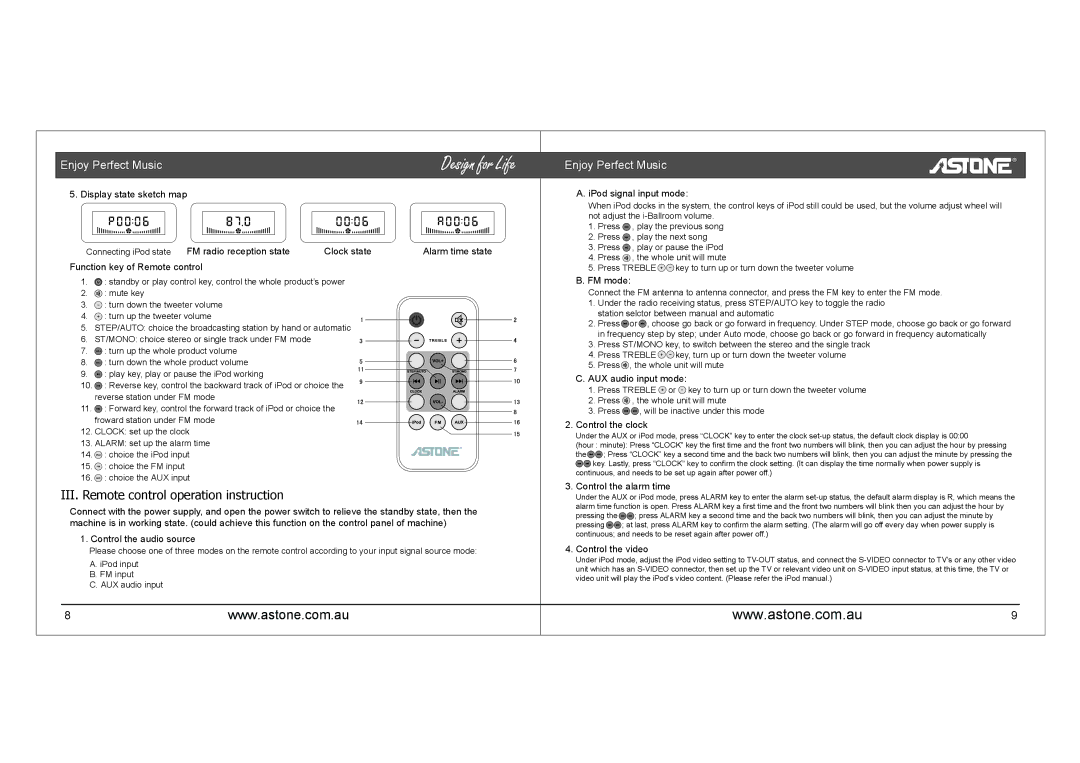
5. Display state sketch map
Connecting iPod state | FM radio reception state | Clock state | Alarm time state |
Function key of Remote control
1.![]() : standby or play control key, control the whole product’s power
: standby or play control key, control the whole product’s power
2.![]() : mute key
: mute key
3.![]() : turn down the tweeter volume
: turn down the tweeter volume
4. ![]() : turn up the tweeter volume
: turn up the tweeter volume
5. STEP/AUTO: choice the broadcasting station by hand or automatic
6. ST/MONO: choice stereo or single track under FM mode
7. ![]() : turn up the whole product volume
: turn up the whole product volume
8. ![]() : turn down the whole product volume
: turn down the whole product volume
9. ![]() : play key, play or pause the iPod working
: play key, play or pause the iPod working
10. ![]() : Reverse key, control the backward track of iPod or choice the reverse station under FM mode
: Reverse key, control the backward track of iPod or choice the reverse station under FM mode
11. ![]() : Forward key, control the forward track of iPod or choice the froward station under FM mode
: Forward key, control the forward track of iPod or choice the froward station under FM mode
12. CLOCK: set up the clock
13. ALARM: set up the alarm time
14. ![]() : choice the iPod input
: choice the iPod input
15.![]() : choice the FM input
: choice the FM input
16.![]() : choice the AUX input
: choice the AUX input
III.Remote control operation instruction
Connect with the power supply, and open the power switch to relieve the standby state, then the machine is in working state. (could achieve this function on the control panel of machine)
1. Control the audio source
Please choose one of three modes on the remote control according to your input signal source mode:
A. iPod input B. FM input
C. AUX audio input
8www.astone.com.au
Enjoy Perfect Music
A. iPod signal input mode:
When iPod docks in the system, the control keys of iPod still could be used, but the volume adjust wheel will not adjust the
1.Press ![]() , play the previous song
, play the previous song
2.Press ![]() , play the next song
, play the next song
3.Press ![]() , play or pause the iPod
, play or pause the iPod
4.Press ![]() , the whole unit will mute
, the whole unit will mute
5.Press TREBLE ![]()
![]() key to turn up or turn down the tweeter volume
key to turn up or turn down the tweeter volume
B.FM mode:
Connect the FM antenna to antenna connector, and press the FM key to enter the FM mode.
1.Under the radio receiving status, press STEP/AUTO key to toggle the radio station selctor between manual and automatic
2.Press ![]() or
or ![]() , choose go back or go forward in frequency. Under STEP mode, choose go back or go forward in frequency step by step; under Auto mode, choose go back or go forward in frequency automatically
, choose go back or go forward in frequency. Under STEP mode, choose go back or go forward in frequency step by step; under Auto mode, choose go back or go forward in frequency automatically
3.Press ST/MONO key, to switch between the stereo and the single track
4.Press TREBLE ![]()
![]() key, turn up or turn down the tweeter volume
key, turn up or turn down the tweeter volume
5.Press ![]() , the whole unit will mute
, the whole unit will mute
C.AUX audio input mode:
1.Press TREBLE ![]() or
or ![]() key to turn up or turn down the tweeter volume
key to turn up or turn down the tweeter volume
2.Press ![]() , the whole unit will mute
, the whole unit will mute
3.Press ![]()
![]() , will be inactive under this mode
, will be inactive under this mode
2.Control the clock
Under the AUX or iPod mode, press “CLOCK” key to enter the clock
(hour : minute): Press “CLOCK” key the first time and the front two numbers will blink, then you can adjust the hour by pressing
the ![]()
![]() ; Press “CLOCK” key a second time and the back two numbers will blink, then you can adjust the minute by pressing the
; Press “CLOCK” key a second time and the back two numbers will blink, then you can adjust the minute by pressing the ![]()
![]() key. Lastly, press “CLOCK” key to confirm the clock setting. (It can display the time normally when power supply is
key. Lastly, press “CLOCK” key to confirm the clock setting. (It can display the time normally when power supply is
continuous, and needs to be set up again after power off.)
3. Control the alarm time
Under the AUX or iPod mode, press ALARM key to enter the alarm
pressing the ![]()
![]() ; press ALARM key a second time and the back two numbers will blink, then you can adjust the minute by
; press ALARM key a second time and the back two numbers will blink, then you can adjust the minute by
pressing ![]()
![]() ; at last, press ALARM key to confirm the alarm setting. (The alarm will go off every day when power supply is continuous; and needs to be reset again after power off.)
; at last, press ALARM key to confirm the alarm setting. (The alarm will go off every day when power supply is continuous; and needs to be reset again after power off.)
4. Control the video
Under iPod mode, adjust the iPod video setting to
www.astone.com.au9
