INSTALLATION

NOTE: This telephone requires a modular telephone jack.

Table

If you have a wall-mounted telephone, remove the telephone from the wall and follow these instructions:

1Remove the base.

2Connect line cord to telephone. Plug the line cord into the jack labeled TEL LINE on the back of the phone.

3Attach the base.

Turn the base so that the larger end of the base is toward the top of the telephone. Attach the base by inserting the tabs into the slots. Push down on the large end of the base to lock it into place.

4Connect the line cord to your modular jack.

Plug the free end of the line cord into a modular jack. Make sure it snaps firmly into place.

5Connect handset to telephone. Plug the coiled cord into the handset jack on the side of the phone. Plug the other end of the coiled cord into the handset, and then hang up.

6Check for dial tone.

Lift the handset and listen for a dial tone. If you cannot hear a dial tone, turn to “In Case of Difficulty.”

Wall

1Remove the base.

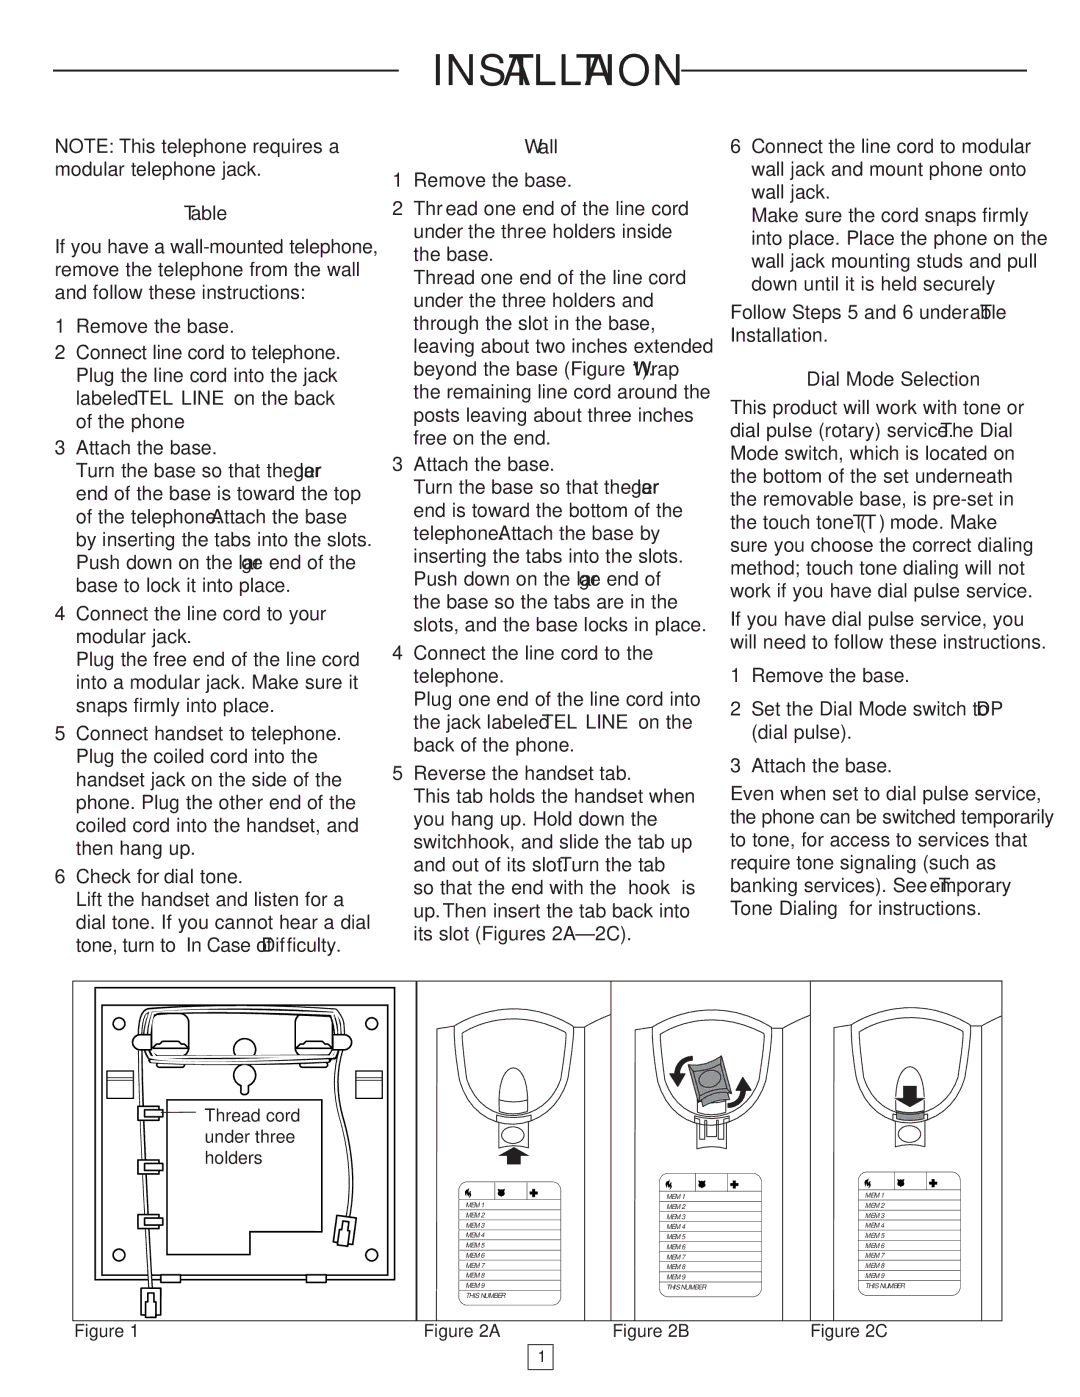
2Thread one end of the line cord under the three holders inside the base.

Thread one end of the line cord under the three holders and through the slot in the base, leaving about two inches extended beyond the base (Figure 1). Wrap the remaining line cord around the posts leaving about three inches free on the end.

3Attach the base.

Turn the base so that the larger end is toward the bottom of the telephone. Attach the base by inserting the tabs into the slots. Push down on the large end of the base so the tabs are in the slots, and the base locks in place.

4Connect the line cord to the telephone.

Plug one end of the line cord into the jack labeled TEL LINE on the back of the phone.

5Reverse the handset tab.

This tab holds the handset when you hang up. Hold down the switchhook, and slide the tab up and out of its slot. Turn the tab so that the end with the “hook” is up. Then insert the tab back into its slot (Figures 2A–2C).

6Connect the line cord to modular wall jack and mount phone onto wall jack.

Make sure the cord snaps firmly into place. Place the phone on the wall jack mounting studs and pull down until it is held securely.

Follow Steps 5 and 6 under “T able” Installation.

Dial Mode Selection

This product will work with tone or dial pulse (rotary) service. The Dial Mode switch, which is located on the bottom of the set underneath the removable base, is pre-set in the touch tone (TT) mode. Make sure you choose the correct dialing method; touch tone dialing will not work if you have dial pulse service.

If you have dial pulse service, you will need to follow these instructions.

1Remove the base.

2Set the Dial Mode switch to DP (dial pulse).

3Attach the base.

Even when set to dial pulse service, the phone can be switched temporarily to tone, for access to services that require tone signaling (such as banking services). See “T emporary Tone Dialing” for instructions.


Thread cord


under three


holders


MEM 1

MEM 1


MEM 1

MEM 2

MEM 2


MEM 2

MEM 3

MEM 3


MEM 3

MEM 4

MEM 4


MEM 4

MEM 5

MEM 5


MEM 5

MEM 6

MEM 6


MEM 6

MEM 7

MEM 7


MEM 7

MEM 8

MEM 8


MEM 8

MEM 9

MEM 9


MEM 9

THIS NUMBER

THIS NUMBER


THIS NUMBER


Figure 1

Figure 2A

Figure 2B

Figure 2C


1


Page 2
Image 2
AT&T 905 user manual Installation, Connect the line cord to your modular jack, Connect the line cord to the telephone

905 specifications

The AT&T 905 is a mobile phone that has garnered attention for its impressive set of features, technologies, and characteristics designed to meet the needs of today's consumers. This device is aimed at users looking for a combination of functionality, durability, and style.

One of the key features of the AT&T 905 is its robust design. Built to withstand the rigors of daily life, the device boasts a durable exterior that can endure drops and scratches, making it an ideal choice for those on the go. The phone is also water-resistant, providing an additional layer of protection against the elements.

The AT&T 905 incorporates a vibrant display that is not only visually appealing but also functional. The touchscreen is responsive and offers clear and crisp visuals, perfect for media consumption, whether streaming videos or browsing photos. The screen size provides ample real estate for navigation and usage comfort, enhancing the overall user experience.

In terms of technology, the AT&T 905 supports 4G LTE connectivity, ensuring fast and reliable internet access for browsing, streaming, and downloading. This level of connectivity is essential for users who rely on their mobile device for work and play, allowing them to stay connected wherever they are.

Equipped with a powerful processor, the AT&T 905 delivers smooth performance and multitasking capabilities. Users can seamlessly switch between applications, access demanding programs, and engage in mobile gaming without experiencing lag. This performance is complemented by a significant amount of internal storage, allowing users to save apps, photos, and other media without worrying about running out of space.

The camera system on the AT&T 905 is another standout feature. It includes both rear and front-facing cameras, with advanced technologies that enhance photography, including features like image stabilization and low-light optimization. Whether capturing memorable moments or engaging in video calls, users can expect high-quality results.

Battery life is another critical aspect, and the AT&T 905 does not disappoint. With a long-lasting battery, users can enjoy extended usage on a single charge, ensuring that the phone remains operational throughout busy days.

In summary, the AT&T 905 combines durability, advanced technology, and user-friendly features, making it a compelling option for consumers looking for a reliable mobile device. Whether for work, play, or staying connected with family and friends, the AT&T 905 is equipped to handle modern demands with ease.