REVISED 1/18/99
I N S T A L L A T I O N
O P E R A T I O N
O P E R A T I O N
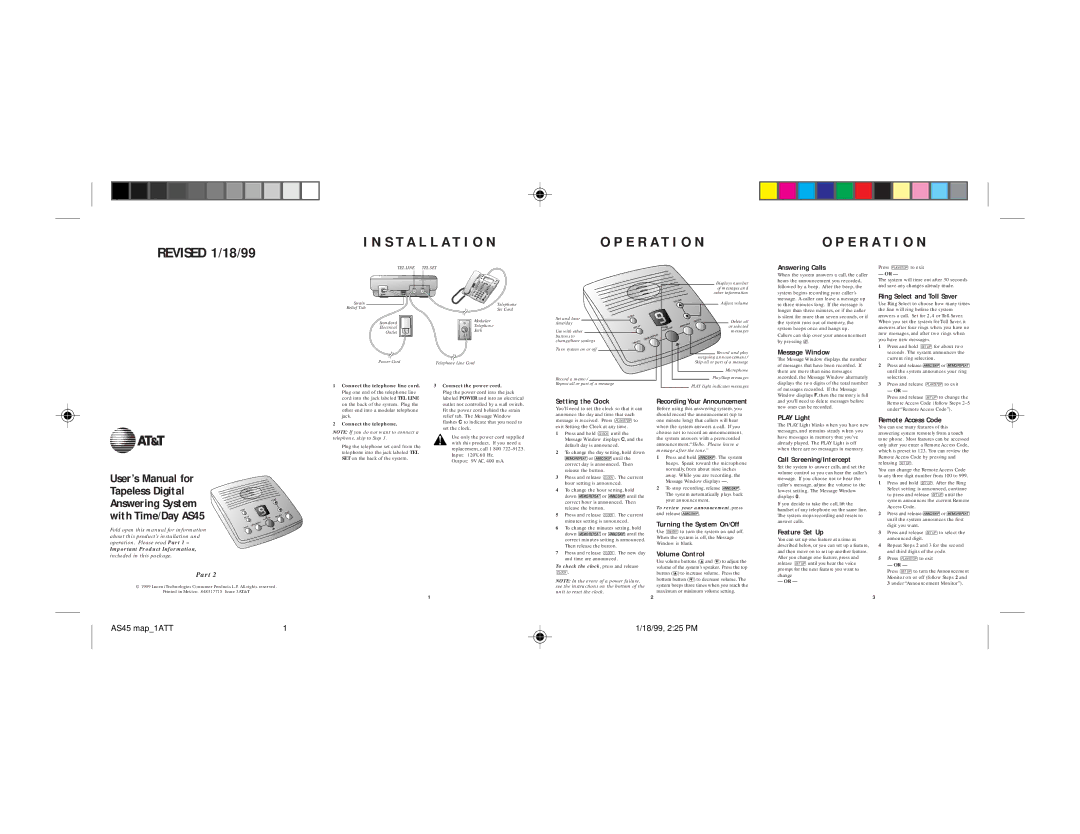
TEL LINE | TEL SET |
Strain
Relief Tab
Standard
Electrical
Outlet
Telephone
Set Cord
Modular
Telephone
Jack
Set and hear time/day
Use with other buttons to change/hear settings
Turn system on or off
Displays number |
of messages and |
other information |
Adjust volume |
Delete all |
or selected |
messages |
Record and play |
outgoing announcement / |
Answering Calls
When the system answers a call, the caller hears the announcement you recorded, followed by a beep. After the beep, the system begins recording your caller’s message. A caller can leave a message up to three minutes long. If the message is longer than three minutes, or if the caller is silent for more than seven seconds, or if the system runs out of memory, the system beeps once and hangs up.
Callers can skip over your announcement by pressing #.
Message Window
Press Pto exit
— OR —
The system will time out after 30 seconds and save any changes already made.
Ring Select and Toll Saver
Use Ring Select to choose how many times the line will ring before the system answers a call. Set for 2, 4 or Toll Saver. When you set the system for Toll Saver, it answers after four rings when you have no new messages, and after two rings when you have new messages.
1 Press and hold Sfor about two |
seconds. The system announces the |
Power Cord | Telephone Line Cord |
Record a memo /
Skip all or part of a message |
Microphone |
Play/Stop messages
The Message Window displays the number of messages that have been recorded. If there are more than nine messages recorded, the Message Window alternately
current ring selection. |
|
2 Press and release | or |
until the system announces your ring | |
selection. |
|
1 Connect the telephone line cord. |
Plug one end of the telephone line |
3 Connect the power cord. |
Plug the power cord into the jack |
Repeat all or part of a message
PLAY Light indicates messages
displays the two digits of the total number of messages recorded. If the Message Window displays F, then the memory is full
3 Press and release Pto exit |
— OR — |
cord into the jack labeled TEL LINE |
on the back of the system. Plug the |
other end into a modular telephone |
labeled POWER and into an electrical |
outlet not controlled by a wall switch. |
Fit the power cord behind the strain |
Setting the Clock
You’ll need to set the clock so that it can announce the day and time that each
Recording Your Announcement
Before using this answering system, you should record the announcement (up to
and you’ll need to delete messages before new ones can be recorded.
Press and release Sto change the Remote Access Code (follow Steps
1
User’s Manual for Tapeless Digital Answering System with Time/Day AS45
Fold open this manual for information about this product’s installation and operation. Please read Part 1 –
Important Product Information,
included in this package.
Part 2
© 1999 Lucent Technologies Consumer Products L.P. All rights reserved.
Printed in Mexico. 848317715 Issue 3AT&T
jack. |
2 Connect the telephone. |
NOTE: If you do not want to connect a telephone, skip to Step 3.
Plug the telephone set cord from the telephone into the jack labeled TEL SET on the back of the system.
relief tab. The Message Window |
flashes C to indicate that you need to |
set the clock. |
Use only the power cord supplied with this product. If you need a replacement, call 1 800
Output: 9V AC, 400 mA.
message is received. Press Pto exit Setting the Clock at any time.
1Press and hold Cuntil the Message Window displays C, and the default day is announced.
2To change the day setting, hold down ![]() or
or ![]() until the correct day is announced. Then release the button.
until the correct day is announced. Then release the button.
3Press and release C. The current hour setting is announced.
4To change the hour setting, hold
down ![]() or
or ![]() until the correct hour is announced. Then release the button.
until the correct hour is announced. Then release the button.
5Press and release C. The current minutes setting is announced.
6To change the minutes setting, hold
down ![]() or
or ![]() until the correct minutes setting is announced. Then release the button.
until the correct minutes setting is announced. Then release the button.
7Press and release C. The new day and time are announced.
To check the clock, press and release
C.
NOTE: In the event of a power failure, see the instructions on the bottom of the unit to reset the clock.
one minute long) that callers will hear when the system answers a call. If you choose not to record an announcement, the system answers with a prerecorded announcement:“Hello. Please leave a message after the tone.”
1Press and hold ![]() . The system beeps. Speak toward the microphone normally, from about nine inches away. While you are recording, the Message Window displays
. The system beeps. Speak toward the microphone normally, from about nine inches away. While you are recording, the Message Window displays
2To stop recording, release ![]() . The system automatically plays back your announcement.
. The system automatically plays back your announcement.
To review your announcement, press
and release ![]() .
.
Turning the System On/Off
Use Oto turn the system on and off. When the system is off, the Message Window is blank.
Volume Control
Use volume buttons (+and
PLAY Light
The PLAY Light blinks when you have new messages, and remains steady when you have messages in memory that you’ve already played. The PLAY Light is off when there are no messages in memory.
Call Screening/Intercept
Set the system to answer calls, and set the volume control so you can hear the caller’s message. If you choose not to hear the caller’s message, adjust the volume to the lowest setting. The Message Window displays 0.
If you decide to take the call, lift the handset of any telephone on the same line. The system stops recording and resets to answer calls.
Feature Set Up
You can set up one feature at a time as described below, or you can set up a feature, and then move on to set up another feature. After you change one feature, press and release Suntil you hear the voice prompt for the next feature you want to change
— OR —
Remote Access Code
You can use many features of this answering system remotely from a touch tone phone. Most features can be accessed only after you enter a Remote Access Code, which is preset to 123. You can review the Remote Access Code by pressing and releasing S.
You can change the Remote Access Code to any three digit number from 100 to 999.
1Press and hold S. After the Ring Select setting is announced, continue to press and release Suntil the system announces the current Remote Access Code.
2Press and release ![]() or
or ![]() until the system announces the first digit you want.
until the system announces the first digit you want.
3Press and release Sto select the announced digit.
4Repeat Steps 2 and 3 for the second and third digits of the code.
5Press Pto exit
— OR —
Press Sto turn the Announcement Monitor on or off (follow Steps 2 and
3under “Announcement Monitor”).
AS45 map_1ATT | 1 |
1
2
1/18/99, 2:25 PM
3