Start Here

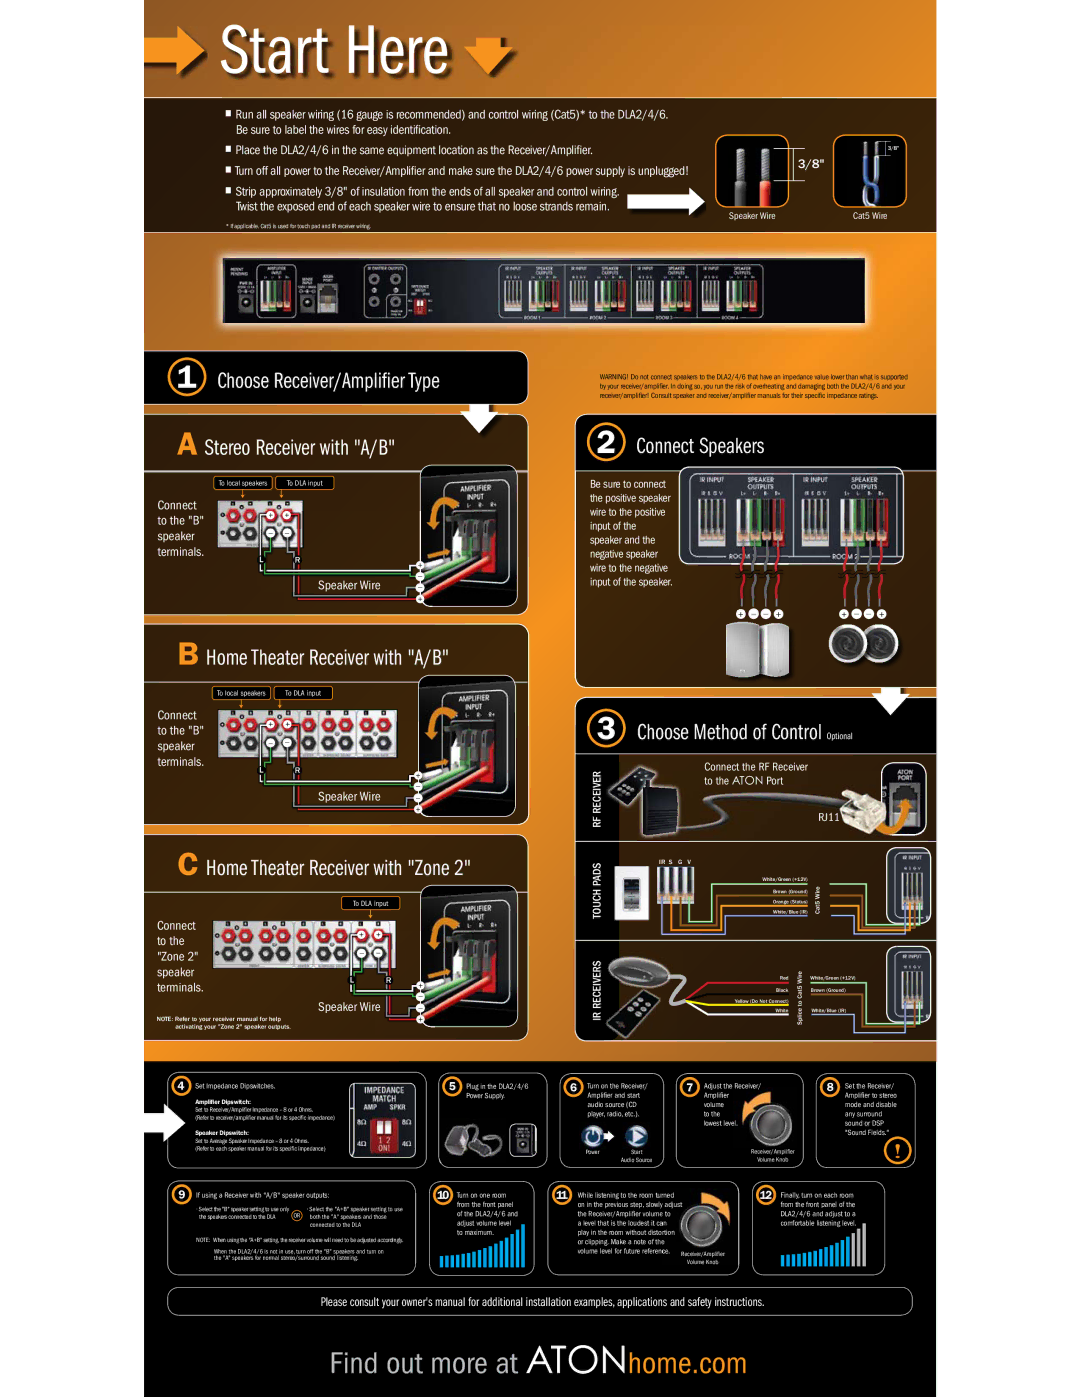
sRun all speaker wiring (16 gauge is recommended) and control wiring (Cat5)* to the DLA2/4/6. Be sure to label the wires for easy identification.

sPlace the DLA2/4/6 in the same equipment location as the Receiver/Amplifier.

sTurn off all power to the Receiver/Amplifier and make sure the DLA2/4/6 power supply is unplugged!

sStrip approximately 3/8" of insulation from the ends of all speaker and control wiring. Twist the exposed end of each speaker wire to ensure that no loose strands remain.

Speaker Wire

* If applicable. Cat5 is used for touch pad and IR receiver wiring.

3/8"

3/8"

Cat5 Wire

1Choose Receiver/Amplifier Type

AStereo Receiver with "A/B"

To local speakers To DLA input

Connect

to the "B"

+

+

speaker


terminals.

L

R

+


Speaker Wire


+

BHome Theater Receiver with "A/B"

To local speakers To DLA input

Connect

to the "B"

+

+

speaker


terminals.

L

R

+


Speaker Wire


+

CHome Theater Receiver with "Zone 2"

WARNING! Do not connect speakers to the DLA2/4/6 that have an impedance value lower than what is supported by your receiver/amplifier. In doing so, you run the risk of overheating and damaging both the DLA2/4/6 and your receiver/amplifier! Consult speaker and receiver/amplifier manuals for their specific impedance ratings.

2Connect Speakers

Be sure to connect the positive speaker wire to the positive input of the speaker and the negative speaker wire to the negative input of the speaker.

+ –

+

+ –

+

3Choose Method of Control Optional

RECEIVER

Connect the RF Receiver


to the ATON Port


RJ11


RF


PADS

IR S G V


White/Green (+12V)


Brown (Ground)

Wire


Connect to the "Zone 2" speaker terminals.

NOTE: Refer to your receiver manual for help activating your "Zone 2" speaker outputs.

To DLA input

+

+


L


R

+


Speaker Wire


+

TOUCH


Orange (Status)


White/Blue (IR)


Cat5


IR RECEIVERS


Red

Splice to Cat5 Wire

White/Green (+12V)


Black


Brown (Ground)


Yellow (Do Not Connect)


White/Blue (IR)


White


4

Set Impedance Dipswitches.


5

Plug in the DLA2/4/6


Power Supply.


Amplifier Dipswitch:


Set to Receiver/Amplifier Impedance – 8 or 4 Ohms.


(Refer to receiver/amplifier manual for its specific impedance)


Speaker Dipswitch:


Set to Average Speaker Impedance – 8 or 4 Ohms.


(Refer to each speaker manual for its specific impedance)


9

If using a Receiver with "A/B" speaker outputs:

10 Turn on one room


s 3ELECT THE " SPEAKER SETTING TOTUSENONLY


ss3ELECT THE ! " SPEAKER SETTING TOTUSEN


from the front panel


OR


of the DLA2/4/6 and


the speakers connected to the DLA

both the "A" speakers and those


adjust volume level


connected to the DLA


to maximum.

NOTE: When using the "A+B" setting, the receiver volume will need to be adjusted accordingly.

When the DLA2/4/6 is not in use, turn off the "B" speakers and turn on the "A" speakers for normal stereo/surround sound listening.

6 Turn on the Receiver/

7 Adjust the

Receiver/

8

Set the Receiver/

Amplifier and start

Amplifier


Amplifier to stereo

audio source (CD

volume


mode and disable

player, radio, etc.).

to the


any surround


lowest level.


sound or DSP


"Sound Fields."


Power

Start


Receiver/Amplifier

!


Audio Source


Volume Knob

11


ned


12 Finally, turn on each room


While listening to the room tur


adjust

from the front panel of the


on in the previous step, slowly


to


DLA2/4/6 and adjust to a


the Receiver/Amplifier volume


n


comfortable listening level.


a level that is the loudest it ca


play in the room without disto

rtion


or clipping. Make a note of th

e


volume level for future referen

ce.

Receiver/Amplifier


Volume Knob


Please consult your owner's manual for additional installation examples, applications and safety instructions.

Page 1
Image 1
ATON DLA2, DLA4 owner manual Choose Receiver/Amplifier Type Stereo Receiver with A/B, Home Theater Receiver with A/B

DLA2, DLA4 specifications

The ATON DLA4 and DLA2 are advanced audio devices renowned for their exceptional sound quality and innovative technologies. These devices are designed for audiophiles and professionals alike, offering a seamless audio experience that caters to various listening environments.

Starting with the ATON DLA4, this model stands out due to its impressive power handling capability and versatility. The DLA4 is equipped with four built-in amplifiers, delivering a robust audio output that can easily fill large spaces. One of the key features of the DLA4 is its support for high-resolution audio formats, ensuring that listeners can experience every nuance and detail in their favorite tracks. Additionally, the DLA4 supports a wide range of connectivity options, including Bluetooth, Wi-Fi, and traditional analog inputs, making it compatible with a variety of devices.

The DLA2, on the other hand, is a more compact and streamlined version, ideal for smaller spaces or users seeking a more portable solution without compromising sound quality. It features two high-performance amplifiers and similar connectivity options as the DLA4, but with a lighter and more space-efficient design. The DLA2 is perfect for casual listeners who appreciate excellent sound without the extensive features that professional setups offer.

Both models incorporate cutting-edge technologies that enhance sound reproduction. The ATON DLA series utilizes advanced digital signal processing (DSP) algorithms that optimize audio clarity and balance across different frequency ranges. This technology ensures that bass, mids, and treble are well-defined, providing a rich and immersive listening experience.

In terms of build quality, both the DLA4 and DLA2 are constructed using high-grade materials that not only contribute to their aesthetic appeal but also enhance durability and performance. The devices feature sleek, modern designs that complement any decor.

Battery life is another critical aspect where the DLA series excels. With efficient power management systems, both models offer extended playback times, making them ideal for outdoor use or extended listening sessions.

In summary, the ATON DLA4 and DLA2 are exemplary audio devices that cater to varying needs, from professional audio environments to casual home listening. Their combination of innovative technologies, robust features, and high-quality construction makes them standout choices for anyone looking to elevate their audio experience.