6.3 Temperature Adjustment

6.3.1Manual Adjustment

Use this mode to set the temperature manually. To place the con- troller in this mode, press Auto/Man so that disappears from the

screen. Set the temperature using the buttons.

NOTE: If the controller is in automatic heat/cool changeover (see section 6.2), the setpoint is automatically reduced or raised by 1°C (1.8°F) when the controller switches to heating mode or to cooling mode respectively. For example, if the setpoint is 24°C (75°F) in heating mode, it will become 25°C (77°F) in cooling mode and will return to 24°C (75°F) when the controller switches back to heating mode.

6.3.2Automatic Adjustment

Use this mode if you want the controller to adjust the temperature according to the programmed schedule. To place the controller in this mode, press Auto/Man so that appears on the screen.

Pre-programmed Schedule

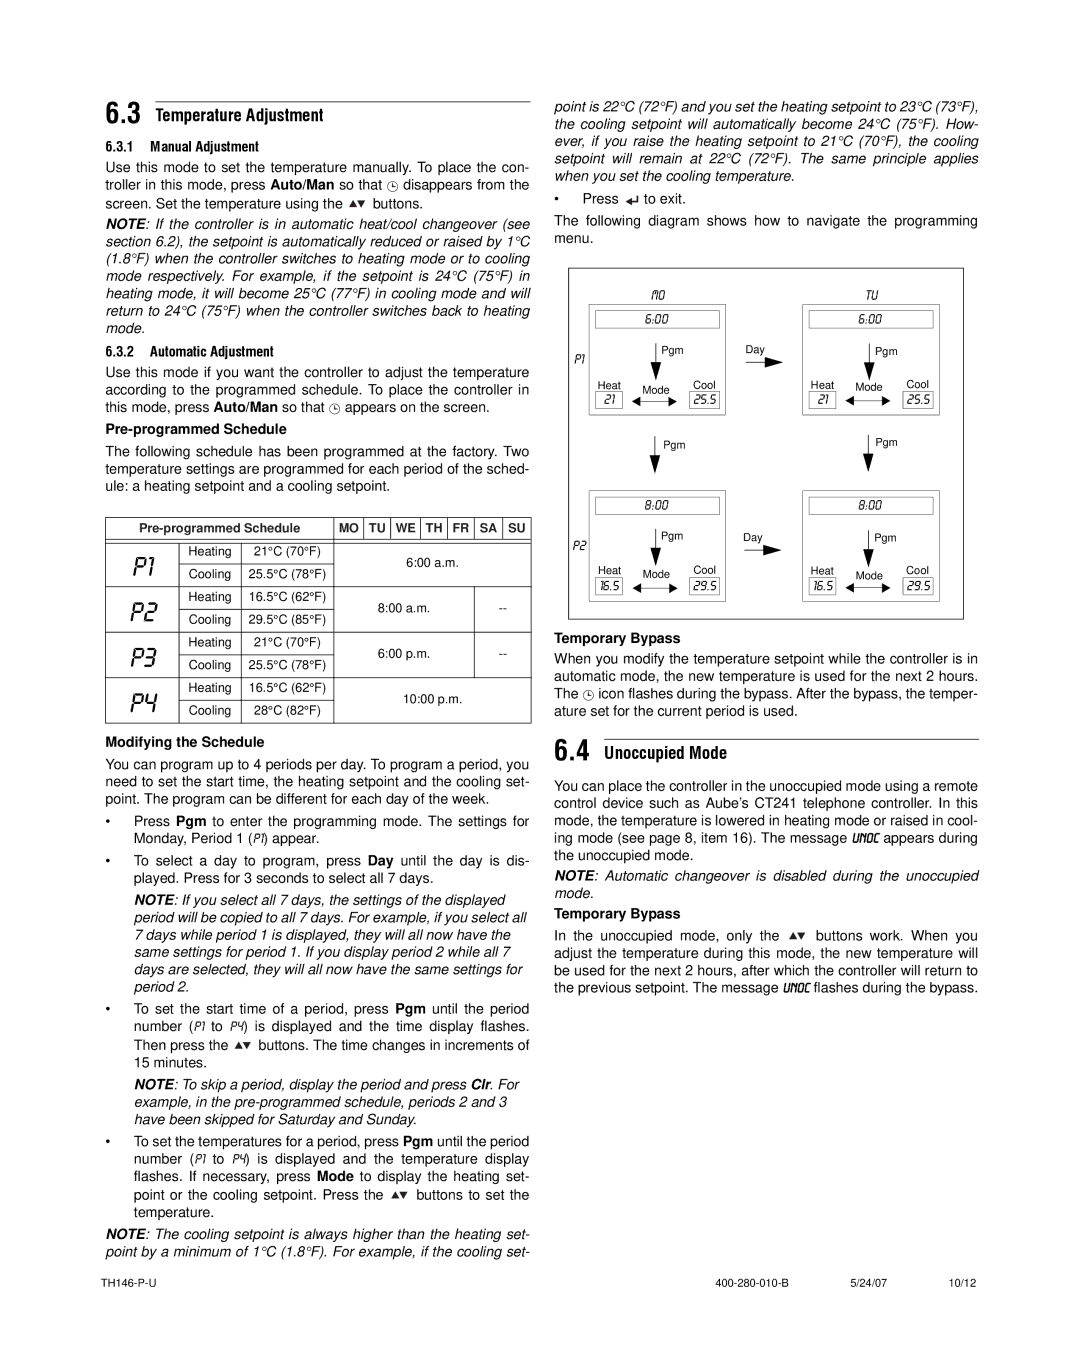
The following schedule has been programmed at the factory. Two temperature settings are programmed for each period of the sched- ule: a heating setpoint and a cooling setpoint.

Pre-programmed Schedule

MO

TU

WE

TH

FR

SA

SU


P1

Heating

21°C (70°F)


6:00 a.m.


Cooling

25.5°C (78°F)


P2

Heating

16.5°C (62°F)


8:00 a.m.

--


Cooling

29.5°C (85°F)


P3

Heating

21°C (70°F)


6:00 p.m.

--


Cooling

25.5°C (78°F)


P4

Heating

16.5°C (62°F)


10:00 p.m.


Cooling

28°C (82°F)


Modifying the Schedule

You can program up to 4 periods per day. To program a period, you need to set the start time, the heating setpoint and the cooling set- point. The program can be different for each day of the week.

Press Pgm to enter the programming mode. The settings for Monday, Period 1 (P1) appear.

To select a day to program, press Day until the day is dis- played. Press for 3 seconds to select all 7 days.

NOTE: If you select all 7 days, the settings of the displayed period will be copied to all 7 days. For example, if you select all 7 days while period 1 is displayed, they will all now have the same settings for period 1. If you display period 2 while all 7 days are selected, they will all now have the same settings for period 2.

To set the start time of a period, press Pgm until the period number (P1 to P4) is displayed and the time display flashes. Then press the buttons. The time changes in increments of 15 minutes.

NOTE: To skip a period, display the period and press Clr. For example, in the pre-programmed schedule, periods 2 and 3 have been skipped for Saturday and Sunday.

To set the temperatures for a period, press Pgm until the period number (P1 to P4) is displayed and the temperature display flashes. If necessary, press Mode to display the heating set-

point or the cooling setpoint. Press the buttons to set the temperature.

NOTE: The cooling setpoint is always higher than the heating set- point by a minimum of 1°C (1.8°F). For example, if the cooling set-

point is 22°C (72°F) and you set the heating setpoint to 23°C (73°F), the cooling setpoint will automatically become 24°C (75°F). How- ever, if you raise the heating setpoint to 21°C (70°F), the cooling setpoint will remain at 22°C (72°F). The same principle applies when you set the cooling temperature.

Press to exit.

The following diagram shows how to navigate the programming menu.


MO


TU


6:00


6:00


P1

Pgm

Day


Pgm


Heat

Mode

Cool

Heat

Mode

Cool

21


25.5

21


25.5


Pgm


Pgm


8:00


8:00


P2

Pgm

Day


Pgm


Heat

Mode

Cool

Heat

Mode

Cool

16.5

29.5

16.5

29.5


Temporary Bypass

When you modify the temperature setpoint while the controller is in automatic mode, the new temperature is used for the next 2 hours. The icon flashes during the bypass. After the bypass, the temper- ature set for the current period is used.

6.4 Unoccupied Mode

You can place the controller in the unoccupied mode using a remote control device such as Aube’s CT241 telephone controller. In this mode, the temperature is lowered in heating mode or raised in cool- ing mode (see page 8, item 16). The message UNOC appears during the unoccupied mode.

NOTE: Automatic changeover is disabled during the unoccupied mode.

Temporary Bypass

In the unoccupied mode, only the buttons work. When you adjust the temperature during this mode, the new temperature will be used for the next 2 hours, after which the controller will return to the previous setpoint. The message UNOC flashes during the bypass.

TH146-P-U

400-280-010-B

5/24/07

10/12

Page 10
Image 10
Aube Technologies TH146-P-U manual Temperature Adjustment, Unoccupied Mode

TH146-P-U specifications

Aube Technologies has made a significant impact in the world of advanced temperature control systems with the introduction of the TH146-P-U model. This innovative device is designed specifically for technologies such as HVAC systems, providing users with an incredibly versatile temperature control solution for both residential and commercial applications.

One of the standout features of the TH146-P-U is its universal compatibility. It is designed to work seamlessly with a wide range of heating and cooling systems, including electric baseboards, convectors, and even fan-forced heaters. This versatility makes it ideal for homeowners and property managers looking to upgrade their current temperature regulation solutions without the need for extensive modifications or compatibility checks.

The TH146-P-U is equipped with a user-friendly interface that simplifies operation. The large, backlit display ensures readability, whether it's day or night. Users can easily program the thermostat to their desired temperature settings, allowing for customized comfort levels throughout the day. Moreover, a built-in digital timer enables users to schedule heating and cooling cycles according to their lifestyle, promoting energy efficiency and cost savings.

One of the key technologies behind the TH146-P-U is its precision temperature sensing capability. The device utilizes advanced algorithms to gauge the temperature accurately, ensuring that it responds quickly to changes in the room. This feature guarantees optimal comfort while preventing energy waste, as the system will operate only when necessary.

A significant advantage of the TH146-P-U is its energy-saving capabilities. The thermostat features adaptable control strategies that maximize energy efficiency without compromising comfort. By monitoring usage patterns and adjusting operation accordingly, the TH146-P-U can significantly lower energy consumption and provide substantial savings on utility bills.

In addition to its performance features, the TH146-P-U also boasts a sleek, modern design that fits seamlessly into any decor. Its compact size makes it easy to install and integrate into existing systems without taking up valuable space.

Overall, the Aube Technologies TH146-P-U thermostat stands out in the marketplace for its versatility, user-friendly features, energy efficiency, and stylish design. It is a fantastic choice for anyone looking to enhance their indoor climate control while reducing energy costs. With its advanced technology and practical characteristics, the TH146-P-U sets a new standard for modern temperature management solutions.