PSW110 / 112
OWNER’S MANUAL


 PSW110
Volume Power Crossover
Protect
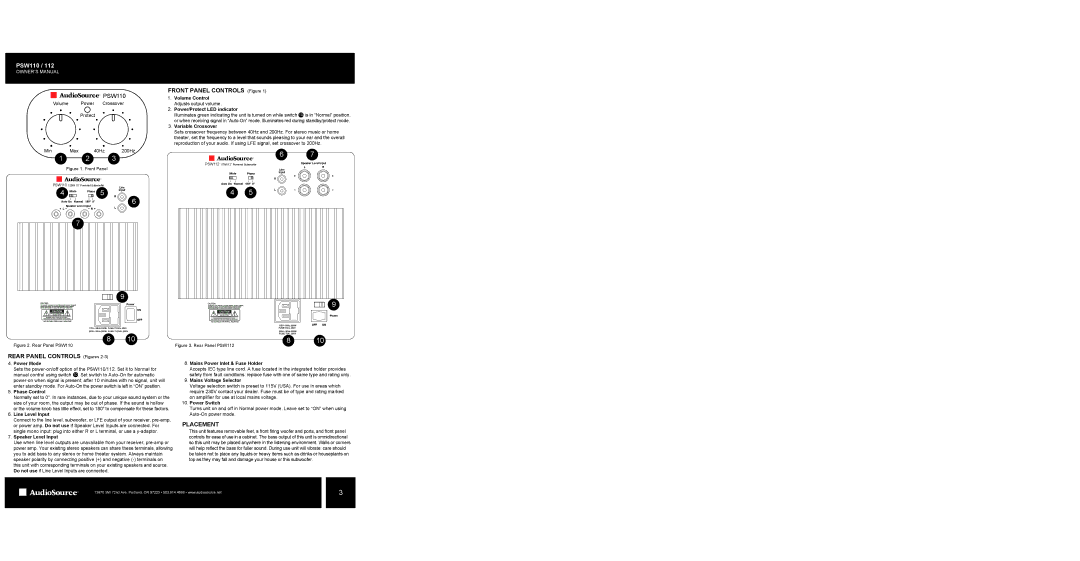
FRONT PANEL CONTROLS (Figure 1)
1.Volume Control Adjusts output volume.
2.Power/Protect LED indicator
Illuminates green indicating the unit is turned on while switch 10 is in “Normal” position, or when receiving signal in
3.Variable Crossover
Sets crossover frequency between 40Hz and 200Hz. For stereo music or home theater, set the frequency to a level that sounds pleasing to your ear and the overall reproduction of your audio. If using LFE signal, set crossover to 200Hz.
Min Max 40Hz 200Hz
1 2 3
Figure 1. Front Panel
PSW110 125W 10” Powered Subwoofer |
| Line | |
4 Mode | Phase 5 |
| |
| Input | ||
R | 6 | ||
Auto On Normal | 180° 0° |
| |
|
| ||
Speaker Level Input | L |
| |
+ L - | - R + |
| |
7
9
|
|
| 6 |
PSW112 175W 12” Powered Subwoofer |
|
| |
|
|
| Line |
Mode | Phase |
| Input |
| + | ||
|
| R | |
|
|
| |
Auto On Normal | 180° 0° |
|
|
4 | 5 | L | - |
|
| ||
7
Speaker Level Input
LR
+
-
Power
ON
OFF
115V~ 60Hz 200W FUSE:T2.5AL 250V
230V~ 50Hz 200W FUSE:T1.25AL 250V
8 10
Figure 2. Rear Panel PSW110
REAR PANEL CONTROLS (Figures 2-3)
Figure 3. Rear Panel PSW112
9
Power
115V~ 60Hz 300W | OFF ON |
FUSE:T4AL 250V |
|
230V~ 50Hz 300W |
|
FUSE:T2AL 250V |
|
8 | 10 |
4.Power Mode
Sets the
5.Phase Control
Normally set to 0°. In rare instances, due to your unique sound system or the size of your room, the output may be out of phase. If the sound is hollow or the volume knob has little effect, set to 180° to compensate for these factors.
6.Line Level Input
Connect to the line level, subwoofer, or LFE output of your receiver,
7.Speaker Level Input
Use when line level outputs are unavailable from your receiver,
8.Mains Power Inlet & Fuse Holder
Accepts IEC type line cord. A fuse located in the integrated holder provides safety from fault conditions: replace fuse with one of same type and rating only.
9.Mains Voltage Selector
Voltage selection switch is preset to 115V (USA). For use in areas which require 230V contact your dealer. Fuse must be of type and rating marked on amplifier for use at local mains voltage.
10.Power Switch
Turns unit on and off in Normal power mode. Leave set to “ON” when using
PLACEMENT
This unit features removable feet, a front firing woofer and ports, and front panel controls for ease of use in a cabinet. The bass output of this unit is omnidirectional so this unit may be placed anywhere in the listening environment. Walls or corners will help reflect the bass for fuller sound. During use unit will vibrate: care should be taken not to place any liquids or heavy items such as drinks or houseplants on top as they may fall and damage your house or this subwoofer.
13970 SW 72nd Ave. Portland, OR 97223 • 503.914.4688 • www.audiosource.net | 3 |
|
