OPERATING CONTROLS AND FUNCTIONS
FRONT PANEL | 1 |
|
2 | 3 | 4 | 5 | 6 | 7 8 9 |
REMOTE CONTROL 26 |
| DVD OPERATION |
OPEN/CLOSE | STOP SKIP/REV PLAY FWD/SKIP |
OUTPUT
25 | 23 | 21 |
24 | 22 | 20 |
|
|
|
| POWER |
|
|
|
| VIDEO |
VCR OPERATION |
|
| CHANNEL |
|
|
| TIMER | L | |
|
|
| ||
|
|
| SET |
|
|
|
| VCR/TV | AUDIO |
|
|
|
| |
STOP/EJECT REW | PLAY | F.FWD REC/OTR | CST.IN | R |
19 | 17 | 15 | 13 | 11 |
18 | 16 |
| 14 12 | 10 |
27 | SPEED | AUDIO |
|
POWER |
| ||
28 |
|
|
|
1 | 2 | 3 |
|
|
|
| SKIP/CH. |
4 | 5 | 6 |
|
29 |
|
| VCR/TV |
7 | 8 | 9 |
|
|
| +100 | SLOW |
| 0 | +10 |
|
DISPLAY | DVD | VCR | PAUSE |
30 |
|
|
31 | PLAY |
|
32 | STOP |
|
33 |
| |
|
| |
34 | RECORD |
|
|
| |
35 | MENU |
|
ENTER |
| |
36 | SETUP TITLE | RETURN |
37 |
|
|
38 |
|
|
39 |
|
|
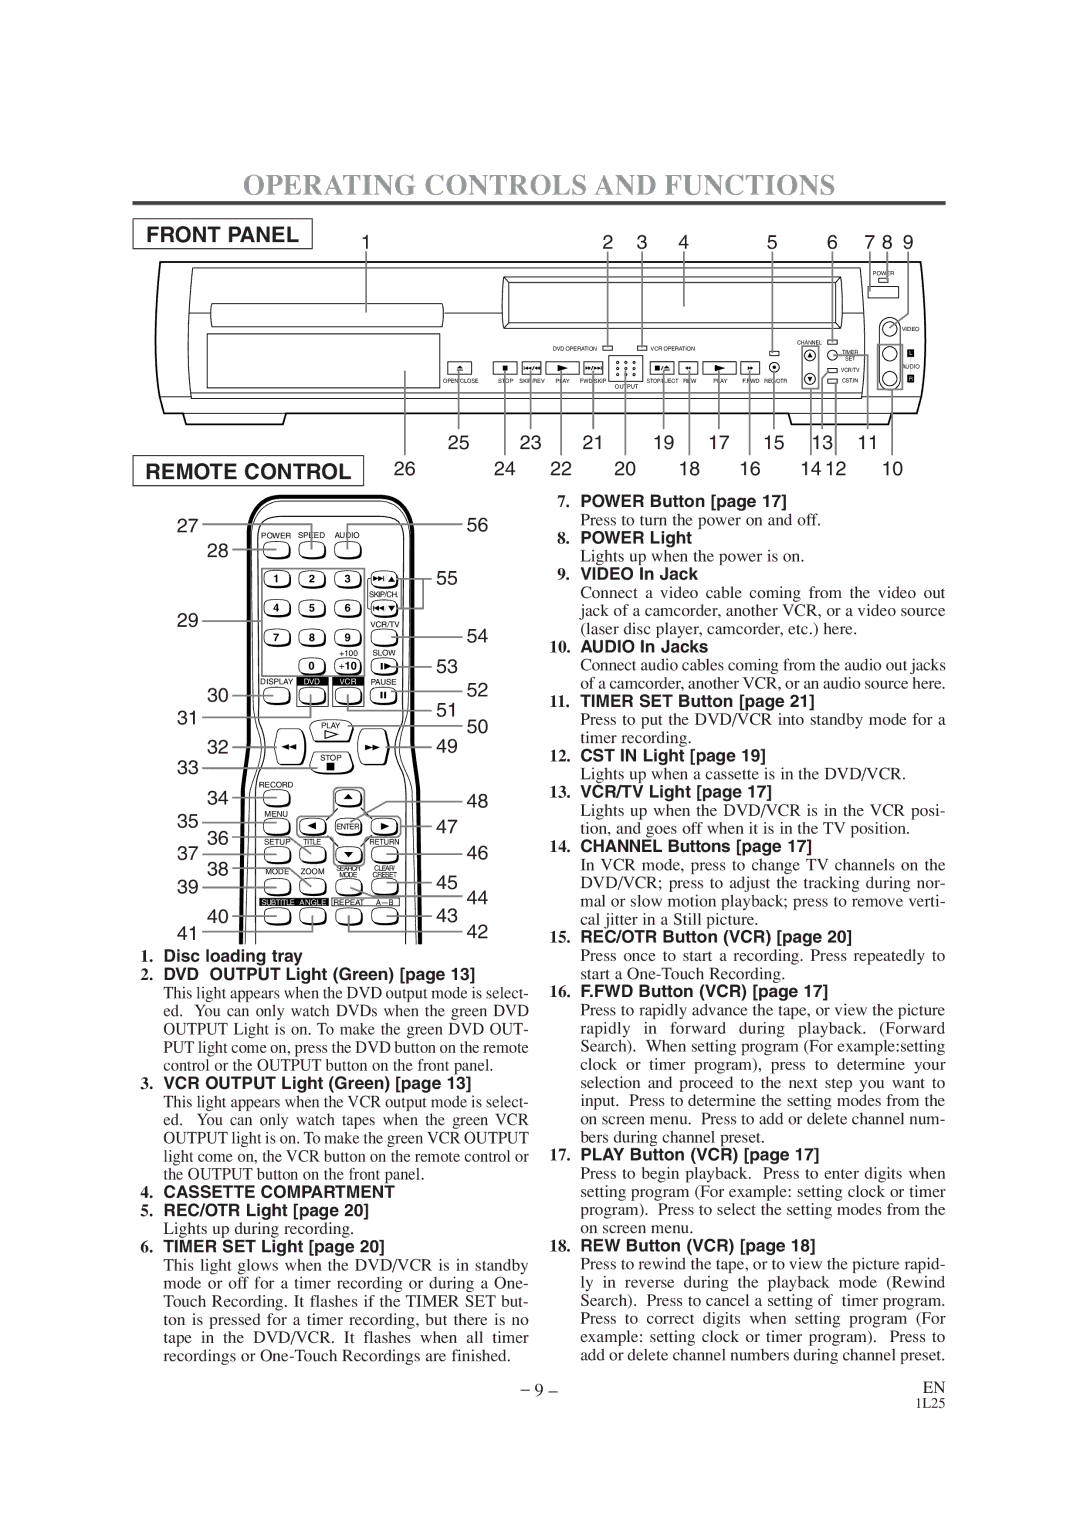
7.POWER Button [page 17]
56Press to turn the power on and off.
8.POWER Light
Lights up when the power is on.
559. VIDEO In Jack
Connect a video cable coming from the video out jack of a camcorder, another VCR, or a video source
54(laser disc player, camcorder, etc.) here.
10.AUDIO In Jacks
53 |
|
| Connect audio cables coming from the audio out jacks |
| 52 |
| of a camcorder, another VCR, or an audio source here. |
| 11. | TIMER SET Button [page 21] | |
51 |
| ||
50 |
| Press to put the DVD/VCR into standby mode for a | |
|
| ||
49 |
| timer recording. | |
|
| ||
| 12. | CST IN Light [page 19] | |
|
|
Lights up when a cassette is in the DVD/VCR.
4813. VCR/TV Light [page 17]
47 |
| Lights up when the DVD/VCR is in the VCR posi- |
| tion, and goes off when it is in the TV position. | |
46 | 14. | CHANNEL Buttons [page 17] |
| In VCR mode, press to change TV channels on the | |
45 |
| |
| DVD/VCR; press to adjust the tracking during nor- | |
44 |
| mal or slow motion playback; press to remove verti- |
43 |
| cal jitter in a Still picture. |
42 | 15. | REC/OTR Button (VCR) [page 20] |
|
| Press once to start a recording. Press repeatedly to |
|
| start a |
| 16. F.FWD Button (VCR) [page 17] | |
|
| Press to rapidly advance the tape, or view the picture |
|
| rapidly in forward during playback. (Forward |
|
| Search). When setting program (For example:setting |
|
| clock or timer program), press to determine your |
|
| selection and proceed to the next step you want to |
|
| input. Press to determine the setting modes from the |
|
| on screen menu. Press to add or delete channel num- |
|
| bers during channel preset. |
| 17. PLAY Button (VCR) [page 17] | |
|
| Press to begin playback. Press to enter digits when |
|
| setting program (For example: setting clock or timer |
|
| program). Press to select the setting modes from the |
|
| on screen menu. |
| 18. REW Button (VCR) [page 18] | |
|
| Press to rewind the tape, or to view the picture rapid- |
|
| ly in reverse during the playback mode (Rewind |
|
| Search). Press to cancel a setting of timer program. |
|
| Press to correct digits when setting program (For |
|
| example: setting clock or timer program). Press to |
|
| add or delete channel numbers during channel preset. |
| – 9 – | EN |
1L25