IMPORTANT SAFETY INSTRUCTIONS
POWER SUPPLY
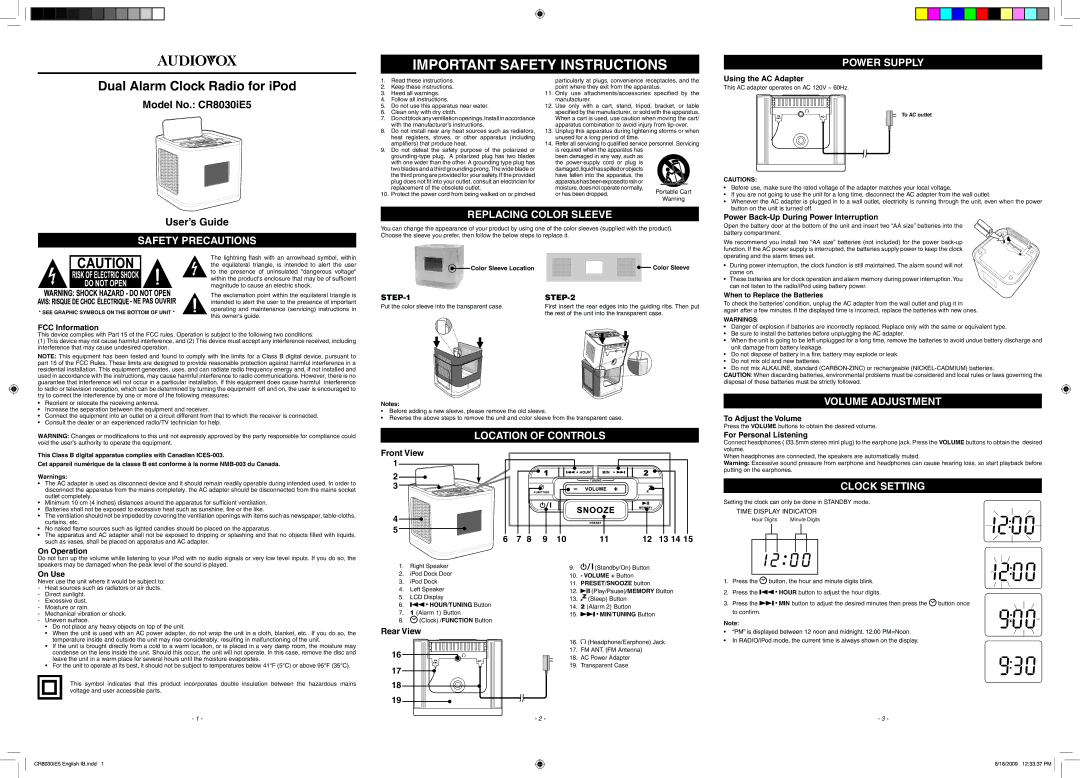
Dual Alarm Clock Radio for iPod
Model No.: CR8030iE5
1.Read these instructions.
2.Keep these instructions.
3.Heed all warnings.
4.Follow all instructions.
5.Do not use this apparatus near water.
6.Clean only with dry cloth.
7.Do not block any ventilation openings.Install in accordance with the manufacturer’s instructions.
8.Do not install near any heat sources such as radiators, heat registers, stoves, or other apparatus (including amplifiers) that produce heat.
9.Do not defeat the safety purpose of the polarized or
10.Protect the power cord from being walked on or pinched
particularly at plugs, convenience receptacles, and the point where they exit from the apparatus.
11.Only use attachments/accessories specified by the manufacturer.
12.Use only with a cart, stand, tripod, bracket, or table specified by the manufacturer, or sold with the apparatus. When a cart is used, use caution when moving the cart/ apparatus combination to avoid injury from
13.Unplug this apparatus during lightening storms or when unused for a long period of time.
14.Refer all servicing to qualified service personnel. Servicing is required when the apparatus has
been damaged in any way, such as
the
Using the AC Adapter
This AC adapter operates on AC 120V ~ 60Hz.
To AC outlet
CAUTIONS:
• Before use, make sure the rated voltage of the adapter matches your local voltage. | |
• | If you are not going to use the unit for a long time, disconnect the AC adapter from the wall outlet. |
• | Whenever the AC adapter is plugged in to a wall outlet, electricity is running through the unit, even when the power |
| button on the unit is turned off. |
User’s Guide
Safety Precautions
|
|
| The lightning flash with an arrowhead symbol, within | |
|
|
| ||
|
|
| the equilateral triangle, is intended to alert the user | |
|
|
| to the presence of uninsulated "dangerous voltage" | |
|
|
| ||
|
|
| within the product's enclosure that may be of sufficient | |
|
|
| magnitude to cause an electric shock. | |
|
|
| The exclamation point within the equilateral triangle is | |
|
|
| intended to alert the user to the presence of important | |
* SEE GRAPHIC SYMBOLS ON THE BOTTOM OF UNIT * | operating and maintenance (servicing) instructions in | |||
this owner's guide. | ||||
|
|
| ||
FCC Information
This device complies with Part 15 of the FCC rules. Operation is subject to the following two conditions:
(1)This device may not cause harmful interference, and (2) This device must accept any interference received, including interference that may cause undesired operation.
NOTE: This equipment has been tested and found to comply with the limits for a Class B digital device, pursuant to part 15 of the FCC Rules. These limits are designed to provide reasonable protection against harmful interference in a residential installation. This equipment generates, uses, and can radiate radio frequency energy and, if not installed and used in accordance with the instructions, may cause harmful interference to radio communications. However, there is no guarantee that interference will not occur in a particular installation. If this equipment does cause harmful interference to radio or television reception, which can be determined by turning the equipment off and on, the user is encouraged to try to correct the interference by one or more of the following measures:
•Reorient or relocate the receiving antenna.
•Increase the separation between the equipment and receiver.
•Connect the equipment into an outlet on a circuit different from that to which the receiver is connected.
•Consult the dealer or an experienced radio/TV technician for help.
WARNING: Changes or modifications to this unit not expressly approved by the party responsible for compliance could void the user’s authority to operate the equipment.
This Class B digital apparatus complies with Canadian
Cet appareil numérique de la classe B est conforme à la norme
Warnings:
•The AC adapter is used as disconnect device and it should remain readily operable during intended used. In order to disconnect the apparatus from the mains completely, the AC adapter should be disconnected from the mains socket outlet completely.
•Minimum 10 cm (4 inches) distances around the apparatus for sufficient ventilation.
•Batteries shall not be exposed to excessive heat such as sunshine, fire or the like.
•The ventilation should not be impeded by covering the ventilation openings with items such as newspaper,
•No naked flame sources such as lighted candles should be placed on the apparatus.
•The apparatus and AC adapter shall not be exposed to dripping or splashing and that no objects filled with liquids, such as vases, shall be placed on apparatus and AC adapter.
On Operation
Do not turn up the volume while listening to your iPod with no audio signals or very low level inputs. If you do so, the speakers may be damaged when the peak level of the sound is played.
On Use
Never use the unit where it would be subject to:
-Heat sources such as radiators or air ducts.
-Direct sunlight.
-Excessive dust.
-Moisture or rain.
-Mechanical vibration or shock.
-Uneven surface.
•Do not place any heavy objects on top of the unit.
•When the unit is used with an AC power adapter, do not wrap the unit in a cloth, blanket, etc.. If you do so, the temperature inside and outside the unit may rise considerably, resulting in malfunctioning of the unit.
•If the unit is brought directly from a cold to a warm location, or is placed in a very damp room, the moisture may condense on the lens inside the unit. Should this occur, the unit will not operate. In this case, remove the disc and leave the unit in a warm place for several hours until the moisture evaporates.
•For the unit to operate at its best, it should not be subject to temperatures below 41°F (5°C) or above 95°F (35°C).
This symbol indicates that this product incorporates double insulation between the hazardous mains
voltage and user accessible parts.
- 1 -
replacing COLOR SLEEVE
You can change the appearance of your product by using one of the color sleeves (supplied with the product). Choose the sleeve you prefer, then follow the below steps to replace it.
|
| Color Sleeve Location |
|
|
|
| Color Sleeve |
|
|
|
|
|
| ||
|
|
|
|
|
| ||
Put the color sleeve into the transparent case. | First insert the rear edges into the guiding ribs. Then put | ||||||
|
|
| the rest of the unit into the transparent case. | ||||
Notes:
•Before adding a new sleeve, please remove the old sleeve.
•Reverse the above steps to remove the unit and color sleeve from the transparent case.
LOCATION OF CONTROLS |
|
| |||||
Front View |
|
|
|
|
|
|
|
1 |
|
|
|
|
|
|
|
2 |
|
|
|
|
|
|
|
3 |
|
|
|
|
|
|
|
4 |
|
|
|
|
|
|
|
5 |
|
|
|
|
|
|
|
6 | 7 | 8 | 9 | 10 | 11 | 12 | 13 14 15 |
1. | Right Speaker | 9. |
|
|
|
|
| (Standby/On) Button | |||||||||
|
|
|
|
| |||||||||||||
|
|
|
|
| |||||||||||||
2. | iPod Dock Door |
|
|
|
|
| |||||||||||
10. - VOLUME + Button | |||||||||||||||||
3. | iPod Dock | 11. PRESET/SNOOZE button | |||||||||||||||
4. | Left Speaker | 12. |
|
|
|
| (Play/Pause)/MEMORY Button | ||||||||||
|
|
| |||||||||||||||
5. | LCD Display |
|
|
| |||||||||||||
13. |
|
| (Sleep) Button | ||||||||||||||
6. |
| HOUR/TUNING Button |
|
| |||||||||||||
| 14. 2 (Alarm 2) Button | ||||||||||||||||
| |||||||||||||||||
7. | 1 (Alarm 1) Button | 15. |
|
|
|
|
| MIN/TUNING Button | |||||||||
|
|
|
|
| |||||||||||||
8. |
| (Clock) /FUNCTION Button |
|
|
|
|
| ||||||||||
|
|
|
|
|
|
|
| ||||||||||
Rear View |
|
|
|
|
|
|
| ||||||||||
|
|
|
|
|
|
|
|
|
|
| 16. |
|
| (Headphone/Earphone) Jack | |||
16 |
|
|
|
|
|
|
|
|
|
| 17. | FM ANT. (FM Antenna) | |||||
|
|
|
|
|
|
|
|
|
| ||||||||
|
|
|
|
|
|
|
|
|
| 18. | AC Power Adapter | ||||||
|
|
|
|
|
|
|
|
| |||||||||
|
|
|
|
|
|
|
|
| |||||||||
17 |
|
|
|
|
|
|
|
|
|
| 19. | Transparent Case | |||||
|
|
|
|
|
|
|
|
|
|
|
|
|
|
|
|
| |
|
|
|
|
|
|
|
|
|
|
|
|
|
|
|
| ||
18 |
|
|
|
|
|
|
|
|
|
|
|
|
|
|
|
|
|
|
|
|
|
|
|
|
|
|
|
|
|
|
|
|
| ||
19 |
|
|
|
|
|
|
|
|
|
| - 2 - |
|
|
|
|
|
|
|
|
|
|
|
|
|
|
|
|
|
|
|
|
|
| ||
|
|
|
|
|
|
|
|
|
|
|
|
|
|
|
|
| |
Power Back-Up During Power Interruption
Open the battery door at the bottom of the unit and insert two “AA size” batteries into the battery compartment.
We recommend you install two “AA size” batteries (not included) for the power
• During power interruption, the clock function is still maintained. The alarm sound will not come on.
• These batteries are for clock operation and alarm memory during power interruption.You can not listen to the radio/iPod using battery power.
When to Replace the Batteries
To check the batteries’ condition, unplug the AC adapter from the wall outlet and plug it in again after a few minutes. If the displayed time is incorrect, replace the batteries with new ones.
WARNINGS:
•Danger of explosion if batteries are incorrectly replaced. Replace only with the same or equivalent type.
•Be sure to install the batteries before unplugging the AC adapter.
•When the unit is going to be left unplugged for a long time, remove the batteries to avoid undue battery discharge and unit damage from battery leakage.
•Do not dispose of battery in a fire; battery may explode or leak.
•Do not mix old and new batteries.
•Do not mix ALKALINE, standard
CAUTION: When discarding batteries, environmental problems must be considered and local rules or laws governing the disposal of these batteries must be strictly followed.
VOLUME ADJUSTMENT
To Adjust the Volume
Press the VOLUME buttons to obtain the desired volume.
For Personal Listening
Connect headphones ( Ø3.5mm stereo mini plug) to the earphone jack. Press the VOLUME buttons to obtain the desired volume.
When headphones are connected, the speakers are automatically muted.
Warning: Excessive sound pressure from earphone and headphones can cause hearing loss, so start playback before putting on the earphones.
clock setting
Setting the clock can only be done in STANDBY mode.
TIME DISPLAY INDICATOR
Hour Digits | Minute Digits | ||||||
|
|
|
|
|
|
|
|
|
|
|
|
|
|
|
|
|
|
|
|
|
|
|
|
|
|
|
|
|
|
|
|
|
|
|
|
|
|
|
|
1. Press the![]() button, the hour and minute digits blink.
button, the hour and minute digits blink.
2.Press the ![]()
![]() HOUR button to adjust the hour digits.
HOUR button to adjust the hour digits.
3.Press the![]()
![]()
![]() MIN button to adjust the desired minutes then press the
MIN button to adjust the desired minutes then press the ![]() button once
button once
to confirm.
Note:
•“PM” is displayed between 12 noon and midnight. 12:00 PM=Noon.
•In RADIO/iPod mode, the current time is always shown on the display.
- 3 -
CR8030iE5 English IB.indd 1
8/18/2009 12:33:37 PM ![]()