VOH684/VOH704

Note: cables exiting the pod should be routed as sho wn.

R e d: +1 2 V D C (Accessory C ir.)

Bla ck: Gro un d


12 Pin Power signal

Po w e r H a rn ess


Item # 4

Mini-Din Connectors

c ho ke


O ption al Hard Wired F M M od ulato r O utpu t


12 V DC Powe r an d Groun d


RCA-Female


Left


Am/Fm


Inpu t


TO

Antenn a

FM


LE FT


WHITE


Modulator


Pa tch Co rd

FACTORY


RIG HT


1070610


RCA Ma le to Male

RADIO

Dash Radio


RED

*Refer t o Instructions with the RF

Rig ht


Mod ulato r K it fo r fu rthe r d etails.

Inpu t


RCA-Female


To Seco nd ary AV M on ito r


TO


INPUT

RCA-Female

Acce ssory

12 V DC Powe r an d Groun d

Harness

OPTIONAL

VIDE O


Item # 2


ADDITIONAL

Auxillary


LINE


O UT

MOINTOR


Pa tch Co rd


video display


VIDE O


RCA Ma le to Male


Power Connecto r


IR LE D:

4 Pin

O ption al External S peakers

Cle an the IR Receive r W ind ow on the fro nt of the VCP.

Remo ve A dhesive Backing a nd App ly IR LED t o IR

Window o n the Face of th e VCP.

G ree n (Right+)

Black (Ground )

G ray (Left+ )

2 1

TV an tenna (If applicable)

Connect to FM radio antenna or equivalent.

Acce ssory

Harness

Item # 2

Red RCA (Audio Rig ht)

Wh ite RCA (Audio Left)

Ye llo w RCA (Vid eo)

"Y" A dapter for use with Non-Ste reo Installations Item # 5

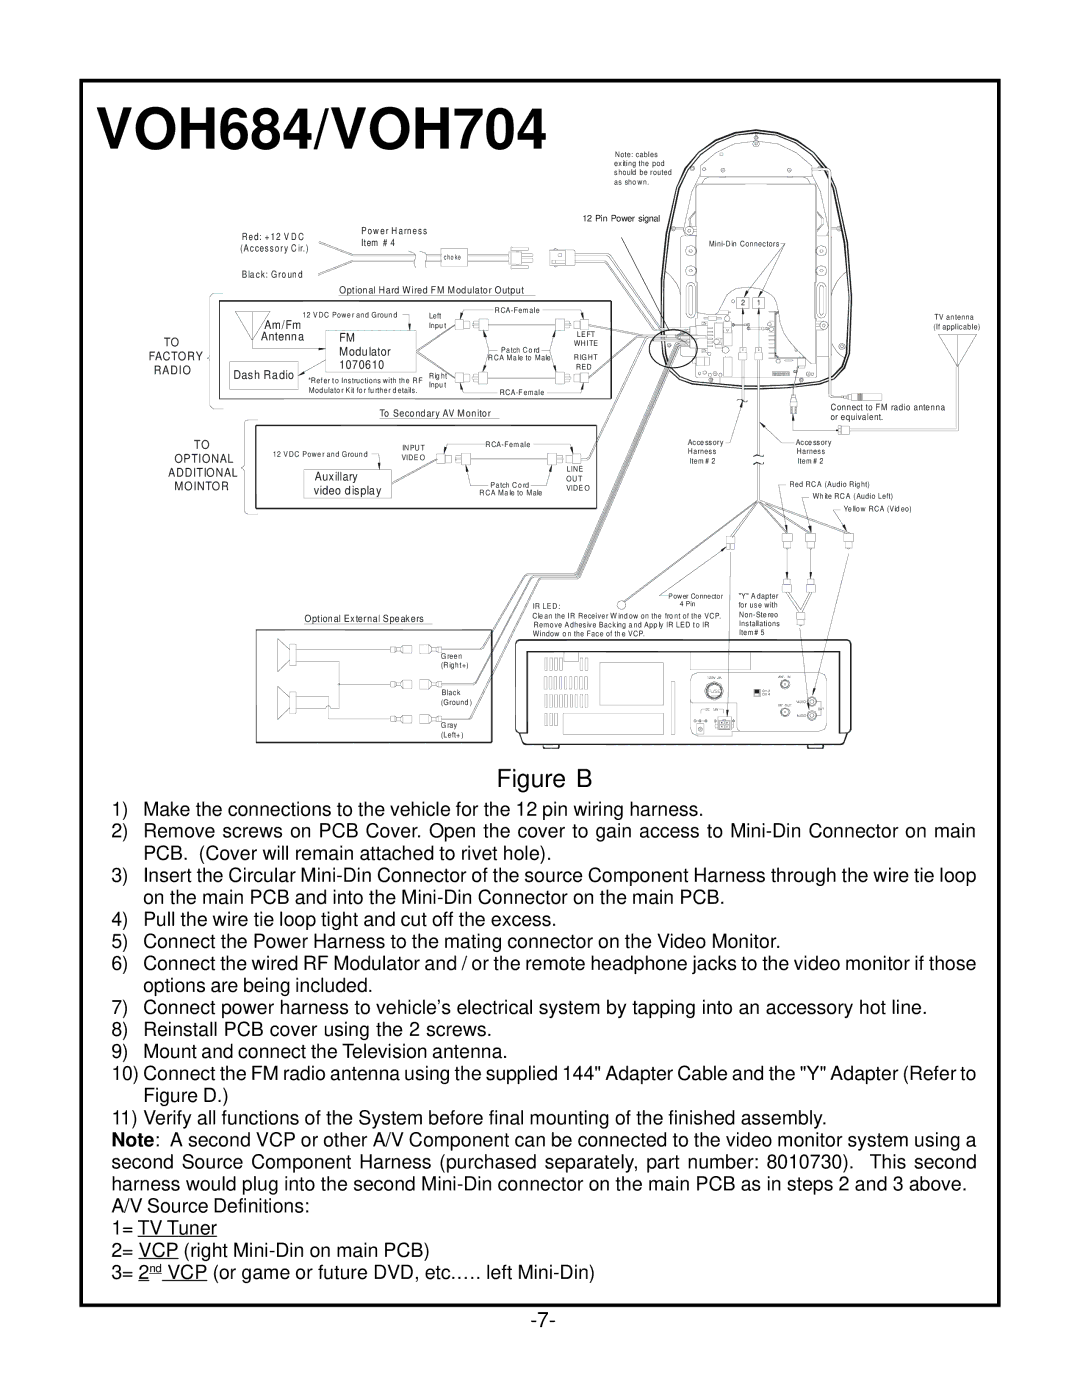
Figure B

1)Make the connections to the vehicle for the 12 pin wiring harness.

2)Remove screws on PCB Cover. Open the cover to gain access to Mini-Din Connector on main PCB. (Cover will remain attached to rivet hole).

3)Insert the Circular Mini-Din Connector of the source Component Harness through the wire tie loop on the main PCB and into the Mini-Din Connector on the main PCB.

4)Pull the wire tie loop tight and cut off the excess.

5)Connect the Power Harness to the mating connector on the Video Monitor.

6)Connect the wired RF Modulator and / or the remote headphone jacks to the video monitor if those options are being included.

7)Connect power harness to vehicle’s electrical system by tapping into an accessory hot line.

8)Reinstall PCB cover using the 2 screws.

9)Mount and connect the Television antenna.

10)Connect the FM radio antenna using the supplied 144" Adapter Cable and the "Y" Adapter (Refer to Figure D.)

11)Verify all functions of the System before final mounting of the finished assembly.

Note: A second VCP or other A/V Component can be connected to the video monitor system using a

second Source Component Harness (purchased separately, part number: 8010730). This second harness would plug into the second Mini-Din connector on the main PCB as in steps 2 and 3 above. A/V Source Definitions:

1= TV Tuner

2= VCP (right Mini-Din on main PCB)

3= 2nd VCP (or game or future DVD, etc.…. left Mini-Din)

-7-

Page 9
Image 9
Audiovox VOH683 owner manual VOH684/VOH704

VOH683, VOH684, VOH704 specifications

The Audiovox VOH704 is a versatile and innovative mobile entertainment system designed to enhance your in-car experience, making long journeys more enjoyable for all passengers. This unit combines state-of-the-art technology with user-friendly features, catering to a range of entertainment needs while on the road.

One of the standout features of the VOH704 is its impressive 7-inch high-resolution LCD display. This screen delivers crisp, vibrant visuals, providing an engaging viewing experience for movies, TV shows, and video games. Its widescreen format is optimized for a cinematic experience, allowing passengers to enjoy a variety of media formats with ease.

The VOH704 is equipped with a built-in DVD player, which supports multiple playback formats, including DVD, CD, and MP3. This versatility ensures that users can enjoy a wide variety of media, whether it's their favorite movies or music playlists. Additionally, the unit is compatible with various video formats, thus accommodating an extensive selection of media files.

Connectivity is another strong point for the Audiovox VOH704. The system comes with USB and SD card inputs, allowing users to easily access their digital media collections. Furthermore, the HDMI input provides seamless connections to external devices such as smartphones, tablets, or gaming consoles, expanding the entertainment options available for passengers.

To facilitate a comfortable viewing experience, the VOH704 features an adjustable mounting system, allowing users to find the perfect viewing angle. This is particularly beneficial for backseat passengers who might have varying preferences for screen placement.

In terms of audio performance, the Audiovox VOH704 does not disappoint. The system incorporates built-in speakers that deliver clear and powerful sound. For those who prefer a more immersive audio experience, users can also connect to their vehicle's sound system via auxiliary input.

Safety and usability are also taken into consideration in the design of the VOH704. The intuitive interface and remote control make it easy for users to navigate through menus and select their desired content without distraction. Additionally, parental controls are built into the system, ensuring that younger passengers can enjoy age-appropriate content.

Overall, the Audiovox VOH704 is a well-rounded mobile entertainment solution that combines impressive display technology with connectivity options, making it a valuable addition to any vehicle. Whether for long road trips or daily commutes, this system helps to transform travel time into quality entertainment time.