MINI CONSOLE INSTALLATION:

This page only covers special installation considerations for the mini-console installation. If the video monitor is to be installed with a custom full sized overhead console, refer to page 3.

If the video monitor is to be installed in a vehicle with the mini console (P/N 102D3595), this console may need to be trimmed to fit the contour of the vehicle headliner.

1)In this installation, the video monitor is mounted directly to the overhead cross-member in the roof using the mounting screw bosses. These screw bosses should contact the cross-member di- rectly (i.e.: no gap between the screw boss and the roof structure). Also, be sure that the screws do not pierce the outer roof skin when fully fastened to the cross-member. The mini-console is attached to the video monitor using the perimeter screw bosses. It is important that the screws used in this installation are not overtightened, and that the video monitor and mini-console are mounted in such a way that the assembly does not distort (or bend) when the mounting screws are tightened. An alternate method is to use a piece of plywood (5"x9"x3/4"). First secure the plywood block to the cross-member, then screw the monitor into the plywood. See the drawing on page 5.

2)It is best to mount the video monitor to the roof structure without the mini-console first. There should be a gap between the headliner and the outer flange of the video monitor. The mini-console should be cut to full this gap. Apply masking tape to the outer surface of the mini-console in the areas where the cut will be made.

3)Mark the cut to follow the necessary contour of the roof. The suggested method of marking is as follows:

A)First mark the narrowest point of the mini-console on the masking tape. Be careful to consider not only vertical location, but fore-aft location.

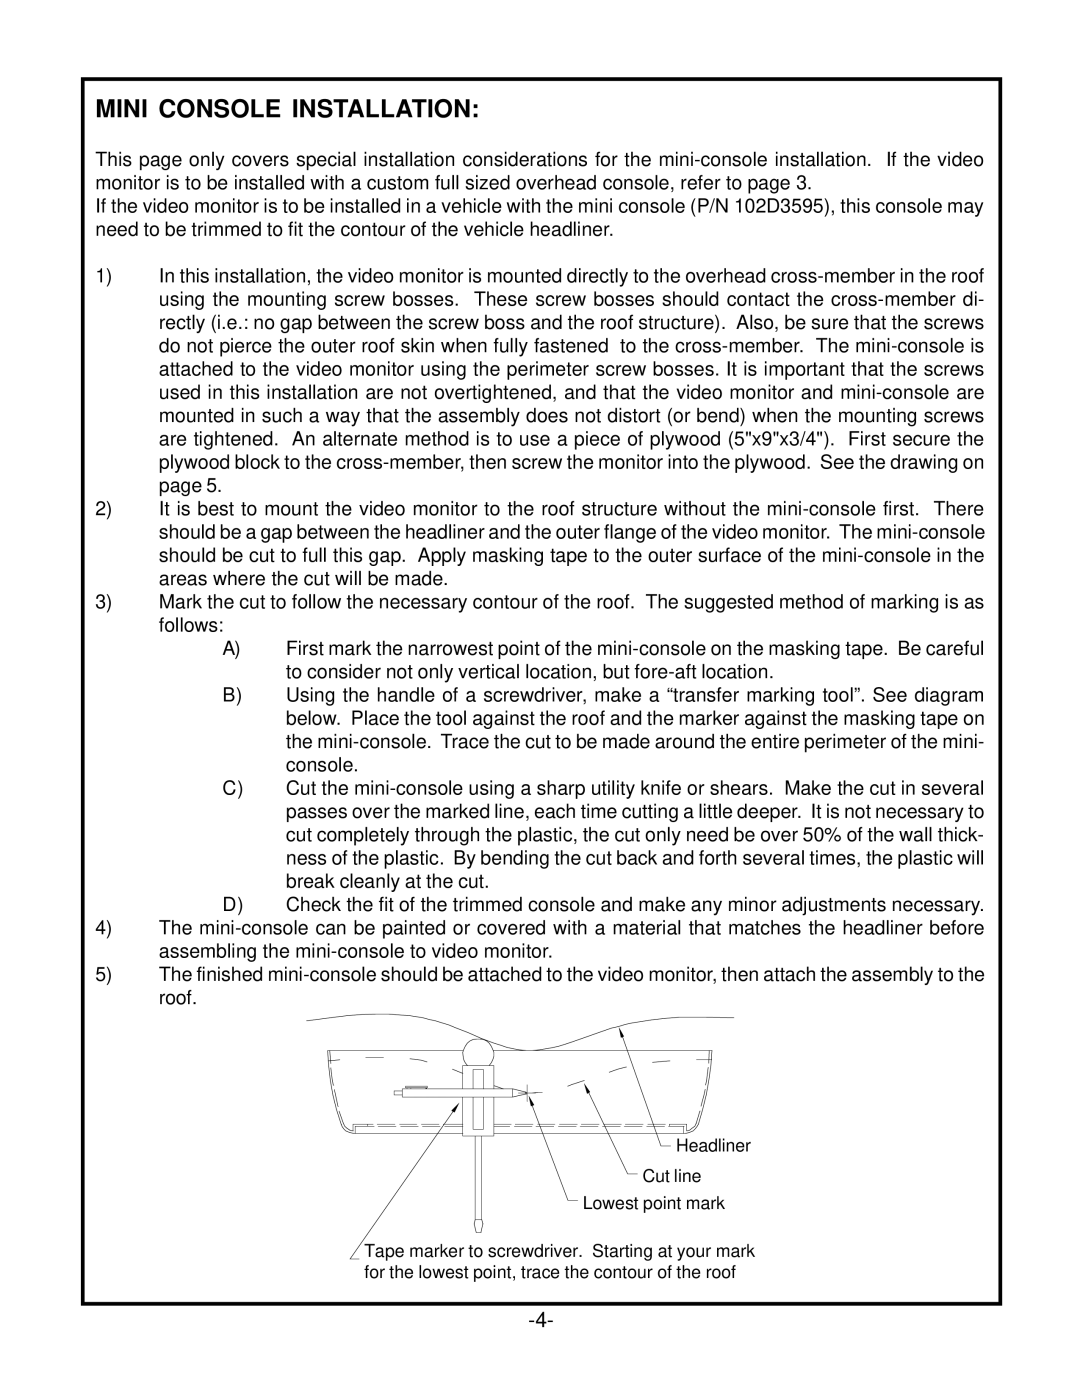
B)Using the handle of a screwdriver, make a “transfer marking tool”. See diagram below. Place the tool against the roof and the marker against the masking tape on the mini-console. Trace the cut to be made around the entire perimeter of the mini- console.

C)Cut the mini-console using a sharp utility knife or shears. Make the cut in several passes over the marked line, each time cutting a little deeper. It is not necessary to cut completely through the plastic, the cut only need be over 50% of the wall thick- ness of the plastic. By bending the cut back and forth several times, the plastic will break cleanly at the cut.

D)Check the fit of the trimmed console and make any minor adjustments necessary.

4)The mini-console can be painted or covered with a material that matches the headliner before assembling the mini-console to video monitor.

5)The finished mini-console should be attached to the video monitor, then attach the assembly to the roof.

Headliner

Cut line

Lowest point mark

Tape marker to screwdriver. Starting at your mark for the lowest point, trace the contour of the roof

-4-

Page 6
Image 6
Audiovox VOH704, VOH684, VOH683 owner manual Mini Console Installation

VOH683, VOH684, VOH704 specifications

The Audiovox VOH704 is a versatile and innovative mobile entertainment system designed to enhance your in-car experience, making long journeys more enjoyable for all passengers. This unit combines state-of-the-art technology with user-friendly features, catering to a range of entertainment needs while on the road.

One of the standout features of the VOH704 is its impressive 7-inch high-resolution LCD display. This screen delivers crisp, vibrant visuals, providing an engaging viewing experience for movies, TV shows, and video games. Its widescreen format is optimized for a cinematic experience, allowing passengers to enjoy a variety of media formats with ease.

The VOH704 is equipped with a built-in DVD player, which supports multiple playback formats, including DVD, CD, and MP3. This versatility ensures that users can enjoy a wide variety of media, whether it's their favorite movies or music playlists. Additionally, the unit is compatible with various video formats, thus accommodating an extensive selection of media files.

Connectivity is another strong point for the Audiovox VOH704. The system comes with USB and SD card inputs, allowing users to easily access their digital media collections. Furthermore, the HDMI input provides seamless connections to external devices such as smartphones, tablets, or gaming consoles, expanding the entertainment options available for passengers.

To facilitate a comfortable viewing experience, the VOH704 features an adjustable mounting system, allowing users to find the perfect viewing angle. This is particularly beneficial for backseat passengers who might have varying preferences for screen placement.

In terms of audio performance, the Audiovox VOH704 does not disappoint. The system incorporates built-in speakers that deliver clear and powerful sound. For those who prefer a more immersive audio experience, users can also connect to their vehicle's sound system via auxiliary input.

Safety and usability are also taken into consideration in the design of the VOH704. The intuitive interface and remote control make it easy for users to navigate through menus and select their desired content without distraction. Additionally, parental controls are built into the system, ensuring that younger passengers can enjoy age-appropriate content.

Overall, the Audiovox VOH704 is a well-rounded mobile entertainment solution that combines impressive display technology with connectivity options, making it a valuable addition to any vehicle. Whether for long road trips or daily commutes, this system helps to transform travel time into quality entertainment time.