Installation Guide
Legal Considerations
Trademark Acknowledgments
Electromagnetic Compatibility EMC
Korea Equipment Modifications
Safeguards
Battery replacement
Page
Axis Q1602-E/AXIS Q1604-E Network Camera Installation Guide
Package contents
Bottom view
Hardware overview
Rear view
Sunshield adjustment Screw
Safety wire tab
Sunshield
Top cover
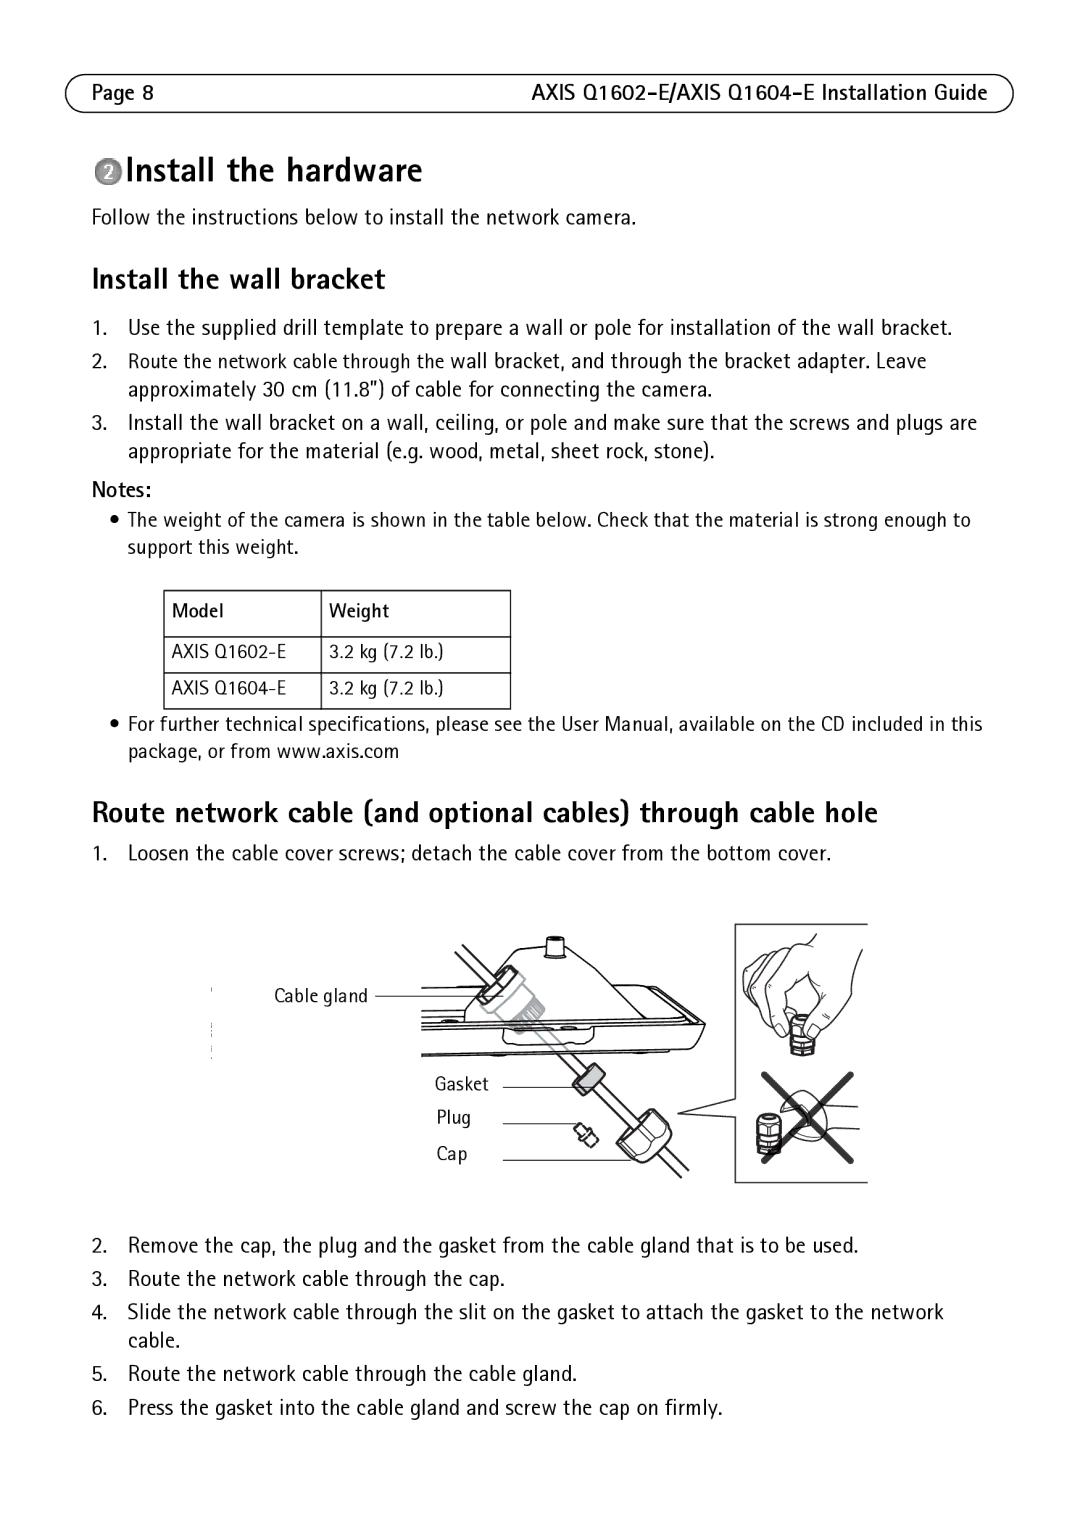
Install the hardware
Install the wall bracket
Follow the instructions below to install the network camera
Model Weight
Attach camera to the wall bracket
Cold Start-up Delay Switch
This switch is enabled by default ensure it remains on
Connect the cables
Attach top cover
Assign an IP address
Method Recommended for
Set the IP address manually optional
Axis IP Utility single camera/small installation
Automatic discovery
Axis Camera Management multiple cameras/large installations
Assign an IP address in a single device
Assign IP addresses in multiple devices
Click OK
Set the password
Click the Create self-signed certificate button
Access the video stream
If required, click the link to install missing decoders
Adjust zoom and focus
Focus puller Control button Zoom puller Status LED
Focus Assistant
Save the key for future reference
Other methods of setting the IP address
Axis Video Hosting System Avhs
Unit connectors
Set the IP address with ARP/Ping
Pin
Color Indication
LED indicators on camera
Function Pin Specifications
Status LED on camera when using the Focus Assistant
Status LED on housing fan/heater
Resetting to the Factory Default settings
Accessing the camera from the Internet
Further information
Tip
Remplacement des piles
Mesures de sécurité
Procédure d’installation
Axis Q1602-E/AXIS Q1604-E Guide d’installation
Contenu de l’emballage
Article Modèles/variantes/remarques
Entrée audio
Vue d’ensemble du matériel
Vue de derrière
Support mural
Pare-soleil
Couvercle supérieur
Installation du matériel
Installation du support mural
Procédez comme suit pour installer la caméra réseau
Remarques
Axis Q1602-E/AXIS Q1604-E Guide d’installation Remarques
Fixation de la caméra au support mural
Branchement des câbles
Remarque
Fixation du couvercle supérieur
Commutateur de report de démarrage à froid
Méthode Recommandée pour Système ’exploitation
Attribution d’une adresse IP
Axis IP Utility Une seule caméra/petite installation
Détection automatique
Définir manuellement l’adresse IP optionnel
Sélectionnez la caméra réseau dans la liste
Attribution d’une adresse IP à une seule caméra
Attribution d’adresses IP à plusieurs périphériques
Configuration du mot de passe
Accès au flux de données vidéo
Réglage du zoom et de la mise au point
Pour régler le zoom et la mise au point, procédez comme suit
Commande de zoom Voyant d’état
Assistant de mise au point
Continuez avec les étapes 6 à 8 à la
Remarques Système ’exploitation Avhs Service
Autres méthodes de définition de l’adresse IP
Enregistrez la clé pour référence ultérieure
Serveur Dhcp
Repérez le numéro de série S/N sur l’étiquette de la caméra
Connecteurs de l’appareil
Définition de l’adresse IP à l’aide d’ARP/Ping
Logement pour carte mémoire SD
Connecteur pour terminaux d’E/S Utilisé dans des
Applications telles que la détection de mouvements, le
Et d’une broche GND, il assure l’interface avec
Broche
Couleur Indication
Voyants lumineux sur la caméra
Voyant Couleur Indication
Voyant d’état du boîtier ventilateur/chauffe-glace
Rétablissement des paramètres d’usine par défaut
Accès à la caméra par Internet
Plus d’informations
Conseil
Sicherheitsvorkehrungen
Batteriewechsel
Installationsschritte
Axis Q1602-E/AXIS Q1604-E Installationsanleitung
Lieferumfang
Wichtig
Hardwareübersicht
Rückansicht
Ansicht von unten
Seite
Obere Abdeckung, untere Abdeckung, Wandhalterung
Installation der Hardware
Installation der Wandhalterung
Hinweise
Modell Gewicht
Ansc hlussmuffe Dichtung Stecker Kappe
Befestigen der Kamera an der Wandhalterung
Anschließen der Kabel
Hinweis
Obere Abdeckung montieren
Schalter für Kaltstartverzögerung
Zuweisen einer IP-Adresse
Methode Empfohlen für Betriebssystem
Manuelle Zuweisung der IP-Adresse optional
Axis IP Utility einzelne Kamera/kleine Installation
Automatische Erkennung
Axis Camera Management mehrere Kameras/große Installationen
Zuweisen einer IP-Adresse für ein einzelnes Gerät
Zuweisen von IP-Adressen für mehrere Geräte
IP zuweisen
Seite
Festlegen des Kennworts
Seite
Zugriff auf den Videostrom
Zoom und Bildschärfe einstellen
Fokus-Assistent
Schärfenzieher Steuertaste Zoomregler Status-LED
Seite
AVHS-Service
Andere Methoden zum Festlegen der IP-Adresse
Hinweise
DHCP-Server
Zuweisen der IP-Adresse per ARP/Ping
Windows-Syntax
Geräteanschlüsse
Speicherkarteneinschub
Kontakt 4 Kontakt
Kontakt 3 Kontakt
Die Ausgabeschaltflächen auf der Seite Live View Live
Weitere Informationen hierzu finden Sie im Benutzerhandbuch
Farbe Bedeutung
Axis Q1602-E/AXIS Q1604-E Installationsanleitung Seite
LED-Anzeigen an der Kamera
Status-LED am Gehäuse Lüfter/Heizung
Tipp
Zugriff auf die Kamera über das Internet
Weitere Informationen
Precauzioni
Sostituzione della batteria
Procedura di installazione
Guida allinstallazione di Axis Q1602-E/AXIS Q1604-E
Contenuto della confezione
Importante
Panoramica dell’hardware
Vista posteriore
Vista dal basso
Pagina
Parasole
Copertura superiore
Viti della copertura Inferiore
Coperchio dei cavi
Modello Peso
Installazione dellhardware
Installare la staffa di montaggio a parete
Italiano
Montare la telecamera sulla staffa a parete
Nota
Collegamento dei cavi
Interruttore di ritardo per lavvio a freddo
Fissare la copertura superiore
Assegnazione di un indirizzo IP
Metodo Consigliato per Sistema operativo
Axis IP Utility telecamera singola/piccole installazioni
Vedere a pagina 87 le istruzioni per impostare la password
Rilevamento automatico
Assegnazione manuale dell’indirizzo IP facoltativa
Axis Camera Management più telecamere/grandi installazioni
Assegnazione di un indirizzo IP a una singola telecamera
Assegnazione degli indirizzi IP a più telecamere
Fare clic su OK
Pagina
Impostazione della password
Pagina
Accesso al flusso video
Regolazione dello zoom e della messa a fuoco
Fuoco
Levetta zoom Comando LED di stato
Pagina
Altri metodi di assegnazione dell’indirizzo IP
Conservare la chiave come riferimento per il futuro
Operativo Connessione al
Servizio Avhs
Connettori
Assegnazione dellindirizzo IP con ARP/Ping
Lingresso dellalimentazione non utilizzato
Il canale sinistro è usato da un segnale in stereo
Attivate mediante API VAPIX, tramite i pulsanti di
Controllo nella pagina Live View immagini dal vivo
Per ulteriori informazioni, consultare la Guida per lutente
Funzione Pin Specifiche
Indicatori LED sulla videocamera
Pagina
Colore Indicazione
Colore
Lampeggio triplo Errore generale
LED di stato nellalloggiamento ventola/riscaldatore
Accesso alla telecamera da Internet
Ripristino delle impostazioni predefinite
Ulteriori informazioni
Suggerimento
Medidas preventivas
Sustitución de la batería
Contenido del paquete
Pasos para la instalación
Guía de instalación de la Axis Q1602-E/AXIS Q1604-E
Ajuste del zoom y el enfoque. Véase la página
Presentación del hardware
Vista inferior
Página
Entrada de audio
Soporte de pared
Cubierta superior, cubierta inferior, soporte de pared
Cable de red pasar Través del soporte de pared
Instalación del hardware
Instalación del soporte de pared
Notas
Modelo Peso
Pre nsaestopas Junta Tapón Tapa
Fijación de la cámara al soporte de pared
Conexión de los cables
Fijación de la cubierta superior
Botón Retraso de inicio en frío
Asignación de una dirección IP
Método Recomendado para Sistema operativo
Dispositivo seleccionado y escriba la dirección IP
Configuración manual de la dirección IP opcional
Detección automática
Asignación de una dirección IP en un dispositivo individual
Asignación de direcciones IP en varios dispositivos
Configuración de la contraseña
Acceso a la transmisión de vídeo
Ajuste del zoom y el enfoque
Apriete de nuevo los botones del zoom y de enfoque
Asistente de enfoque
Otros métodos para configurar la dirección IP
Continúe con los pasos 6 8 en la página
Uso en sistema Notas Operativo
Servicio de DNS
Configuración de la dirección IP con ARP/Ping
Conserve la clave para referencia en el futuro
Conectores
Para obtener más información, consulte el Manual del usuario
Función Pin Notas Especificaciones
Indicadores LED en la cámara
Color Indicación
LED de estado en la carcasa ventilador/calefactor
Restablecimiento de los valores iniciales
Acceso a la cámara desde Internet
Más información
Un consejo
Page
Ver