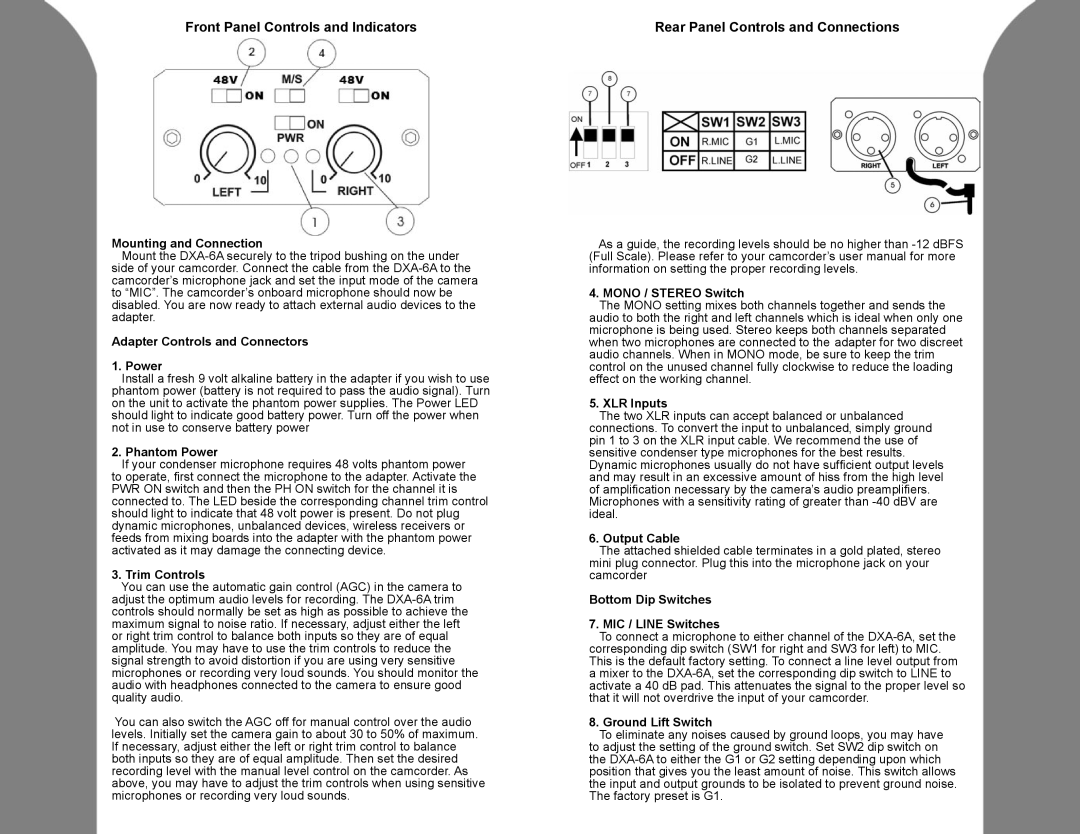
Front Panel Controls and Indicators

Rear Panel Controls and Connections

Mounting and Connection

Mount the DXA-6A securely to the tripod bushing on the under side of your camcorder. Connect the cable from the DXA-6A to the camcorder’s microphone jack and set the input mode of the camera to “MIC”. The camcorder’s onboard microphone should now be disabled. You are now ready to attach external audio devices to the adapter.

Adapter Controls and Connectors

1. Power

Install a fresh 9 volt alkaline battery in the adapter if you wish to use phantom power (battery is not required to pass the audio signal). Turn on the unit to activate the phantom power supplies. The Power LED should light to indicate good battery power. Turn off the power when not in use to conserve battery power

2. Phantom Power

If your condenser microphone requires 48 volts phantom power to operate, first connect the microphone to the adapter. Activate the PWR ON switch and then the PH ON switch for the channel it is connected to. The LED beside the corresponding channel trim control should light to indicate that 48 volt power is present. Do not plug dynamic microphones, unbalanced devices, wireless receivers or feeds from mixing boards into the adapter with the phantom power activated as it may damage the connecting device.

3. Trim Controls

You can use the automatic gain control (AGC) in the camera to adjust the optimum audio levels for recording. The DXA-6A trim controls should normally be set as high as possible to achieve the maximum signal to noise ratio. If necessary, adjust either the left or right trim control to balance both inputs so they are of equal amplitude. You may have to use the trim controls to reduce the signal strength to avoid distortion if you are using very sensitive microphones or recording very loud sounds. You should monitor the audio with headphones connected to the camera to ensure good quality audio.

You can also switch the AGC off for manual control over the audio levels. Initially set the camera gain to about 30 to 50% of maximum. If necessary, adjust either the left or right trim control to balance both inputs so they are of equal amplitude. Then set the desired recording level with the manual level control on the camcorder. As above, you may have to adjust the trim controls when using sensitive microphones or recording very loud sounds.

As a guide, the recording levels should be no higher than -12 dBFS (Full Scale). Please refer to your camcorder’s user manual for more information on setting the proper recording levels.

4. MONO / STEREO Switch

The MONO setting mixes both channels together and sends the audio to both the right and left channels which is ideal when only one microphone is being used. Stereo keeps both channels separated when two microphones are connected to the adapter for two discreet audio channels. When in MONO mode, be sure to keep the trim control on the unused channel fully clockwise to reduce the loading effect on the working channel.

5. XLR Inputs

The two XLR inputs can accept balanced or unbalanced connections. To convert the input to unbalanced, simply ground pin 1 to 3 on the XLR input cable. We recommend the use of sensitive condenser type microphones for the best results. Dynamic microphones usually do not have sufficient output levels and may result in an excessive amount of hiss from the high level of amplification necessary by the camera’s audio preamplifiers. Microphones with a sensitivity rating of greater than -40 dBV are ideal.

6. Output Cable

The attached shielded cable terminates in a gold plated, stereo mini plug connector. Plug this into the microphone jack on your camcorder

Bottom Dip Switches

7. MIC / LINE Switches

To connect a microphone to either channel of the DXA-6A, set the corresponding dip switch (SW1 for right and SW3 for left) to MIC. This is the default factory setting. To connect a line level output from a mixer to the DXA-6A, set the corresponding dip switch to LINE to activate a 40 dB pad. This attenuates the signal to the proper level so that it will not overdrive the input of your camcorder.

8. Ground Lift Switch

To eliminate any noises caused by ground loops, you may have to adjust the setting of the ground switch. Set SW2 dip switch on the DXA-6A to either the G1 or G2 setting depending upon which position that gives you the least amount of noise. This switch allows the input and output grounds to be isolated to prevent ground noise. The factory preset is G1.

Page 2
Image 2
BeachTek DXA-6A Mounting and Connection, Adapter Controls and Connectors Power, Trim Controls, Mono / Stereo Switch

DXA-6A specifications

The BeachTek DXA-6A is an innovative audio interface designed specifically for DSLR and mirrorless cameras, providing an exceptional solution for filmmakers and videographers who require superior sound quality without compromising on portability. This compact and lightweight unit is engineered to enhance the audio capabilities of your camera by allowing for professional-grade microphones to be connected easily, thereby elevating the overall production quality.

One of the standout features of the DXA-6A is its dual-channel design, accommodating both XLR microphones and line-level sources. This flexibility allows users to capture sound from various sources, such as boom mics, handheld devices, or external mixers, making it ideal for interviews, events, or narrative filmmaking. The DXA-6A also boasts a built-in low-cut filter, which effectively reduces unwanted low-frequency noise, such as wind or handling sounds, ensuring clean audio capture.

The unit incorporates high-quality microphone preamps, providing a clean and transparent signal path. With a substantial gain range, the DXA-6A can amplify weak signals while ensuring low noise levels, which is crucial for getting the best sound in challenging environments. Additionally, the device features adjustable input levels, enabling precise control over audio recording and allowing users to adapt swiftly to different situations.

Another significant technological aspect of the DXA-6A is its ability to provide phantom power (48V) to condenser microphones, which is essential for ensuring optimal performance of these sensitive devices. This feature broadens the range of compatible microphones, empowering users to choose the best tool for their sound requirements.

The ergonomic design and durable construction of the DXA-6A make it well-suited for on-the-go use. The interface can be easily mounted on top of a camera or tripod, keeping your setup compact and easy to manage. Furthermore, the clear LED indicators provide visual feedback on audio levels, ensuring that you are always aware of your recording state.

In summary, the BeachTek DXA-6A combines advanced audio technology with user-friendly features, making it an essential tool for anyone serious about capturing high-quality sound in their video projects. Its versatility, reliability, and portability make it a top choice for professionals looking to enhance their filmmaking experience.