REVERSING THE DOOR

We recommend that you reverse the door before switching on for the first time.

Tools required: Small and medium size flat and cross-headed screwdrivers, a pair of pliers.

Spare Parts supplied in the plastic bag: The following parts, which are exclusively for left hand side fitted hinge operation are supplied in a plastic bag with the appliance:

-Door top trim hinge covers – there are 2 different parts, one for each side of top trim.

(12)

We suggest you keep all the parts supplied in the plastic bag and also parts, which have been removed when reversing

2

5

the door, in a safe place for possible future, re-use.

IMPORTANT: We suggest you ask somebody to help you when moving the appliance around and to hold the door when removing / re-fitting hinges and the door to avoid any injury and damage to the product.

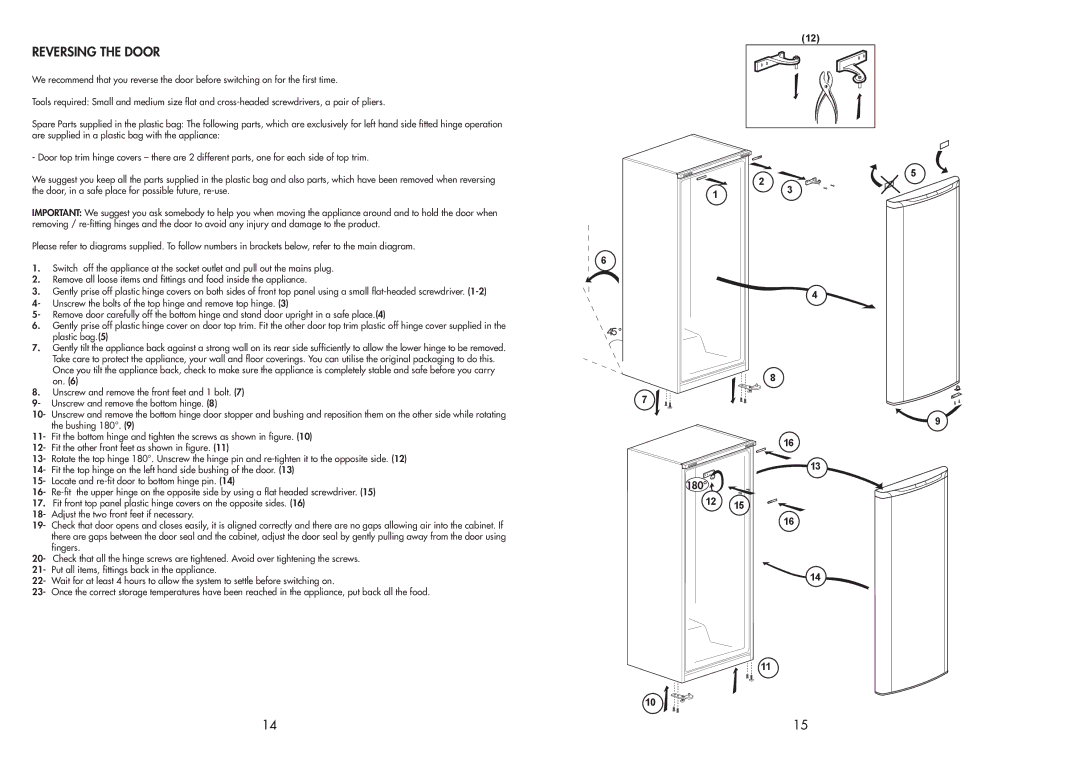
Please refer to diagrams supplied. To follow numbers in brackets below, refer to the main diagram.

1.Switch off the appliance at the socket outlet and pull out the mains plug.

2.Remove all loose items and fittings and food inside the appliance.

3.Gently prise off plastic hinge covers on both sides of front top panel using a small flat-headed screwdriver. (1-2) 4- Unscrew the bolts of the top hinge and remove top hinge. (3)

5- Remove door carefully off the bottom hinge and stand door upright in a safe place.(4)

6.Gently prise off plastic hinge cover on door top trim. Fit the other door top trim plastic off hinge cover supplied in the plastic bag.(5)

7.Gently tilt the appliance back against a strong wall on its rear side sufficiently to allow the lower hinge to be removed. Take care to protect the appliance, your wall and floor coverings. You can utilise the original packaging to do this. Once you tilt the appliance back, check to make sure the appliance is completely stable and safe before you carry on. (6)

8.Unscrew and remove the front feet and 1 bolt. (7)

9- Unscrew and remove the bottom hinge. (8)

10- Unscrew and remove the bottom hinge door stopper and bushing and reposition them on the other side while rotating the bushing 180°. (9)

11- Fit the bottom hinge and tighten the screws as shown in figure. (10)

12- Fit the other front feet as shown in figure. (11)

13- Rotate the top hinge 180°. Unscrew the hinge pin and re-tighten it to the opposite side. (12)

14- Fit the top hinge on the left hand side bushing of the door. (13)

15- Locate and re-fit door to bottom hinge pin. (14)

16- Re-fit the upper hinge on the opposite side by using a flat headed screwdriver. (15)

17.Fit front top panel plastic hinge covers on the opposite sides. (16) 18- Adjust the two front feet if necessary.

19- Check that door opens and closes easily, it is aligned correctly and there are no gaps allowing air into the cabinet. If there are gaps between the door seal and the cabinet, adjust the door seal by gently pulling away from the door using fingers.

20- Check that all the hinge screws are tightened. Avoid over tightening the screws.

21- Put all items, fittings back in the appliance.

22- Wait for at least 4 hours to allow the system to settle before switching on.

23- Once the correct storage temperatures have been reached in the appliance, put back all the food.

6

45°

7

10

1

180°

12 15

3

4

8

9

16

13

16

14

11

14

15

Page 9
Image 9
Beko TLDA 567 manual 180

TLDA 567 specifications

The Beko TLDA 567 is a highly efficient and stylish appliance that combines functionality with modern design to enhance any kitchen space. This 60 cm wide slimline dishwasher stands out due to its excellent features, innovative technologies, and user-friendly characteristics.

One of the standout features of the Beko TLDA 567 is its A+++ energy rating, which ensures maximum efficiency, reducing energy consumption and contributing to cost savings. With a capacity to accommodate up to 15 place settings, it is perfect for both small households and larger families. This model has six different wash programs, including intensity options tailored for various levels of soiling, meaning it can handle everything from lightly soiled dishes to heavily caked pots and pans.

The "Quick & Clean" function is another remarkable characteristic, allowing users to wash a full load in just 30 minutes. This is ideal for those who are always on the go and need their dishes cleaned in a hurry. Additionally, the "Half Load" option lets users run the dishwasher when it’s only partially full, saving both time and water.

The TLDA 567 is equipped with Beko's corner wash feature, which ensures that every corner of the dishwasher receives thorough cleaning, optimizing water spray patterns to reach every dish effectively. The interior of the dishwasher is designed with adjustable racks and folding tines, enabling customizable space for bulky items, which enhances usability.

Moreover, this dishwasher incorporates an advanced AquaIntense technology, providing extra water pressure for the lower basket to tackle stubborn dirt on pots and pans. This feature guarantees a deeper clean, ensuring that every dish sparkles pristine after each wash.

Another modern attribute of the Beko TLDA 567 is its quiet operation, with a noise level of only 48 dB, making it one of the quieter models on the market. This is particularly ideal for open-plan living spaces where noise can be a concern.

With its sleek design, efficient washing capabilities, and innovative features, the Beko TLDA 567 proves to be a reliable and stylish choice for any kitchen, combining practicality with performance. As a result, it is more than just a dishwasher; it is an essential appliance that significantly simplifies the dishwashing experience while aligning with energy-saving practices.