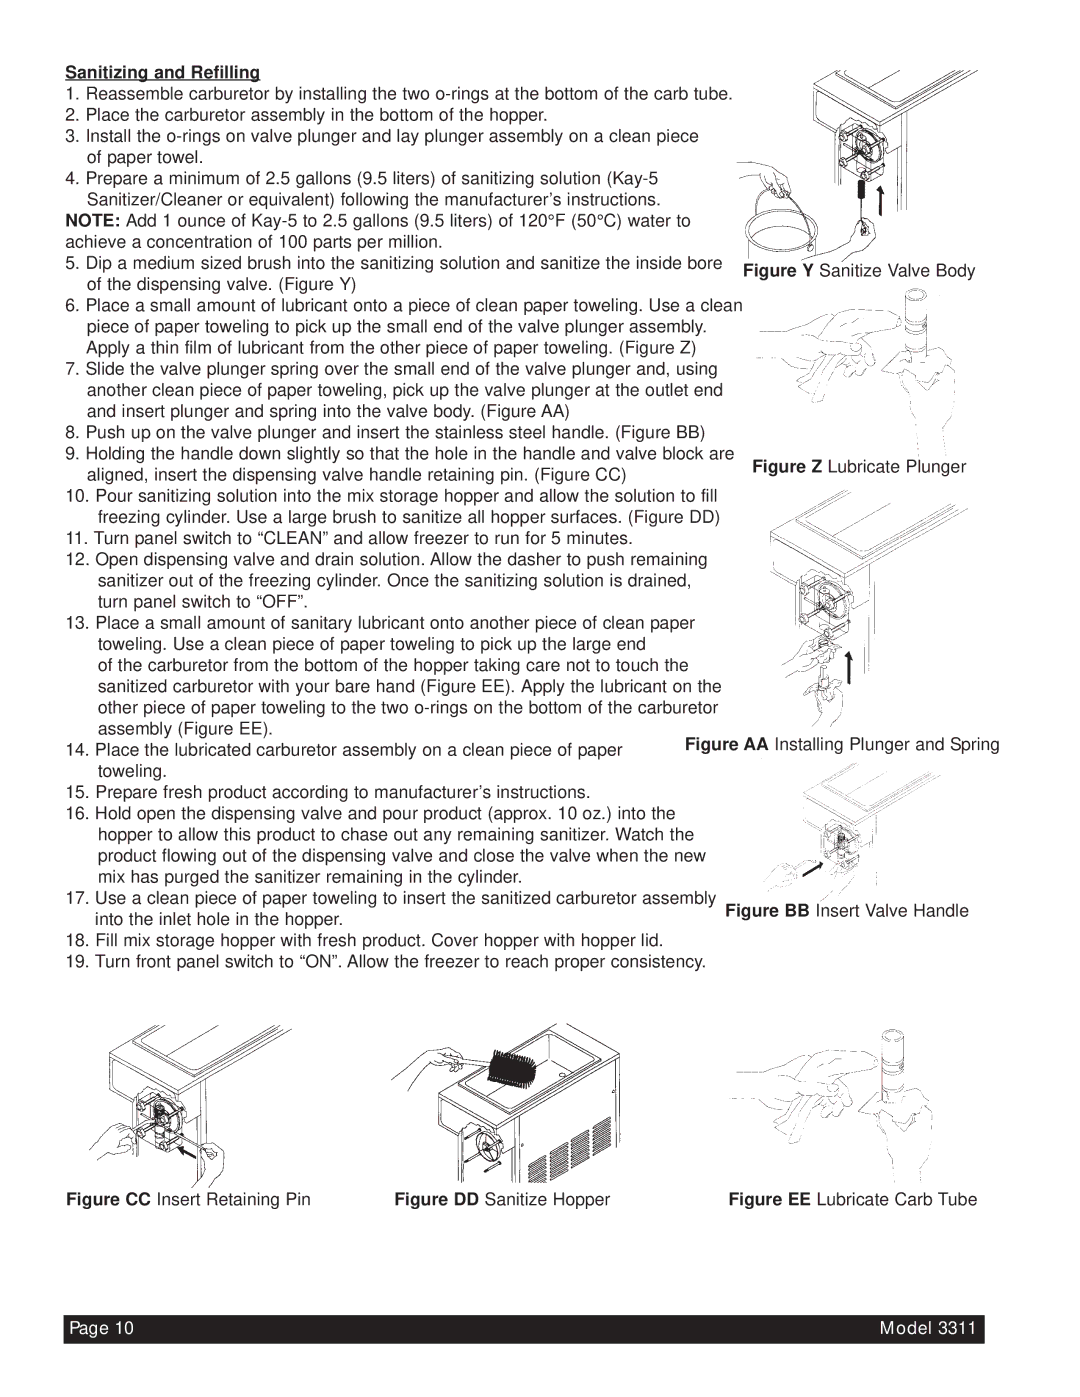
Figure BB Insert Valve Handle
Figure EE Lubricate Carb Tube
Model 3311
Figure AA Installing Plunger and Spring
Figure Y Sanitize Valve Body
Figure Z Lubricate Plunger

Sanitizing and Refilling

1.Reassemble carburetor by installing the two o-rings at the bottom of the carb tube.

2.Place the carburetor assembly in the bottom of the hopper.

3.Install the o-rings on valve plunger and lay plunger assembly on a clean piece of paper towel.

4.Prepare a minimum of 2.5 gallons (9.5 liters) of sanitizing solution (Kay-5 Sanitizer/Cleaner or equivalent) following the manufacturer’s instructions.

NOTE: Add 1 ounce of Kay-5 to 2.5 gallons (9.5 liters) of 120°F (50°C) water to achieve a concentration of 100 parts per million.

5.Dip a medium sized brush into the sanitizing solution and sanitize the inside bore of the dispensing valve. (Figure Y)

6.Place a small amount of lubricant onto a piece of clean paper toweling. Use a clean piece of paper toweling to pick up the small end of the valve plunger assembly. Apply a thin film of lubricant from the other piece of paper toweling. (Figure Z)

7.Slide the valve plunger spring over the small end of the valve plunger and, using another clean piece of paper toweling, pick up the valve plunger at the outlet end and insert plunger and spring into the valve body. (Figure AA)

8.Push up on the valve plunger and insert the stainless steel handle. (Figure BB)

9.Holding the handle down slightly so that the hole in the handle and valve block are aligned, insert the dispensing valve handle retaining pin. (Figure CC)

10.Pour sanitizing solution into the mix storage hopper and allow the solution to fill freezing cylinder. Use a large brush to sanitize all hopper surfaces. (Figure DD)

11.Turn panel switch to “CLEAN” and allow freezer to run for 5 minutes.

12.Open dispensing valve and drain solution. Allow the dasher to push remaining sanitizer out of the freezing cylinder. Once the sanitizing solution is drained, turn panel switch to “OFF”.

13.Place a small amount of sanitary lubricant onto another piece of clean paper toweling. Use a clean piece of paper toweling to pick up the large end

of the carburetor from the bottom of the hopper taking care not to touch the sanitized carburetor with your bare hand (Figure EE). Apply the lubricant on the other piece of paper toweling to the two o-rings on the bottom of the carburetor assembly (Figure EE).

14.Place the lubricated carburetor assembly on a clean piece of paper

toweling.

15.Prepare fresh product according to manufacturer’s instructions.

16.Hold open the dispensing valve and pour product (approx. 10 oz.) into the hopper to allow this product to chase out any remaining sanitizer. Watch the product flowing out of the dispensing valve and close the valve when the new mix has purged the sanitizer remaining in the cylinder.

17.Use a clean piece of paper toweling to insert the sanitized carburetor assembly into the inlet hole in the hopper.

18.Fill mix storage hopper with fresh product. Cover hopper with hopper lid.

19.Turn front panel switch to “ON”. Allow the freezer to reach proper consistency.

Figure CC Insert Retaining Pin

Figure DD Sanitize Hopper

Page 10

Page 12
Image 12
Beverage-Air 3311 manual Sanitizing and Refilling, Figure CC Insert Retaining Pin

3311 specifications

The Beverage-Air 3311 is a top-tier commercial refrigerator meticulously designed to meet the demanding needs of foodservice establishments. Known for its reliability and efficiency, this model is a favorite among restaurant owners, bars, and cafés. The primary focus of the Beverage-Air 3311 is to provide optimal storage conditions for beverages, including soft drinks, juice, and bottled water, ensuring they are kept at ideal temperatures for maximum freshness.

One of the standout features of the Beverage-Air 3311 is its spacious interior, which provides ample storage for a variety of beverages. Measuring 33 inches wide, this unit can accommodate multiple shelves, each adjustable to suit the specific height requirements of various bottles and containers. The unit typically comes with sturdy, epoxy-coated wire shelves that not only ensure uniform cooling but also provide resistance against spills and easy cleaning.

Equipped with a powerful refrigeration system, the Beverage-Air 3311 utilizes environmentally friendly refrigerants, aligning with modern standards for sustainability. The compressor is designed for efficiency, providing rapid cooling and maintaining consistent temperatures across the unit while minimizing energy consumption. This feature is particularly valuable for businesses aiming to reduce operating costs while maintaining high product quality.

The Beverage-Air 3311 also includes a self-closing door with magnetic gaskets, which helps maintain the internal temperature and prevents cold air loss, thereby enhancing energy efficiency. Additionally, the doors are equipped with locks to ensure the security of valuable beverages during off-hours.

For enhanced visibility, the Beverage-Air 3311 can feature a glass door option, allowing customers and staff to easily view the stored products without opening the door. This feature not only improves accessibility but also adds an aesthetic appeal to the display.

In terms of durability, the exterior of the Beverage-Air 3311 is crafted from high-quality stainless steel, providing resistance against rust and corrosion while ensuring an easy-to-clean surface. The interior is designed with seamless construction, which further reduces the chances of bacteria buildup and makes maintenance straightforward.

Overall, the Beverage-Air 3311 combines advanced technology with thoughtful design features, making it an ideal choice for those looking to enhance their beverage service. With its capacity, efficiency, and durability, this commercial refrigerator stands out as a reliable partner in the fast-paced environment of food and beverage service.