DR100B ManualENSP 041408.qxp 4/14/2008 2:34 PM Page 4
This device complies with part 15 of the FCC rules. Operation is subject to the following two conditions: (1) this device may not cause harmful interference, and (2) this device must accept any interference received, including interference that may cause undesired operation.
This equipment has been tested and found to comply with the limits for a Class B digital device, pursuant to part 15 of the FCC Rules. These limits are designed to provide reasonable protection against harmful interference in a residential installation. This equipment generates, uses and can radiate radio frequency energy and, if not installed and used in accordance with the instructions, may cause harmful interference to radio communications. However, there is no guarantee that interference will not occur in a particular installation. If equipment does cause harmful interference to radio or television reception, which can be determined by turning the equipment off and on, the user is encouraged to try to correct the interference by one or more of the following measures:
•Reorient or relocate the receiving antenna.
•Increase the separation between equipment and receiver.
•Connect the equipment into an outlet on a circuit different from that to which the receiver is connected.
•Consult the dealer or an experienced radio/TV technician for help.
Changes or modifications not approved by the party responsible for compliance could void user’s authority to operate the equipment.
INTRODUCTION
Thank you for choosing the Black & Decker® Digital MP3 Worksite Radio. Please read this guide carefully before use to ensure optimum performance and avoid damage to the unit or items that you are using it with.
MODE INDICATOR
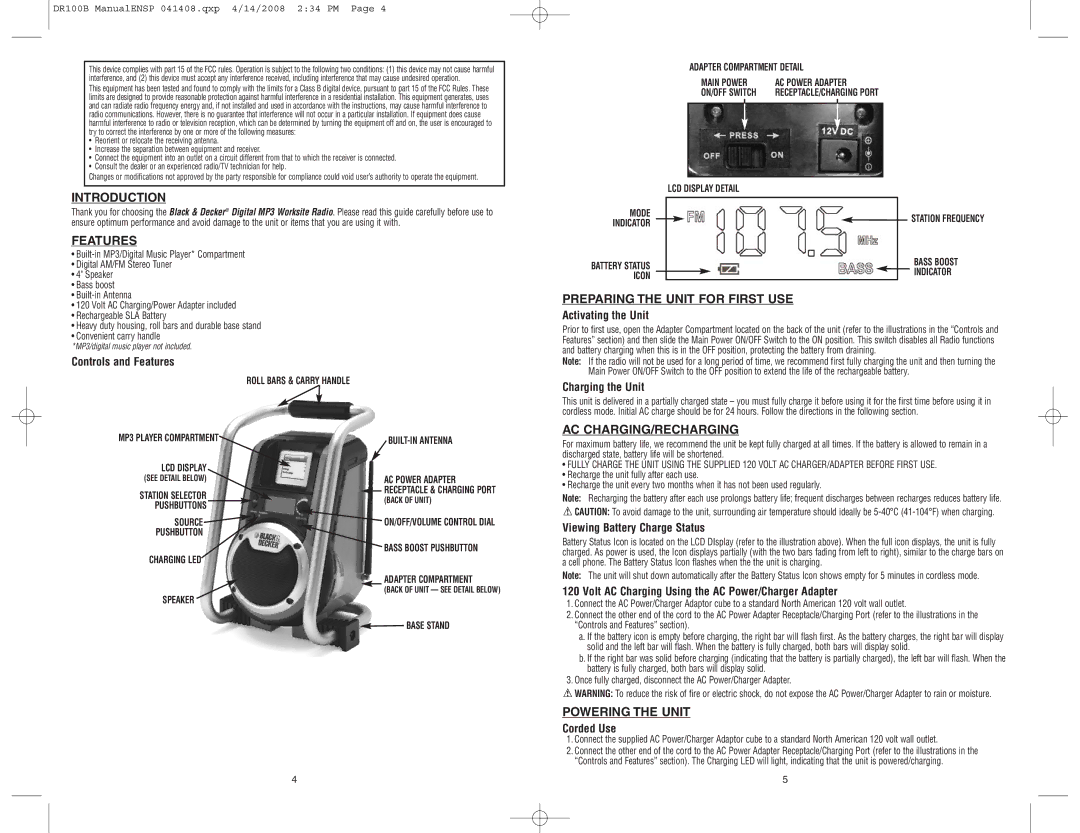
ADAPTER COMPARTMENT DETAIL
MAIN POWER | AC POWER ADAPTER |
ON/OFF SWITCH | RECEPTACLE/CHARGING PORT |
|
|
|
|
LCD DISPLAY DETAIL
![]() STATION FREQUENCY
STATION FREQUENCY
FEATURES
• |
• Digital AM/FM Stereo Tuner |
• 4" Speaker |
• Bass boost |
BATTERY STATUS ICON
BASS BOOST INDICATOR
• |
• 120 Volt AC Charging/Power Adapter included |
• Rechargeable SLA Battery |
• Heavy duty housing, roll bars and durable base stand |
• Convenient carry handle |
*MP3/digital music player not included.
Controls and Features
ROLL BARS & CARRY HANDLE
MP3 PLAYER COMPARTMENT
LCD DISPLAY
(SEE DETAIL BELOW)
STATION SELECTOR
PUSHBUTTONS
SOURCE![]()
PUSHBUTTON
CHARGING LED
SPEAKER
AC POWER ADAPTER ![]() RECEPTACLE & CHARGING PORT
RECEPTACLE & CHARGING PORT
(BACK OF UNIT)
ON/OFF/VOLUME CONTROL DIAL
BASS BOOST PUSHBUTTON
ADAPTER COMPARTMENT
(BACK OF UNIT — SEE DETAIL BELOW)
![]() BASE STAND
BASE STAND
PREPARING THE UNIT FOR FIRST USE
Activating the Unit
Prior to first use, open the Adapter Compartment located on the back of the unit (refer to the illustrations in the “Controls and Features” section) and then slide the Main Power ON/OFF Switch to the ON position. This switch disables all Radio functions and battery charging when this is in the OFF position, protecting the battery from draining.
Note: If the radio will not be used for a long period of time, we recommend first fully charging the unit and then turning the Main Power ON/OFF Switch to the OFF position to extend the life of the rechargeable battery.
Charging the Unit
This unit is delivered in a partially charged state – you must fully charge it before using it for the first time before using it in cordless mode. Initial AC charge should be for 24 hours. Follow the directions in the following section.
AC CHARGING/RECHARGING
For maximum battery life, we recommend the unit be kept fully charged at all times. If the battery is allowed to remain in a discharged state, battery life will be shortened.
•FULLY CHARGE THE UNIT USING THE SUPPLIED 120 VOLT AC CHARGER/ADAPTER BEFORE FIRST USE.
•Recharge the unit fully after each use.
•Recharge the unit every two months when it has not been used regularly.
Note: Recharging the battery after each use prolongs battery life; frequent discharges between recharges reduces battery life.
![]() CAUTION: To avoid damage to the unit, surrounding air temperature should ideally be
CAUTION: To avoid damage to the unit, surrounding air temperature should ideally be
Viewing Battery Charge Status
Battery Status Icon is located on the LCD DIsplay (refer to the illustration above). When the full icon displays, the unit is fully charged. As power is used, the Icon displays partially (with the two bars fading from left to right), similar to the charge bars on a cell phone. The Battery Status Icon flashes when the the unit is charging.
Note: The unit will shut down automatically after the Battery Status Icon shows empty for 5 minutes in cordless mode.
120 Volt AC Charging Using the AC Power/Charger Adapter
1.Connect the AC Power/Charger Adaptor cube to a standard North American 120 volt wall outlet.
2.Connect the other end of the cord to the AC Power Adapter Receptacle/Charging Port (refer to the illustrations in the “Controls and Features” section).
a.If the battery icon is empty before charging, the right bar will flash first. As the battery charges, the right bar will display solid and the left bar will flash. When the battery is fully charged, both bars will display solid.
b.If the right bar was solid before charging (indicating that the battery is partially charged), the left bar will flash. When the battery is fully charged, both bars will display solid.
3.Once fully charged, disconnect the AC Power/Charger Adapter.
![]() WARNING: To reduce the risk of fire or electric shock, do not expose the AC Power/Charger Adapter to rain or moisture.
WARNING: To reduce the risk of fire or electric shock, do not expose the AC Power/Charger Adapter to rain or moisture.
POWERING THE UNIT
Corded Use
1.Connect the supplied AC Power/Charger Adaptor cube to a standard North American 120 volt wall outlet.
2.Connect the other end of the cord to the AC Power Adapter Receptacle/Charging Port (refer to the illustrations in the “Controls and Features” section). The Charging LED will light, indicating that the unit is powered/charging.
4
5