DR100B ManualENSP 041408.qxp 4/14/2008 2:34 PM Page 6
Note: When the unit is powered using this method, it will also be in “recharge mode” as long as it is connected to an AC wall outlet, so there is no drain on the
![]() WARNING: To reduce the risk of fire or electric shock, do not use this radio outdoors in corded mode. The AC Power/Charger Adapter is NOT
WARNING: To reduce the risk of fire or electric shock, do not use this radio outdoors in corded mode. The AC Power/Charger Adapter is NOT
Cordless Use
This unit has a
Note: If audio is weak or sound drops out, it is an indication that the battery may need recharging. Refer to the “AC Charging/Recharging” section for directions.
USING THE RADIO
Refer to the “Controls and Indicators” section to locate referenced buttons and controls.
1.Turn the ON/OFF/Volume Control Dial clockwise to turn the power ON. The LCD Display will illuminate. Adjust volume by turning dial to desired level.
Note: The LCD Display backlight will turn OFF after 10 seconds if no additional buttons are pressed.
2.Press the Source Pushutton to cycle through AM, FM and AUX. Select the desired band (AM or FM). Rotate the antenna upward if the radio is tuned to an FM station.
Notes: Reception will vary depending on location and strength of radio signal.
If reception is poor: For FM stations, rotate the
AM reception may be clearer when the unit is used in Cordless mode.
3.Press either the ▲ or ▼ Station Selector Pushbutton to tune in the desired station. The receiver will automatically “lock” onto channels with strong enough signals. The station frequency will show on the LCD Display.
4.Turn the ON/OFF/Volume Control Dial clockwise to adjust the volume.
Bass Boost
•Press the Bass Boost Pushbutton while the unit is turned ON to activate the Bass Boost function.
•Press again to cancel this function. When this function is activated, the Bass Boost icon on the LCD Display will illuminate.
USING THE MP3/DIGITAL MUSIC PLAYER COMPARTMENT/CABLE PLUG
Refer to the “Controls and Indicators” section to locate referenced buttons and controls.
The DR100B comes with an MP3/Digital Music Player Compartment and Cable Plug. To play music from an MP3 or digital music player:
1.Turn the ON/OFF/Volume Control Dial clockwise to turn the power ON. The LCD Display will illuminate. Adjust volume by turning dial to desired level.
Note: The LCD Display backlight will turn OFF after 10 seconds if no additional buttons are pressed.
2.Press the Source Pushutton to cycle through AM, FM and AUX. Select AUX.
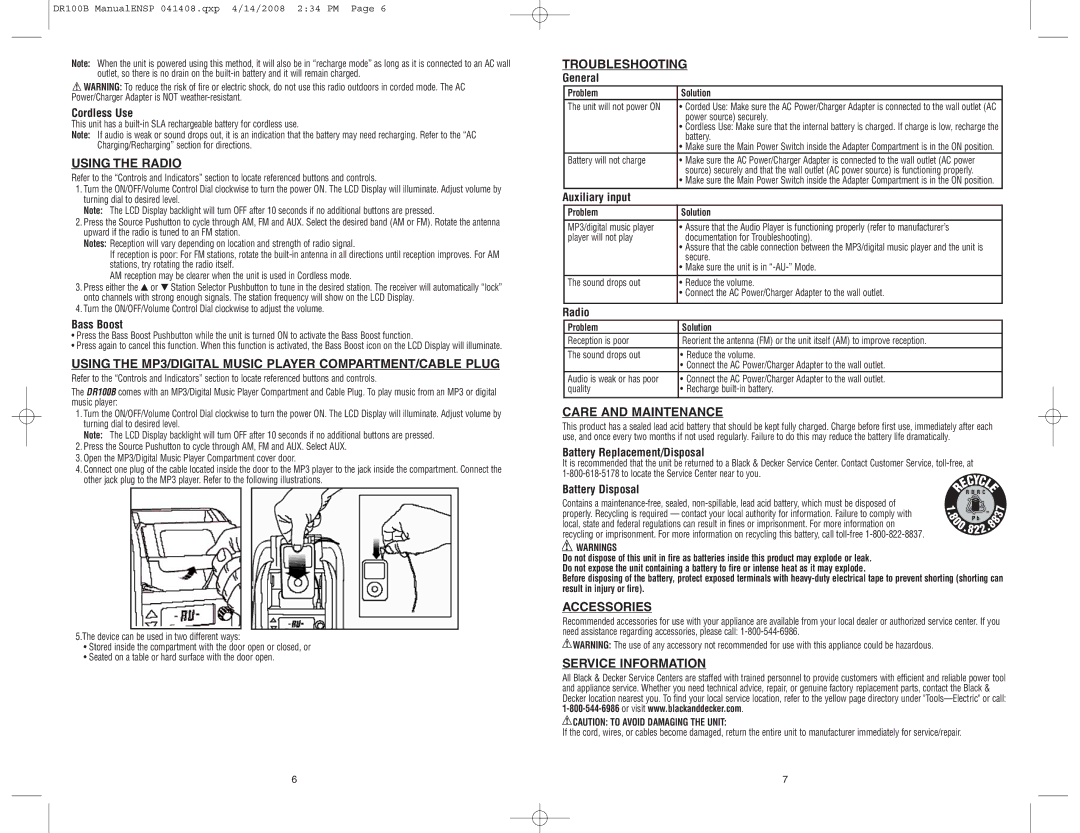
3.Open the MP3/Digital Music Player Compartment cover door.
4.Connect one plug of the cable located inside the door to the MP3 player to the jack inside the compartment. Connect the other jack plug to the MP3 player. Refer to the following illustrations.
5.The device can be used in two different ways:
•Stored inside the compartment with the door open or closed, or
•Seated on a table or hard surface with the door open.
TROUBLESHOOTING
General
Problem | Solution |
The unit will not power ON | • Corded Use: Make sure the AC Power/Charger Adapter is connected to the wall outlet (AC |
| power source) securely. |
| • Cordless Use: Make sure that the internal battery is charged. If charge is low, recharge the |
| battery. |
| • Make sure the Main Power Switch inside the Adapter Compartment is in the ON position. |
Battery will not charge | • Make sure the AC Power/Charger Adapter is connected to the wall outlet (AC power |
| source) securely and that the wall outlet (AC power source) is functioning properly. |
| • Make sure the Main Power Switch inside the Adapter Compartment is in the ON position. |
Auxiliary input
Problem | Solution |
MP3/digital music player | • Assure that the Audio Player is functioning properly (refer to manufacturer’s |
player will not play | documentation for Troubleshooting). |
| • Assure that the cable connection between the MP3/digital music player and the unit is |
| secure. |
| • Make sure the unit is in |
The sound drops out | • Reduce the volume. |
| • Connect the AC Power/Charger Adapter to the wall outlet. |
|
|
Radio
Problem | Solution |
Reception is poor | Reorient the antenna (FM) or the unit itself (AM) to improve reception. |
The sound drops out | • Reduce the volume. |
| • Connect the AC Power/Charger Adapter to the wall outlet. |
Audio is weak or has poor | • Connect the AC Power/Charger Adapter to the wall outlet. |
quality | • Recharge |
CARE AND MAINTENANCE
This product has a sealed lead acid battery that should be kept fully charged. Charge before first use, immediately after each use, and once every two months if not used regularly. Failure to do this may reduce the battery life dramatically.
Battery Replacement/Disposal
It is recommended that the unit be returned to a Black & Decker Service Center. Contact Customer Service,
Battery Disposal
Contains a
![]() WARNINGS
WARNINGS
Do not dispose of this unit in fire as batteries inside this product may explode or leak. Do not expose the unit containing a battery to fire or intense heat as it may explode.
Before disposing of the battery, protect exposed terminals with
ACCESSORIES
Recommended accessories for use with your appliance are available from your local dealer or authorized service center. If you need assistance regarding accessories, please call:
![]() WARNING: The use of any accessory not recommended for use with this appliance could be hazardous.
WARNING: The use of any accessory not recommended for use with this appliance could be hazardous.
SERVICE INFORMATION
All Black & Decker Service Centers are staffed with trained personnel to provide customers with efficient and reliable power tool and appliance service. Whether you need technical advice, repair, or genuine factory replacement parts, contact the Black & Decker location nearest you. To find your local service location, refer to the yellow page directory under
![]() CAUTION: TO AVOID DAMAGING THE UNIT:
CAUTION: TO AVOID DAMAGING THE UNIT:
If the cord, wires, or cables become damaged, return the entire unit to manufacturer immediately for service/repair.
6 | 7 |