4.After measuring the overhang molding thickness as shown in Illustration G, look at the dashed lines on the mounting template; each line has a measurement next to it that indicates the thickness of the overhang molding used with that line. For example, if your cabinet has an overhang molding thickness of ½”, you will use the ½” dashed line on the template.

5.Fold the template along the dashed line that matches the thickness of your overhang molding.

6.Place the folded template against the back edge of the overhang molding, making sure the side with the drill hole marks is facing down (H).

H

Important: Do not align screw holes on template directly under the partition between cabinets, as this will prevent you from installing the appliance properly. Pay close attention to where the drill holes will be set so as not to damage your cabinets during mounting. Drilling through your cabinet’s partition may cause damage to cabinets and prevent proper installation.

7.Making sure to keep the fold line straight against the back edge of the overhang molding, tape the template securely in place.

8.Drilling from under the cabinet up, drill holes through the 4 places marked on the template using a ¼-inch drill bit (J).

J

Important: Always ensure you are drilling straight up through the marked mounting holes on the template. Drilling at an angle may prevent proper installation and may damage cabinets if the drill bit pierces the partition.

9.Once holes are drilled, remove tape and mounting template.

10.Wipe dust and debris off the underside and topside of the cabinet surface.

11.Place a washer inside the cabinet over each of the 4 holes you drilled.

10

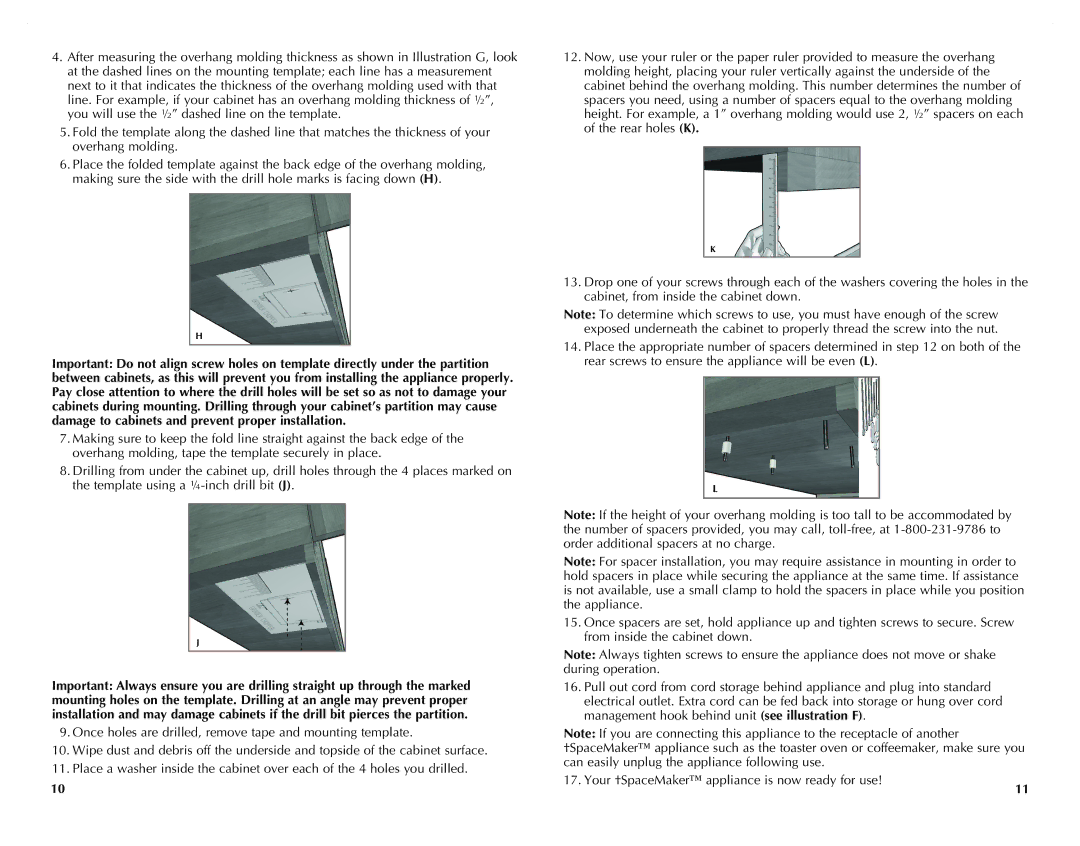
12.Now, use your ruler or the paper ruler provided to measure the overhang molding height, placing your ruler vertically against the underside of the cabinet behind the overhang molding. This number determines the number of spacers you need, using a number of spacers equal to the overhang molding height. For example, a 1” overhang molding would use 2, ½” spacers on each of the rear holes (K).

K

13.Drop one of your screws through each of the washers covering the holes in the cabinet, from inside the cabinet down.

Note: To determine which screws to use, you must have enough of the screw exposed underneath the cabinet to properly thread the screw into the nut.

14.Place the appropriate number of spacers determined in step 12 on both of the rear screws to ensure the appliance will be even (L).

L

Note: If the height of your overhang molding is too tall to be accommodated by the number of spacers provided, you may call, toll-free, at 1-800-231-9786 to order additional spacers at no charge.

Note: For spacer installation, you may require assistance in mounting in order to hold spacers in place while securing the appliance at the same time. If assistance is not available, use a small clamp to hold the spacers in place while you position the appliance.

15.Once spacers are set, hold appliance up and tighten screws to secure. Screw from inside the cabinet down.

Note: Always tighten screws to ensure the appliance does not move or shake during operation.

16.Pull out cord from cord storage behind appliance and plug into standard electrical outlet. Extra cord can be fed back into storage or hung over cord management hook behind unit (see illustration F).

Note: If you are connecting this appliance to the receptacle of another †SpaceMaker™ appliance such as the toaster oven or coffeemaker, make sure you can easily unplug the appliance following use.

17. Your †SpaceMaker™ appliance is now ready for use!

11


Page 6
Image 6
Black & Decker CG800B, CG800WM manual

CG800, CG800WM, CG800B specifications

The Black & Decker CG800B, CG800WM, and CG800 are widely recognized for their exceptional performance in the realm of electric grass trimmers. These models provide users with an efficient and effective solution for maintaining lawns and gardens, thanks to their innovative designs and cutting-edge technology.

At the heart of the CG800B, CG800WM, and CG800 is a powerful 6.5 amp motor that delivers reliable performance across a variety of landscaping tasks. This motor ensures that users can tackle thick grass, weeds, and overgrown areas with ease, making these trimmers suitable for both small yards and larger garden spaces. The lightweight design of these trimmers enhances user comfort, allowing for extended periods of use without fatigue.

One of the standout features is the automatic feed spool system. This technology enables the trimmers to feed new line as needed, eliminating the interruptions that often accompany manual line adjustments. As a result, users can focus on the task at hand without worrying about frequently stopping to replace or adjust the cutting line.

The CG800B and CG800WM models come equipped with a 12-inch cutting width, providing a wide swath that allows for efficient trimming in fewer passes. This feature is particularly beneficial for users with larger areas to maintain, as it saves time while delivering a clean and precise finish. Additionally, the adjustable pivoting head allows for easy transitions between trimming and edging, ensuring versatility in various landscaping tasks.

These models also include soft-grip handles designed for comfort and better control during use. The ergonomic design minimizes strain on the hands and wrists, making it easier to maneuver the trimmer around flower beds, fences, and other obstacles in the yard.

In terms of maintenance, the CG800B, CG800WM, and CG800 models are user-friendly, allowing for quick line replacements and easy access to the spool. This ease of use is a significant advantage for homeowners and gardeners who prioritize efficiency and convenience.

Overall, the Black & Decker CG800B, CG800WM, and CG800 electric grass trimmers embody durability, performance, and user-centric design. These models cater to both novice gardeners and experienced landscapers, making them valuable tools for achieving a well-manicured lawn. With their combination of technology, comfort, and efficiency, they continue to be a popular choice among homeowners looking to simplify their lawn care tasks.