How to Use

This appliance is for household use only.

GETTING STARTED

1.For warranty verification, do not remove line cord tag.

2.Please go to www.prodprotect.com/applica to register your warranty.

3.Wash the coffee grinding bowl, mini food processor workbowl and blades for both in hot soapy water, rinse and dry thoroughly as directed in the CARE AND CLEANING section of this Use & Care manual.

Important: Although these parts can be washed in the dishwasher, we recommend they be washed by hand to preserve the sharpness of the blades and the appearance of the workbowl. Do not immerse the appliance in water.

4. Wipe outside of appliance with a damp cloth; dry thoroughly.

Note: For your protection this appliance has a dual safety mechanism. Do not attempt to use this appliance unless either container with the appropriate blade is in place.

GRINDING COFFEE BEANS

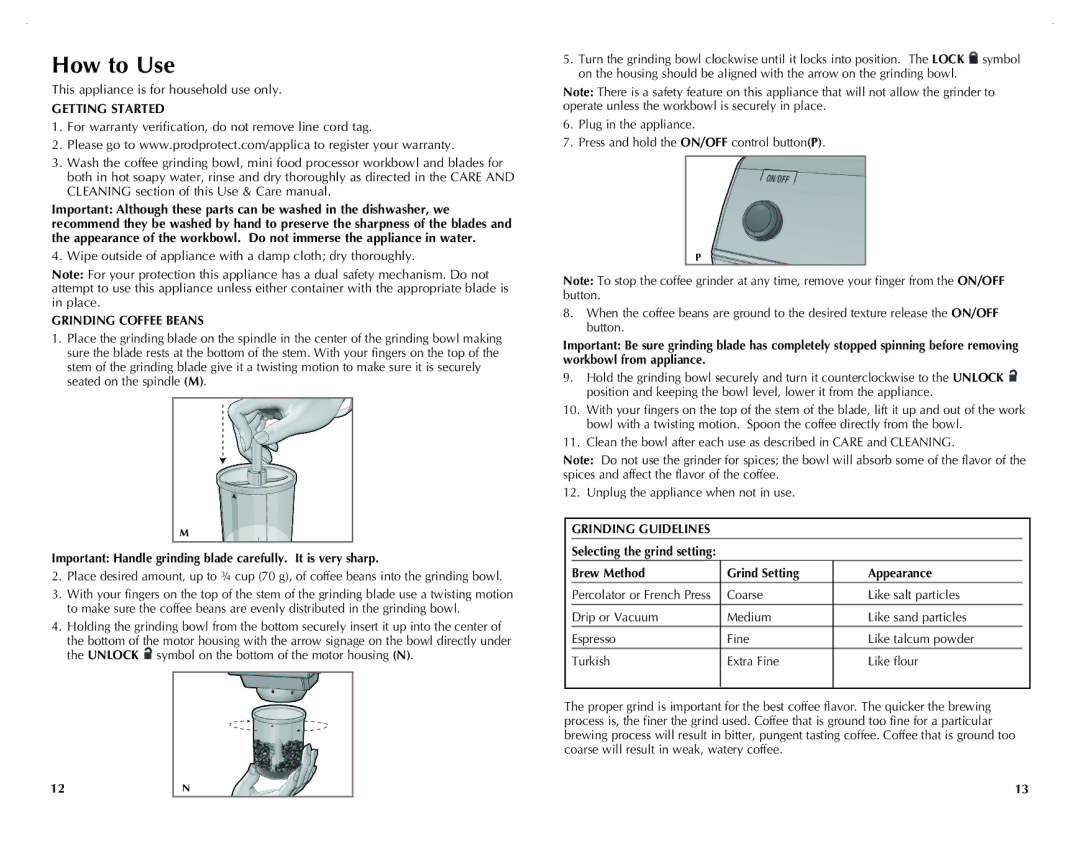
1.Place the grinding blade on the spindle in the center of the grinding bowl making sure the blade rests at the bottom of the stem. With your fingers on the top of the stem of the grinding blade give it a twisting motion to make sure it is securely seated on the spindle (M).

M

Important: Handle grinding blade carefully. It is very sharp.

2.Place desired amount, up to ¾ cup (70 g), of coffee beans into the grinding bowl.

3.With your fingers on the top of the stem of the grinding blade use a twisting motion to make sure the coffee beans are evenly distributed in the grinding bowl.

4.Holding the grinding bowl from the bottom securely insert it up into the center of the bottom of the motor housing with the arrow signage on the bowl directly under the UNLOCK symbol on the bottom of the motor housing (N).

12

N

5.Turn the grinding bowl clockwise until it locks into position. The LOCK symbol on the housing should be aligned with the arrow on the grinding bowl.

Note: There is a safety feature on this appliance that will not allow the grinder to operate unless the workbowl is securely in place.

6.Plug in the appliance.

7.Press and hold the ON/OFF control button(P).

P

Note: To stop the coffee grinder at any time, remove your finger from the ON/OFF button.

8.When the coffee beans are ground to the desired texture release the ON/OFF button.

Important: Be sure grinding blade has completely stopped spinning before removing workbowl from appliance.

9.Hold the grinding bowl securely and turn it counterclockwise to the UNLOCK position and keeping the bowl level, lower it from the appliance.

10.With your fingers on the top of the stem of the blade, lift it up and out of the work bowl with a twisting motion. Spoon the coffee directly from the bowl.

11.Clean the bowl after each use as described in CARE and CLEANING.

Note: Do not use the grinder for spices; the bowl will absorb some of the flavor of the spices and affect the flavor of the coffee.

12. Unplug the appliance when not in use.

GRINDING GUIDELINES

Selecting the grind setting:


Brew Method

Grind Setting

Appearance


Percolator or French Press

Coarse

Like salt particles


Drip or Vacuum

Medium

Like sand particles


Espresso

Fine

Like talcum powder


Turkish

Extra Fine

Like flour


The proper grind is important for the best coffee flavor. The quicker the brewing process is, the finer the grind used. Coffee that is ground too fine for a particular brewing process will result in bitter, pungent tasting coffee. Coffee that is ground too coarse will result in weak, watery coffee.

13

Page 7
Image 7
Black & Decker CG800WM, CG800B manual How to Use, Grinding Coffee Beans, Grinding Guidelines

CG800, CG800WM, CG800B specifications

The Black & Decker CG800B, CG800WM, and CG800 are widely recognized for their exceptional performance in the realm of electric grass trimmers. These models provide users with an efficient and effective solution for maintaining lawns and gardens, thanks to their innovative designs and cutting-edge technology.

At the heart of the CG800B, CG800WM, and CG800 is a powerful 6.5 amp motor that delivers reliable performance across a variety of landscaping tasks. This motor ensures that users can tackle thick grass, weeds, and overgrown areas with ease, making these trimmers suitable for both small yards and larger garden spaces. The lightweight design of these trimmers enhances user comfort, allowing for extended periods of use without fatigue.

One of the standout features is the automatic feed spool system. This technology enables the trimmers to feed new line as needed, eliminating the interruptions that often accompany manual line adjustments. As a result, users can focus on the task at hand without worrying about frequently stopping to replace or adjust the cutting line.

The CG800B and CG800WM models come equipped with a 12-inch cutting width, providing a wide swath that allows for efficient trimming in fewer passes. This feature is particularly beneficial for users with larger areas to maintain, as it saves time while delivering a clean and precise finish. Additionally, the adjustable pivoting head allows for easy transitions between trimming and edging, ensuring versatility in various landscaping tasks.

These models also include soft-grip handles designed for comfort and better control during use. The ergonomic design minimizes strain on the hands and wrists, making it easier to maneuver the trimmer around flower beds, fences, and other obstacles in the yard.

In terms of maintenance, the CG800B, CG800WM, and CG800 models are user-friendly, allowing for quick line replacements and easy access to the spool. This ease of use is a significant advantage for homeowners and gardeners who prioritize efficiency and convenience.

Overall, the Black & Decker CG800B, CG800WM, and CG800 electric grass trimmers embody durability, performance, and user-centric design. These models cater to both novice gardeners and experienced landscapers, making them valuable tools for achieving a well-manicured lawn. With their combination of technology, comfort, and efficiency, they continue to be a popular choice among homeowners looking to simplify their lawn care tasks.