How to Use

This product is for household use only.

GETTING STARTED

Remove packing materials and any stickers. Peel off clear protective film from control panel.

Wash all parts as instructed in Care and Cleaning.

Select a location for the unit. Leave some space between the back of the unit and your wall to allow heat to flow without damaging cabinet and walls.

Insert crumb tray underneath the bottom heating elements.

Untie the cord and unwind it.

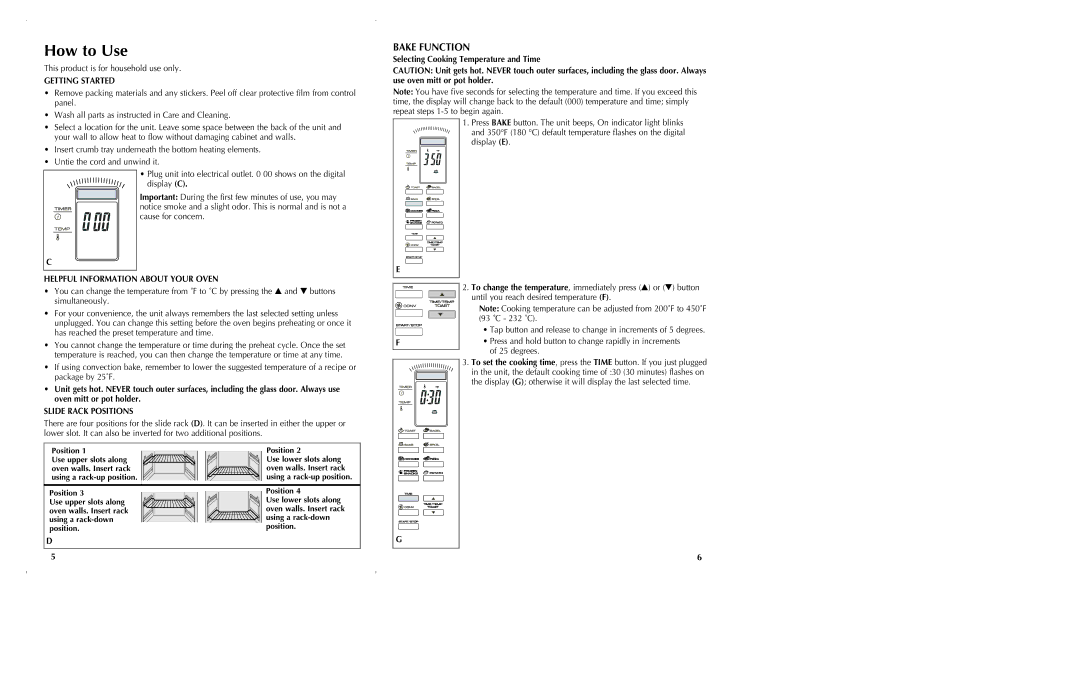
• Plug unit into electrical outlet. 0 00 shows on the digital display (C).

Important: During the first few minutes of use, you may notice smoke and a slight odor. This is normal and is not a cause for concern.

C

HELPFUL INFORMATION ABOUT YOUR OVEN

You can change the temperature from ˚F to ˚C by pressing the ▲ and ▼ buttons simultaneously.

For your convenience, the unit always remembers the last selected setting unless unplugged. You can change this setting before the oven begins preheating or once it has reached the preset temperature and time.

You cannot change the temperature or time during the preheat cycle. Once the set temperature is reached, you can then change the temperature or time at any time.

If using convection bake, remember to lower the suggested temperature of a recipe or package by 25˚F.

Unit gets hot. NEVER touch outer surfaces, including the glass door. Always use oven mitt or pot holder.

SLIDE RACK POSITIONS

There are four positions for the slide rack (D). It can be inserted in either the upper or lower slot. It can also be inverted for two additional positions.

Position 1

Position 2

Use upper slots along

Use lower slots along

oven walls. Insert rack

oven walls. Insert rack

using a rack-up position.

using a rack-up position.

BAKE FUNCTION

Selecting Cooking Temperature and Time

CAUTION: Unit gets hot. NEVER touch outer surfaces, including the glass door. Always use oven mitt or pot holder.

Note: You have five seconds for selecting the temperature and time. If you exceed this time, the display will change back to the default (000) temperature and time; simply repeat steps 1-5 to begin again.

1. Press BAKE button. The unit beeps, On indicator light blinks and 350°F (180 °C) default temperature flashes on the digital

display (E).

E


2. To change the temperature, immediately press (▲) or (▼) button


until you reach desired temperature (F).


Note: Cooking temperature can be adjusted from 200˚F to 450˚F


(93 ˚C - 232 ˚C).


• Tap button and release to change in increments of 5 degrees.

F

• Press and hold button to change rapidly in increments


of 25 degrees.


3. To set the cooking time, press the TIME button. If you just plugged


in the unit, the default cooking time of :30 (30 minutes) flashes on


the display (G); otherwise it will display the last selected time.

Position 3

Use upper slots along oven walls. Insert rack using a rack-down position.

D

Position 4

Use lower slots along oven walls. Insert rack

using a rack-down position.

G

5

6

Page 4
Image 4
Black & Decker CTO6301, CTO6305 Bake Function, Getting Started, Helpful Information about Your Oven, Slide Rack Positions

CTO6305, CTO6301 specifications

The Black & Decker CTO6301 and CTO6305 are two exceptional toaster ovens designed to enhance your cooking experience with efficiency and versatility. Both models showcase Black & Decker's commitment to quality and user-friendly design, making them ideal for busy households.

One of the standout features of the CTO6301 and CTO6305 is their spacious interior. With a capacity that accommodates six slices of bread or a 12-inch pizza, these toaster ovens can handle a wide range of cooking tasks. This large space is complemented by adjustable racks, allowing users to position food for optimal cooking results.

Both models boast multiple cooking functions, including toast, bake, broil, and keep warm, providing versatility for different cooking needs. The toaster ovens are equipped with intuitive dials that offer precise control over time and temperature settings, ensuring consistent results across various recipes. This ease of use makes them suitable for novice cooks and seasoned chefs alike.

In terms of technology, the CTO6301 and CTO6305 feature an easy-to-read timer with a stay-on function that allows for longer cooking times when needed. The ovens include an advanced heating system that distributes heat evenly, eliminating hot spots and ensuring thorough cooking. This technology enhances the flavor and texture of food, allowing users to achieve professional-quality results at home.

Cleaning is made simple with the removable crumb tray, which collects debris and crumbs during cooking, ensuring the interior remains tidy. The non-stick interior surface further eases the cleaning process, making maintenance hassle-free after cooking.

The sleek design of both the CTO6301 and CTO6305 complements any kitchen décor. Their compact footprint fits conveniently on countertops, making them suitable for kitchens of all sizes. Available in various colors, these toaster ovens can easily blend into your kitchen aesthetic.

Safety features are also a priority with these models. The cool-touch handles ensure users can safely operate the oven without the risk of burns. Additionally, the ovens are equipped with an automatic shut-off feature that provides peace of mind, automatically turning off the appliance after a set time to prevent overheating.

In conclusion, the Black & Decker CTO6301 and CTO6305 toaster ovens are practical and versatile kitchen appliances that combine innovation and user-friendly features. Their spacious interiors, multiple cooking functions, and advanced technologies make them a valuable addition to any kitchen, catering to a wide range of cooking needs while ensuring ease of use and maintenance.