How to Use
This appliance is for household use only.
GETTING STARTED
• | Remove packing materials and any stickers from the unit. |
• | Wash all parts as instructed in Care and Cleaning. |
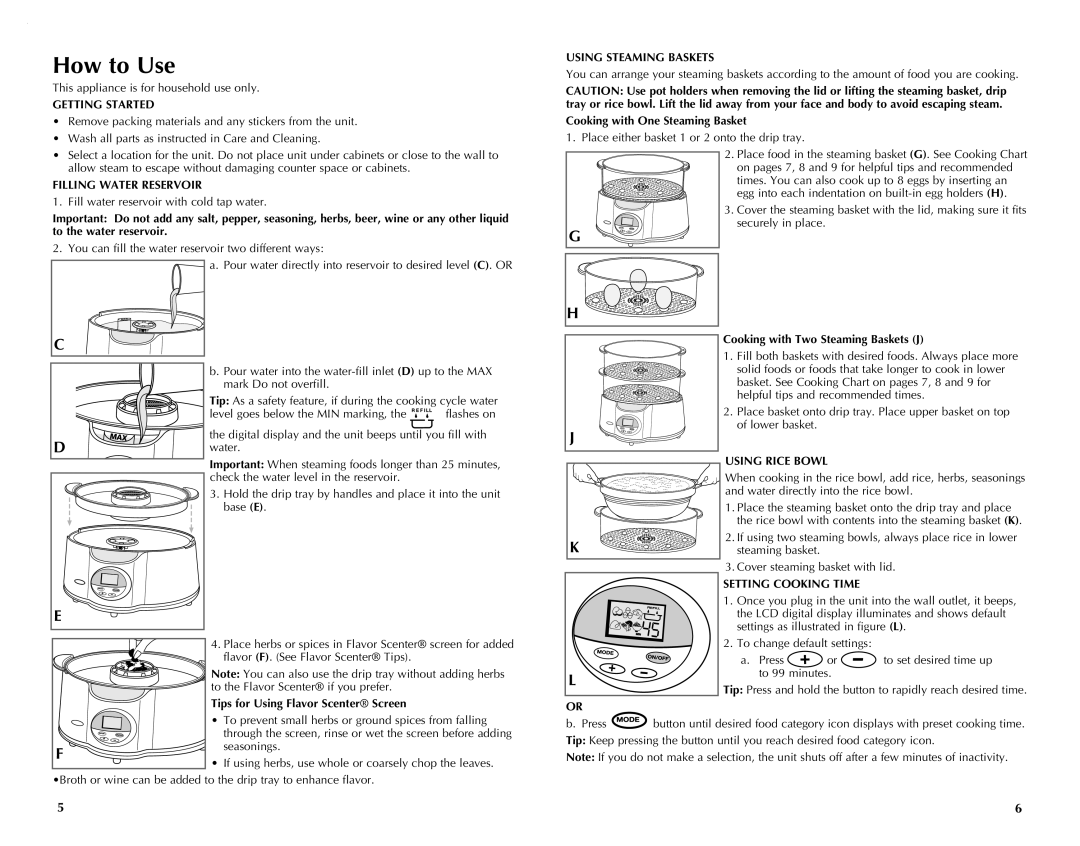
USING STEAMING BASKETS
You can arrange your steaming baskets according to the amount of food you are cooking.
CAUTION: Use pot holders when removing the lid or lifting the steaming basket, drip tray or rice bowl. Lift the lid away from your face and body to avoid escaping steam.
Cooking with One Steaming Basket
1. Place either basket 1 or 2 onto the drip tray.
• Select a location for the unit. Do not place unit under cabinets or close to the wall to |
allow steam to escape without damaging counter space or cabinets. |
FILLING WATER RESERVOIR
1. Fill water reservoir with cold tap water.
Important: Do not add any salt, pepper, seasoning, herbs, beer, wine or any other liquid to the water reservoir.
2.You can fill the water reservoir two different ways:
a. Pour water directly into reservoir to desired level (C). OR
G
H ![]()
2.Place food in the steaming basket (G). See Cooking Chart on pages 7, 8 and 9 for helpful tips and recommended times. You can also cook up to 8 eggs by inserting an egg into each indentation on
3.Cover the steaming basket with the lid, making sure it fits securely in place.
C
Cooking with Two Steaming Baskets (J)
1. Fill both baskets with desired foods. Always place more
D
b. Pour water into the
Tip: As a safety feature, if during the cooking cycle water
level goes below the MIN marking, the | flashes on |
the digital display and the unit beeps until you fill with water.
Important: When steaming foods longer than 25 minutes,
J
solid foods or foods that take longer to cook in lower basket. See Cooking Chart on pages 7, 8 and 9 for helpful tips and recommended times.
2. Place basket onto drip tray. Place upper basket on top of lower basket.
USING RICE BOWL
E![]()
check the water level in the reservoir.
3.Hold the drip tray by handles and place it into the unit base (E).
![]() When cooking in the rice bowl, add rice, herbs, seasonings and water directly into the rice bowl.
When cooking in the rice bowl, add rice, herbs, seasonings and water directly into the rice bowl.
1.Place the steaming basket onto the drip tray and place the rice bowl with contents into the steaming basket (K).
K | 2. If using two steaming bowls, always place rice in lower |
steaming basket. |
3.Cover steaming basket with lid.
SETTING COOKING TIME
1.Once you plug in the unit into the wall outlet, it beeps,
the LCD digital display illuminates and shows default |
settings as illustrated in figure (L). |
| 4. Place herbs or spices in Flavor Scenter® screen for added | |
| flavor (F). (See Flavor Scenter® Tips). | |
| Note: You can also use the drip tray without adding herbs | |
| to the Flavor Scenter® if you prefer. | |
| Tips for Using Flavor Scenter® Screen | |
| • To prevent small herbs or ground spices from falling | |
| through the screen, rinse or wet the screen before adding | |
F | seasonings. | |
• If using herbs, use whole or coarsely chop the leaves. | ||
|
•Broth or wine can be added to the drip tray to enhance flavor.
| 2. To change default settings: |
| ||
| a. Press | or | to set desired time up | |
L | to 99 minutes. |
| ||
Tip: Press and hold the button to rapidly reach desired time. | ||||
| ||||
OR
b.Press ![]() button until desired food category icon displays with preset cooking time. Tip: Keep pressing the button until you reach desired food category icon.
button until desired food category icon displays with preset cooking time. Tip: Keep pressing the button until you reach desired food category icon.
Note: If you do not make a selection, the unit shuts off after a few minutes of inactivity.
5 | 6 |