Symbols
The label on your tool may include the following symbols. The symbols and their definitions are as follows:
V | volts | A | amperes | |||||||
Hz | hertz | W | watts | |||||||
min | minutes |
|
|
| or AC | alternating current | ||||
|
|
|
| or DC | direct current | no | no load speed | |||
|
|
|
| |||||||
|
|
|
|
| Class I Construction |
|
|
|
| earthing terminal |
|
|
| ................... |
|
|
| ..................... | |||
|
|
|
|
|
|
|
|
| ||
|
|
|
|
|
|
|
|
| ||
|
|
|
|
| (grounded) |
|
|
| ................... | safety alert symbol |
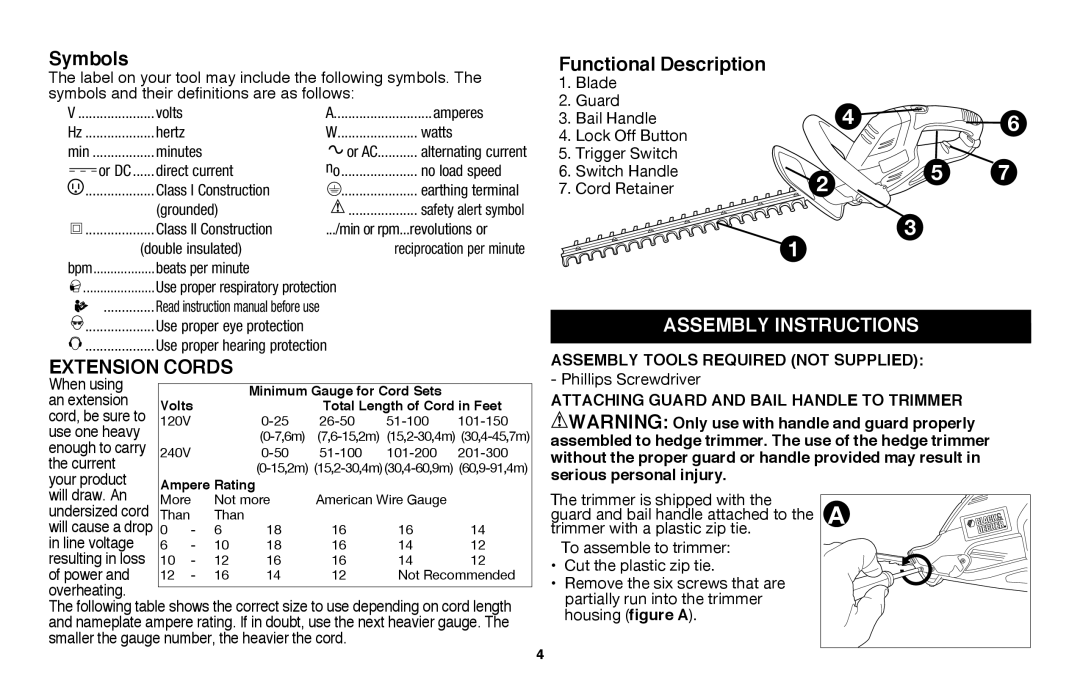
Functional Description
1. | Blade |
|
|
|
2. Guard |
| 4 |
| |
3. | Bail Handle |
| 6 | |
4. | Lock Off Button |
| ||
5. | Trigger Switch |
| 5 | 7 |
6. | Switch Handle | 2 | ||
7. | Cord Retainer |
|
| |
................... | Class II Construction | .../min or rpm...revolutions or |
| (double insulated) | reciprocation per minute |
bpm | beats per minute |
|
..................... | Use proper respiratory protection | |
............... | Read instruction manual before use |
|
1
3
................... Use proper eye protection |
|
|
| ||
.................... Use proper hearing protection |
|
| |||
Extension Cords |
|
|
|
| |
When using |
|
|
| ||
Volts | Minimum Gauge for Cord Sets |
| |||
an extension | total Length of Cord in Feet | ||||
cord, be sure to | 120V | ||||
use one heavy |
| ||||
enough to carry | 240V | ||||
the current |
| ||||
your product | Ampere Rating |
|
|
| |
Assembly instructions
ASSEMBLY TOOLS REQUIRED (NOT SUPPLIED):
- Phillips Screwdriver
Attaching Guard and bail handle to trimmer ![]() WARNING: Only use with handle and guard properly assembled to hedge trimmer. The use of the hedge trimmer without the proper guard or handle provided may result in serious personal injury.
WARNING: Only use with handle and guard properly assembled to hedge trimmer. The use of the hedge trimmer without the proper guard or handle provided may result in serious personal injury.
will draw. An | More | Not more | American Wire Gauge |
| |||
undersized cord | Than | - | Than | 18 | 16 | 16 | 14 |
will cause a drop | 0 | 6 | |||||
in line voltage | 6 | - | 10 | 18 | 16 | 14 | 12 |
resulting in loss | 10 | - | 12 | 16 | 16 | 14 | 12 |
of power and | 12 | - | 16 | 14 | 12 | Not Recommended | |
overheating. |
|
|
|
|
|
|
|
|
|
|
|
|
|
| |
The following table shows the correct size to use depending on cord length | |||||||
and nameplate ampere rating. If in doubt, use the next heavier gauge. The | |||||||
smaller the gauge number, the heavier the cord. |
|
| |||||
The trimmer is shipped with the guard and bail handle attached to the trimmer with a plastic zip tie.
To assemble to trimmer:
•Cut the plastic zip tie.
•Remove the six screws that are partially run into the trimmer housing (figure A).
4
A |