PREPARING YOUR CHAIN SAW FOR USE |
| |||||
WARNING: Read and understand all instructions. Failure to | ||||||
follow all instructions listed below may result in electric shock, fire | ||||||
and/or serious personal injury. |
|
|
|
|
|
|
ASSEMBLY |
|
|
|
|
| |
Installing the Guide Bar and Saw Chain |
|
|
|
| ||
CAUTION: Sharp chain. Always wear protective gloves when | ||||||
handling the chain. The chain is sharp and can cut you when it is not | ||||||
running. |
|
|
|
|
|
|
WARNING: Sharp moving chain. To prevent accidental |
|
| ||||
operation, insure that battery is disconnected from the tool |
| |||||
before performing the following operations. | Failure to do this | |||||
could result in serious personal | D |
|
|
|
|
|
injury. |
|
|
|
|
| |
The saw chain and guide bar are |
|
|
|
| 11 | |
packed separately in the carton |
|
|
|
| ||
inside the scabbard. The chain has |
|
| 10 |
|
|
|
been placed on the guide bar at the |
|
|
|
|
| |
factory to insure that the teeth are |
|
|
|
|
|
|
facing in the proper direction when |
|
|
|
| 13 | |
you first attach it. Should the chain |
|
|
|
| ||
come off of the guide bar, refer to the |
|
|
|
|
|
|
section “Replacing the Chain” for proper tooth orientation. |
|
|
| |||
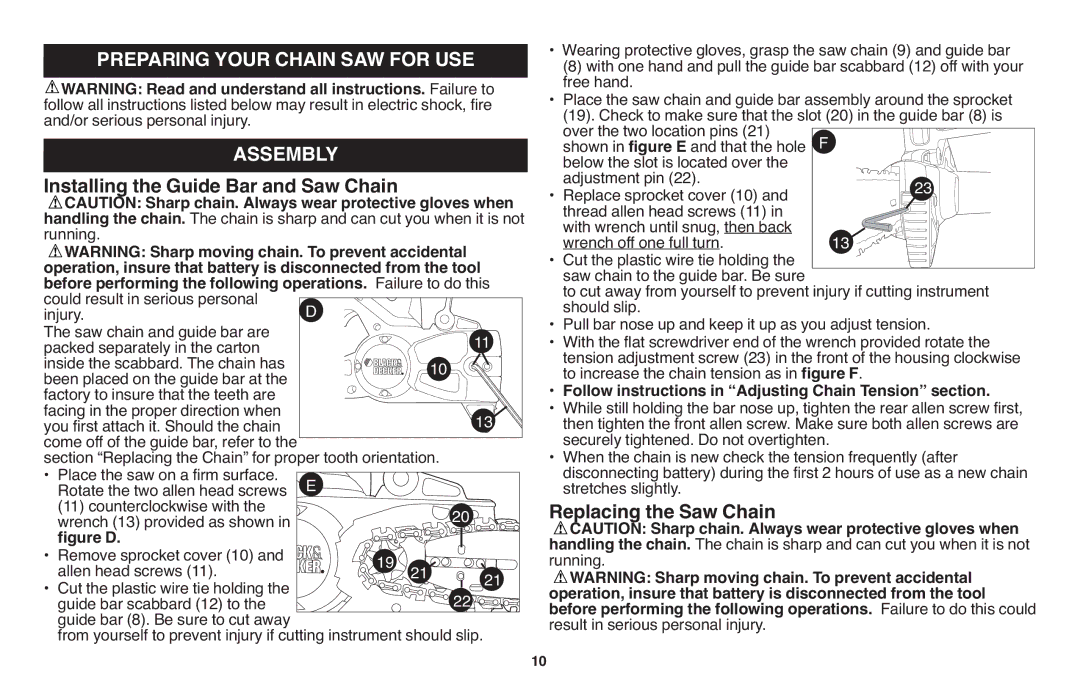
• Place the saw on a firm surface. | E |
|
|
|
|
|
Rotate the two allen head screws |
|
|
|
|
| |
(11) counterclockwise with the |
|
|
| 20 |
|
|
wrench (13) provided as shown in |
|
|
|
|
| |
figure D. |
|
|
|
|
|
|
• Remove sprocket cover (10) and |
| 19 |
|
|
|
|
allen head screws (11). |
| 21 |
|
| 21 | |
• Cut the plastic wire tie holding the |
|
| 22 |
| ||
guide bar scabbard (12) to the |
|
|
|
|
| |
guide bar (8). Be sure to cut away |
|
|
|
|
|
|
from yourself to prevent injury if cutting instrument should slip. |
| |||||
• Wearing protective gloves, grasp the saw chain (9) and guide bar | ||
| (8) with one hand and pull the guide bar scabbard (12) off with your | |
| free hand. |
|
• Place the saw chain and guide bar assembly around the sprocket | ||
| (19). Check to make sure that the slot (20) in the guide bar (8) is | |
| over the two location pins (21) | F |
| shown in figure E and that the hole | |
| below the slot is located over the |
|
• | adjustment pin (22). | 23 |
Replace sprocket cover (10) and | ||
| thread allen head screws (11) in |
|
| with wrench until snug, then back | 13 |
• | wrench off one full turn. | |
Cut the plastic wire tie holding the |
| |
| saw chain to the guide bar. Be sure |
|
| to cut away from yourself to prevent injury if cutting instrument | |
• | should slip. |
|
Pull bar nose up and keep it up as you adjust tension. | ||
• | With the flat screwdriver end of the wrench provided rotate the | |
| tension adjustment screw (23) in the front of the housing clockwise | |
• | to increase the chain tension as in figure F. | |
Follow instructions in “Adjusting Chain Tension” section. | ||
• | While still holding the bar nose up, tighten the rear allen screw first, | |
| then tighten the front allen screw. Make sure both allen screws are | |
• | securely tightened. Do not overtighten. | |
When the chain is new check the tension frequently (after | ||
| disconnecting battery) during the first 2 hours of use as a new chain | |
stretches slightly.
Replacing the Saw Chain
CAUTION: Sharp chain. Always wear protective gloves when handling the chain. The chain is sharp and can cut you when it is not running.
WARNING: Sharp moving chain. To prevent accidental operation, insure that battery is disconnected from the tool before performing the following operations. Failure to do this could result in serious personal injury.
10