STANDARD INSTALLATION (FLAT CABINET)
Important: Always wear protective glasses or goggles to prevent injury when drilling.
1.Clear countertop under installation area to avoid getting dust or debris on other appliances or items. Open cabinets and remove contents to make mounting easier.
2.With cabinet doors open, place mounting template flush against the surface of the underside of your cabinet, making sure to align thick line on template with bottom front edge of your cabinet (D).
D
Important: Do not align screw holes on template with the partition between cabinets, as this will prevent you from installing the appliance properly. Pay close attention to where the drill holes will be set so as not to damage your cabinets during mounting. Drilling through your cabinet’s partition may cause damage to cabinets and prevent proper installation.
3.Once thick line is straight with bottom front edge, pull template tight and tape down on all 4 corners to hold in place.
4.Drilling from under the cabinet up, drill holes through the 4 places marked on the template, using a
E
Important: Always ensure you are drilling straight up through the marked mounting hole on the template. Drilling at an angle may prevent proper installation and may damage cabinets if the drill bit pierces the partition.
5.Once holes are drilled, remove tape and mounting template and save template with your instructions in case you move or wish to remount at a later time.
6.Wipe dust and debris off inside cabinet surface. Also, make sure
7.Place a washer inside the cabinet over each of the 4 holes you drilled.
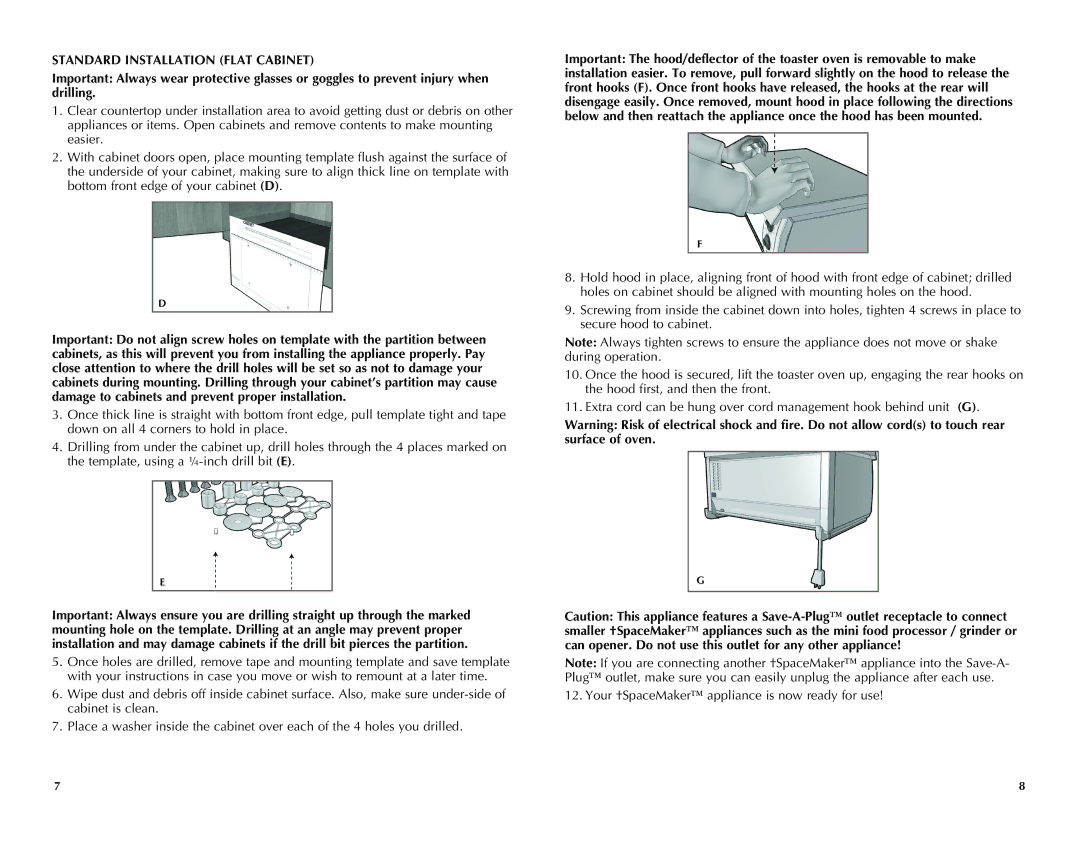
Important: The hood/deflector of the toaster oven is removable to make installation easier. To remove, pull forward slightly on the hood to release the front hooks (F). Once front hooks have released, the hooks at the rear will disengage easily. Once removed, mount hood in place following the directions below and then reattach the appliance once the hood has been mounted.
F
8.Hold hood in place, aligning front of hood with front edge of cabinet; drilled holes on cabinet should be aligned with mounting holes on the hood.
9.Screwing from inside the cabinet down into holes, tighten 4 screws in place to secure hood to cabinet.
Note: Always tighten screws to ensure the appliance does not move or shake during operation.
10.Once the hood is secured, lift the toaster oven up, engaging the rear hooks on the hood first, and then the front.
11.Extra cord can be hung over cord management hook behind unit (G).
Warning: Risk of electrical shock and fire. Do not allow cord(s) to touch rear surface of oven.
G
Caution: This appliance features a
Note: If you are connecting another †SpaceMaker™ appliance into the
12. Your †SpaceMaker™ appliance is now ready for use!
7 | 8 |