A
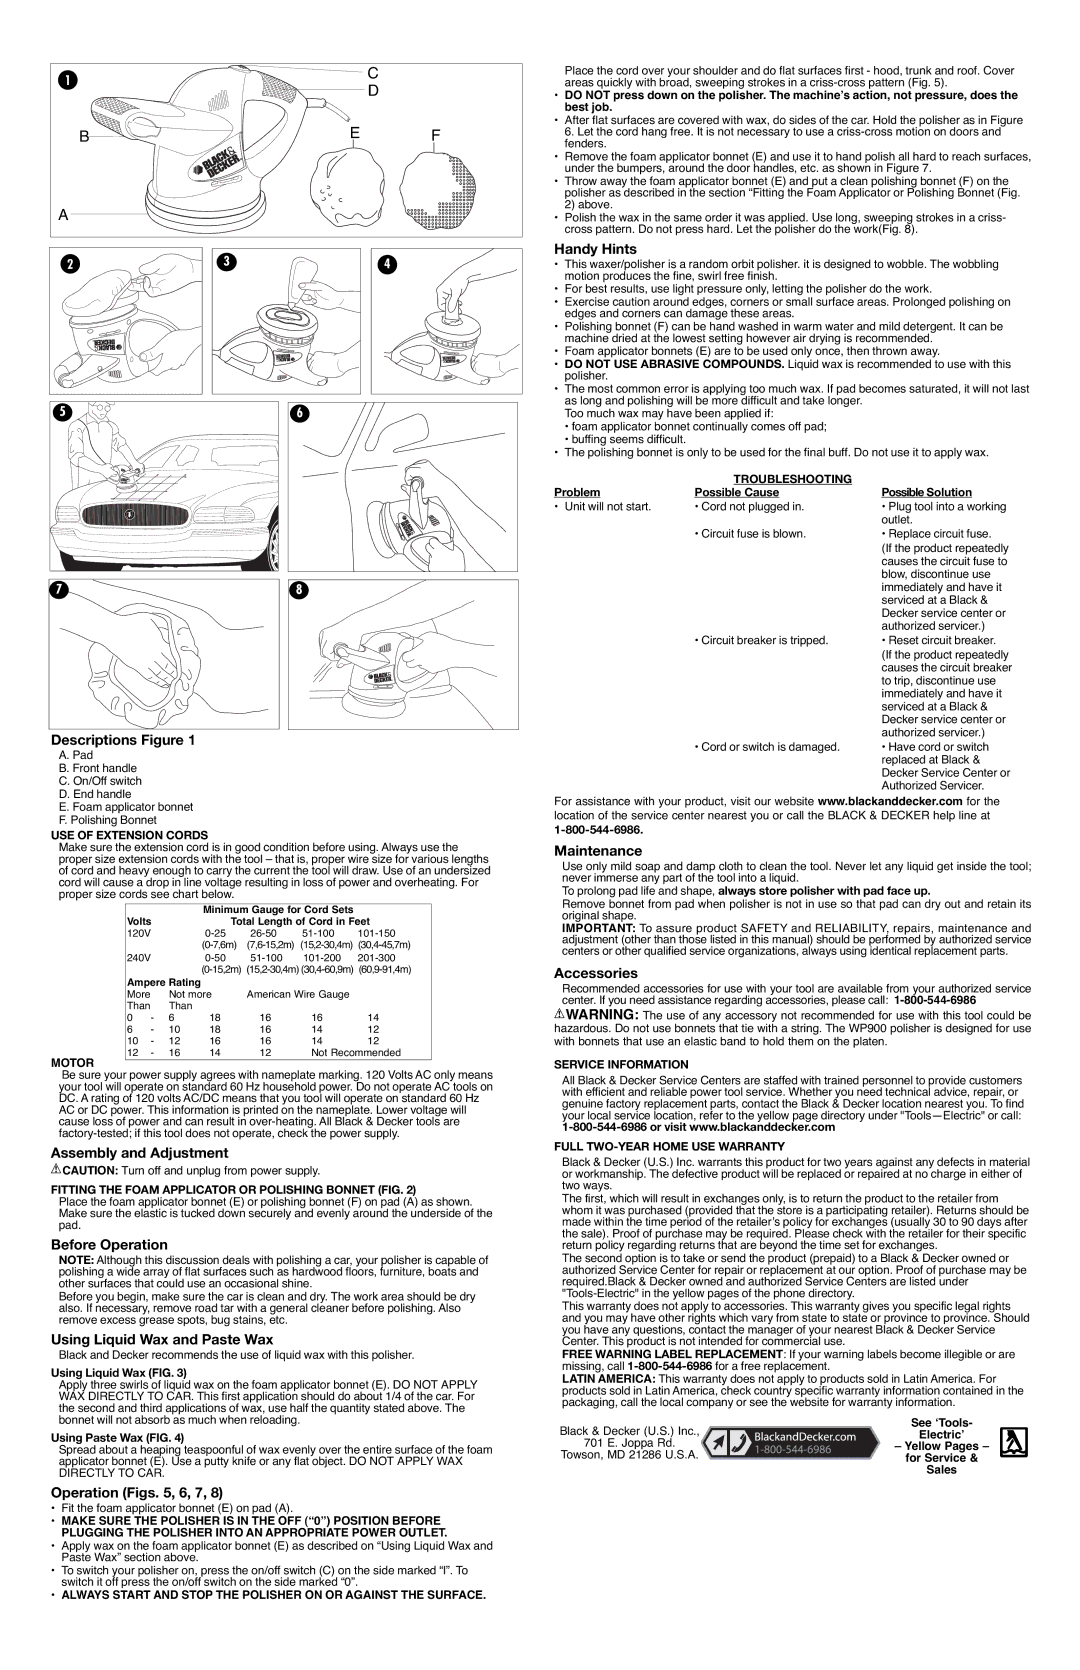
Descriptions Figure 1
A.Pad
B.Front handle
C.On/Off switch
D.End handle
E.Foam applicator bonnet
F.Polishing Bonnet
USE OF EXTENSION CORDS
Make sure the extension cord is in good condition before using. Always use the proper size extension cords with the tool – that is, proper wire size for various lengths of cord and heavy enough to carry the current the tool will draw. Use of an undersized cord will cause a drop in line voltage resulting in loss of power and overheating. For proper size cords see chart below.
| | | Minimum Gauge for Cord Sets | |
Volts | | Total Length of Cord in Feet |
120V | | 0-25 | 26-50 | 51-100 | 101-150 |
| | | (0-7,6m) | (7,6-15,2m) (15,2-30,4m) (30,4-45,7m) |
240V | | 0-50 | 51-100 | 101-200 | 201-300 |
| | | (0-15,2m) (15,2-30,4m) (30,4-60,9m) (60,9-91,4m) |
Ampere Rating | | | | |
More | | Not more | American Wire Gauge | |
Than | | Than | | | | |
0 | - | 6 | 18 | 16 | 16 | 14 |
6 | - | 10 | 18 | 16 | 14 | 12 |
10 | - | 12 | 16 | 16 | 14 | 12 |
12 | - | 16 | 14 | 12 | Not Recommended |
MOTOR
Be sure your power supply agrees with nameplate marking. 120 Volts AC only means your tool will operate on standard 60 Hz household power. Do not operate AC tools on DC. A rating of 120 volts AC/DC means that you tool will operate on standard 60 Hz AC or DC power. This information is printed on the nameplate. Lower voltage will cause loss of power and can result in over-heating. All Black & Decker tools are factory-tested; if this tool does not operate, check the power supply.
Assembly and Adjustment
 CAUTION: Turn off and unplug from power supply.
FITTING THE FOAM APPLICATOR OR POLISHING BONNET (FIG. 2)
Place the foam applicator bonnet (E) or polishing bonnet (F) on pad (A) as shown. Make sure the elastic is tucked down securely and evenly around the underside of the pad.
Before Operation
NOTE: Although this discussion deals with polishing a car, your polisher is capable of polishing a wide array of flat surfaces such as hardwood floors, furniture, boats and other surfaces that could use an occasional shine.
Before you begin, make sure the car is clean and dry. The work area should be dry also. If necessary, remove road tar with a general cleaner before polishing. Also remove excess grease spots, bug stains, etc.
Using Liquid Wax and Paste Wax
Black and Decker recommends the use of liquid wax with this polisher.
Using Liquid Wax (FIG. 3)
Apply three swirls of liquid wax on the foam applicator bonnet (E). DO NOT APPLY WAX DIRECTLY TO CAR. This first application should do about 1/4 of the car. For the second and third applications of wax, use half the quantity stated above. The bonnet will not absorb as much when reloading.
Using Paste Wax (FIG. 4)
Spread about a heaping teaspoonful of wax evenly over the entire surface of the foam applicator bonnet (E). Use a putty knife or any flat object. DO NOT APPLY WAX DIRECTLY TO CAR.
Operation (Figs. 5, 6, 7, 8)
•Fit the foam applicator bonnet (E) on pad (A).
•MAKE SURE THE POLISHER IS IN THE OFF (“0”) POSITION BEFORE PLUGGING THE POLISHER INTO AN APPROPRIATE POWER OUTLET.
•Apply wax on the foam applicator bonnet (E) as described on “Using Liquid Wax and Paste Wax” section above.
•To switch your polisher on, press the on/off switch (C) on the side marked “l”. To switch it off press the on/off switch on the side marked “0”.
•ALWAYS START AND STOP THE POLISHER ON OR AGAINST THE SURFACE.
Place the cord over your shoulder and do flat surfaces first - hood, trunk and roof. Cover areas quickly with broad, sweeping strokes in a criss-cross pattern (Fig. 5).
•DO NOT press down on the polisher. The machineʼs action, not pressure, does the best job.
•After flat surfaces are covered with wax, do sides of the car. Hold the polisher as in Figure 6. Let the cord hang free. It is not necessary to use a criss-cross motion on doors and fenders.
•Remove the foam applicator bonnet (E) and use it to hand polish all hard to reach surfaces, under the bumpers, around the door handles, etc. as shown in Figure 7.
•Throw away the foam applicator bonnet (E) and put a clean polishing bonnet (F) on the polisher as described in the section “Fitting the Foam Applicator or Polishing Bonnet (Fig. 2) above.
•Polish the wax in the same order it was applied. Use long, sweeping strokes in a criss- cross pattern. Do not press hard. Let the polisher do the work(Fig. 8).
Handy Hints
•This waxer/polisher is a random orbit polisher. it is designed to wobble. The wobbling motion produces the fine, swirl free finish.
•For best results, use light pressure only, letting the polisher do the work.
•Exercise caution around edges, corners or small surface areas. Prolonged polishing on edges and corners can damage these areas.
•Polishing bonnet (F) can be hand washed in warm water and mild detergent. It can be machine dried at the lowest setting however air drying is recommended.
•Foam applicator bonnets (E) are to be used only once, then thrown away.
•DO NOT USE ABRASIVE COMPOUNDS. Liquid wax is recommended to use with this polisher.
•The most common error is applying too much wax. If pad becomes saturated, it will not last as long and polishing will be more difficult and take longer.
Too much wax may have been applied if:
•foam applicator bonnet continually comes off pad;
•buffing seems difficult.
•The polishing bonnet is only to be used for the final buff. Do not use it to apply wax.
| TROUBLESHOOTING | |
Problem | Possible Cause | Possible Solution |
• Unit will not start. | • Cord not plugged in. | • Plug tool into a working |
| | outlet. |
| • Circuit fuse is blown. | • Replace circuit fuse. |
| | (If the product repeatedly |
| | causes the circuit fuse to |
| | blow, discontinue use |
| | immediately and have it |
| | serviced at a Black & |
| | Decker service center or |
| | authorized servicer.) |
| • Circuit breaker is tripped. | • Reset circuit breaker. |
| | (If the product repeatedly |
| | causes the circuit breaker |
| | to trip, discontinue use |
| | immediately and have it |
| | serviced at a Black & |
| | Decker service center or |
| | authorized servicer.) |
| • Cord or switch is damaged. | • Have cord or switch |
| | replaced at Black & |
| | Decker Service Center or |
| | Authorized Servicer. |
For assistance with your product, visit our website www.blackanddecker.com for the location of the service center nearest you or call the BLACK & DECKER help line at
1-800-544-6986.
Maintenance
Use only mild soap and damp cloth to clean the tool. Never let any liquid get inside the tool; never immerse any part of the tool into a liquid.
To prolong pad life and shape, always store polisher with pad face up.
Remove bonnet from pad when polisher is not in use so that pad can dry out and retain its original shape.
IMPORTANT: To assure product SAFETY and RELIABILITY, repairs, maintenance and adjustment (other than those listed in this manual) should be performed by authorized service centers or other qualified service organizations, always using identical replacement parts.
Accessories
Recommended accessories for use with your tool are available from your authorized service center. If you need assistance regarding accessories, please call: 1-800-544-6986
 WARNING: The use of any accessory not recommended for use with this tool could be hazardous. Do not use bonnets that tie with a string. The WP900 polisher is designed for use with bonnets that use an elastic band to hold them on the platen.
SERVICE INFORMATION
All Black & Decker Service Centers are staffed with trained personnel to provide customers with efficient and reliable power tool service. Whether you need technical advice, repair, or genuine factory replacement parts, contact the Black & Decker location nearest you. To find your local service location, refer to the yellow page directory under "Tools—Electric" or call:
1-800-544-6986 or visit www.blackanddecker.com
FULL TWO-YEAR HOME USE WARRANTY
Black & Decker (U.S.) Inc. warrants this product for two years against any defects in material or workmanship. The defective product will be replaced or repaired at no charge in either of two ways.
The first, which will result in exchanges only, is to return the product to the retailer from whom it was purchased (provided that the store is a participating retailer). Returns should be made within the time period of the retailerʼs policy for exchanges (usually 30 to 90 days after the sale). Proof of purchase may be required. Please check with the retailer for their specific return policy regarding returns that are beyond the time set for exchanges.
The second option is to take or send the product (prepaid) to a Black & Decker owned or authorized Service Center for repair or replacement at our option. Proof of purchase may be required.Black & Decker owned and authorized Service Centers are listed under "Tools-Electric" in the yellow pages of the phone directory.
This warranty does not apply to accessories. This warranty gives you specific legal rights and you may have other rights which vary from state to state or province to province. Should you have any questions, contact the manager of your nearest Black & Decker Service Center. This product is not intended for commercial use.
FREE WARNING LABEL REPLACEMENT: If your warning labels become illegible or are missing, call 1-800-544-6986for a free replacement.
LATIN AMERICA: This warranty does not apply to products sold in Latin America. For products sold in Latin America, check country specific warranty information contained in the packaging, call the local company or see the website for warranty information.
Black & Decker (U.S.) Inc., | See ʻTools- |
Electricʼ |
701 E. Joppa Rd. | – Yellow Pages – |
Towson, MD 21286 U.S.A. | for Service & |
| Sales |