1. What's Included |
|
1. RF Receiver | x 1pcs |
3. Key Functions
1 | 3 |
|
2
![]() 4
4
MRF90 | 2. RF Remote Control | x 1pcs | |
Floating, |
|
|
|
Radio Frequency Wireless Remote With White LED LIGHT | 3. Long Lasting 3V Lithium Battery x 1pcs | ||
| |||
| 4. | User Manual x 1pcs |
|
| 5. | ||
| 6. | ||
| 7. | Double sided Mounting Tape x 2 pcs | |
| 8. | Lanyard x 1pcs |
|
Compatible with MR2180UA, MR1650UA, MR1630UA
| 2. Connecting the RF Receiver | |||||||||||||||
| Connect the MRF90 black box receiver to the RF | |||||||||||||||
MRF90 | remote port connector at the back of the unit securely. | |||||||||||||||
Make sure the pins are aligned properly when pugging | ||||||||||||||||
in, and the connection is secure, use tape to secure | ||||||||||||||||
Floating, | the connection if needed. When installing the receiver | |||||||||||||||
do not put it in any metal shielding for better reception. | ||||||||||||||||
Radio Frequency Wireless Remote With White LED LIGHT | ||||||||||||||||
|
|
|
|
|
|
|
|
|
|
|
|
|
|
| ||
|
|
|
|
|
|
|
|
|
|
|
|
|
|
|
| |
|
|
|
|
|
|
|
|
|
|
|
|
|
|
|
| |
|
|
|
|
|
|
|
|
|
|
|
|
|
|
|
| |
Main Unit
RF Remote Port | Port |
| RF Remote |
RF Receiver
7 ![]()
![]()
![]() 6
6
![]() 5
5
8
![]() 9
9
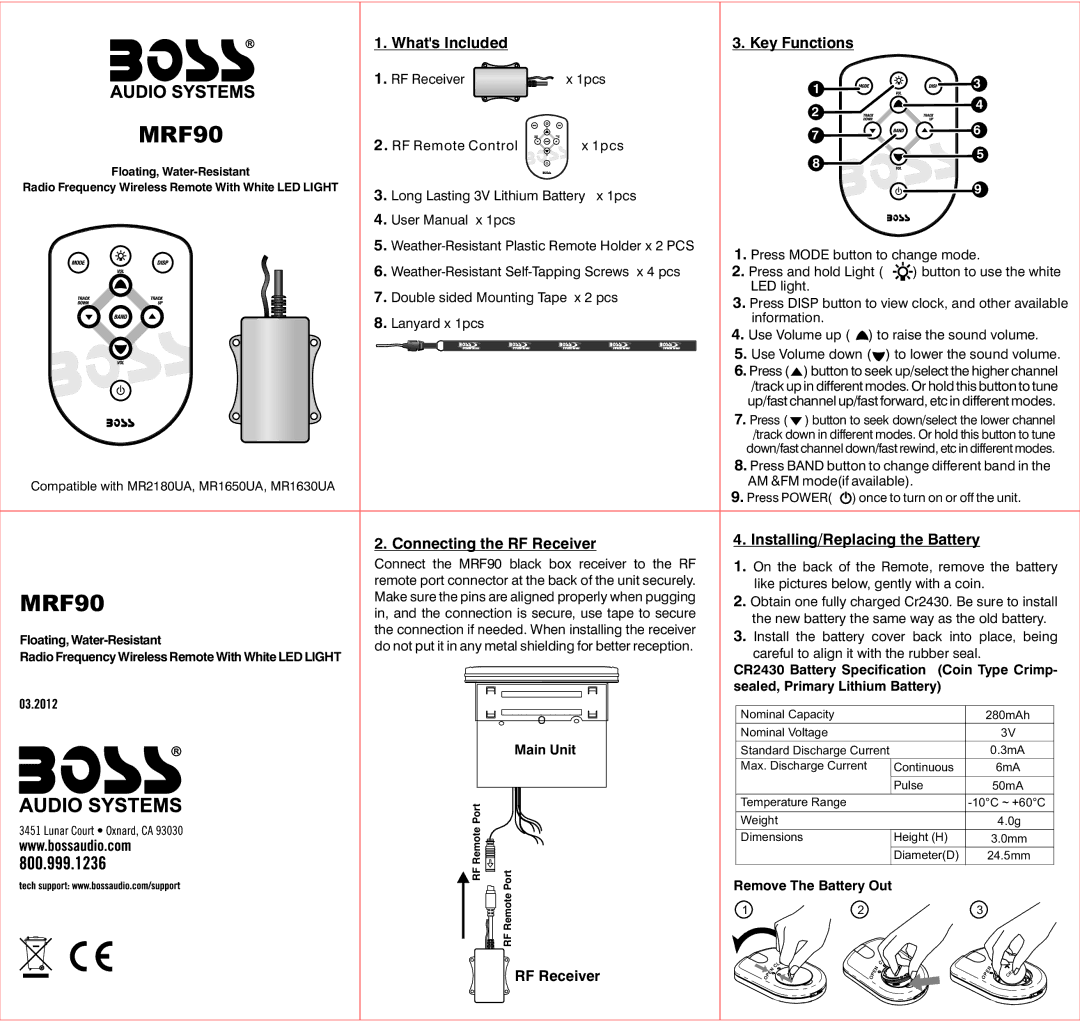
1.Press MODE button to change mode.
2.Press and hold Light ( ![]() ) button to use the white LED light.
) button to use the white LED light.
3.Press DISP button to view clock, and other available information.
4.Use Volume up ( ![]() ) to raise the sound volume.
) to raise the sound volume.
5.Use Volume down (![]() ) to lower the sound volume.
) to lower the sound volume.
6.Press ( ) button to seek up/select the higher channel
/track up in different modes. Or hold this button to tune up/fast channel up/fast forward, etc in different modes.
7.Press ( ![]() ) button to seek down/select the lower channel
) button to seek down/select the lower channel
/track down in different modes. Or hold this button to tune down/fast channel down/fast rewind, etc in different modes.
8.Press BAND button to change different band in the AM &FM mode(if available).
9.Press POWER( ![]() ) once to turn on or off the unit.
) once to turn on or off the unit.
4.Installing/Replacing the Battery
1.On the back of the Remote, remove the battery like pictures below, gently with a coin.
2.Obtain one fully charged Cr2430. Be sure to install the new battery the same way as the old battery.
3.Install the battery cover back into place, being
careful to align it with the rubber seal.
CR2430 Battery Specification (Coin Type Crimp- sealed, Primary Lithium Battery)
Nominal Capacity |
| 280mAh |
Nominal Voltage |
| 3V |
Standard Discharge Current |
| 0.3mA |
Max. Discharge Current | Continuous | 6mA |
| Pulse | 50mA |
Temperature Range |
| |
Weight |
| 4.0g |
Dimensions | Height (H) | 3.0mm |
| Diameter(D) | 24.5mm |
Remove The Battery Out
1 |
| 2 | 3 |
|
|
|
|
|
| E |
|
|
|
| E |
| E | S |
|
|
|
| |
| LO |
|
|
|
| S | |
| S |
|
|
|
| O | |
| LO | C |
|
|
|
| L |
| C | N |
|
|
| N | C |
O PE | N |
|
| E |
| ||
| OP | O | P |
|
| ||
|
|
|
|
