| Express® Deck Lavatory System |
Installation Instructions |
|
|
|
Installation Instructions continued . . .
Step 5: Optional hot water heater
WARNING: To avoid personal injury or damage to the unit when installing the water heater, make all plumbing connections first, then proceed with the electrical connections.
NOTE: 240/208 or 277 voltage is required |
|
|
|
|
|
for hot water heater. Refer to the |
|
| #8 NUT |
| |
installation manual provided with the hot | BRACKET |
| |||
#8 WASHER |
|
| |||
water heater for further installation |
|
|
|
| |
|
|
|
|
| |
information. |
|
|
|
|
|
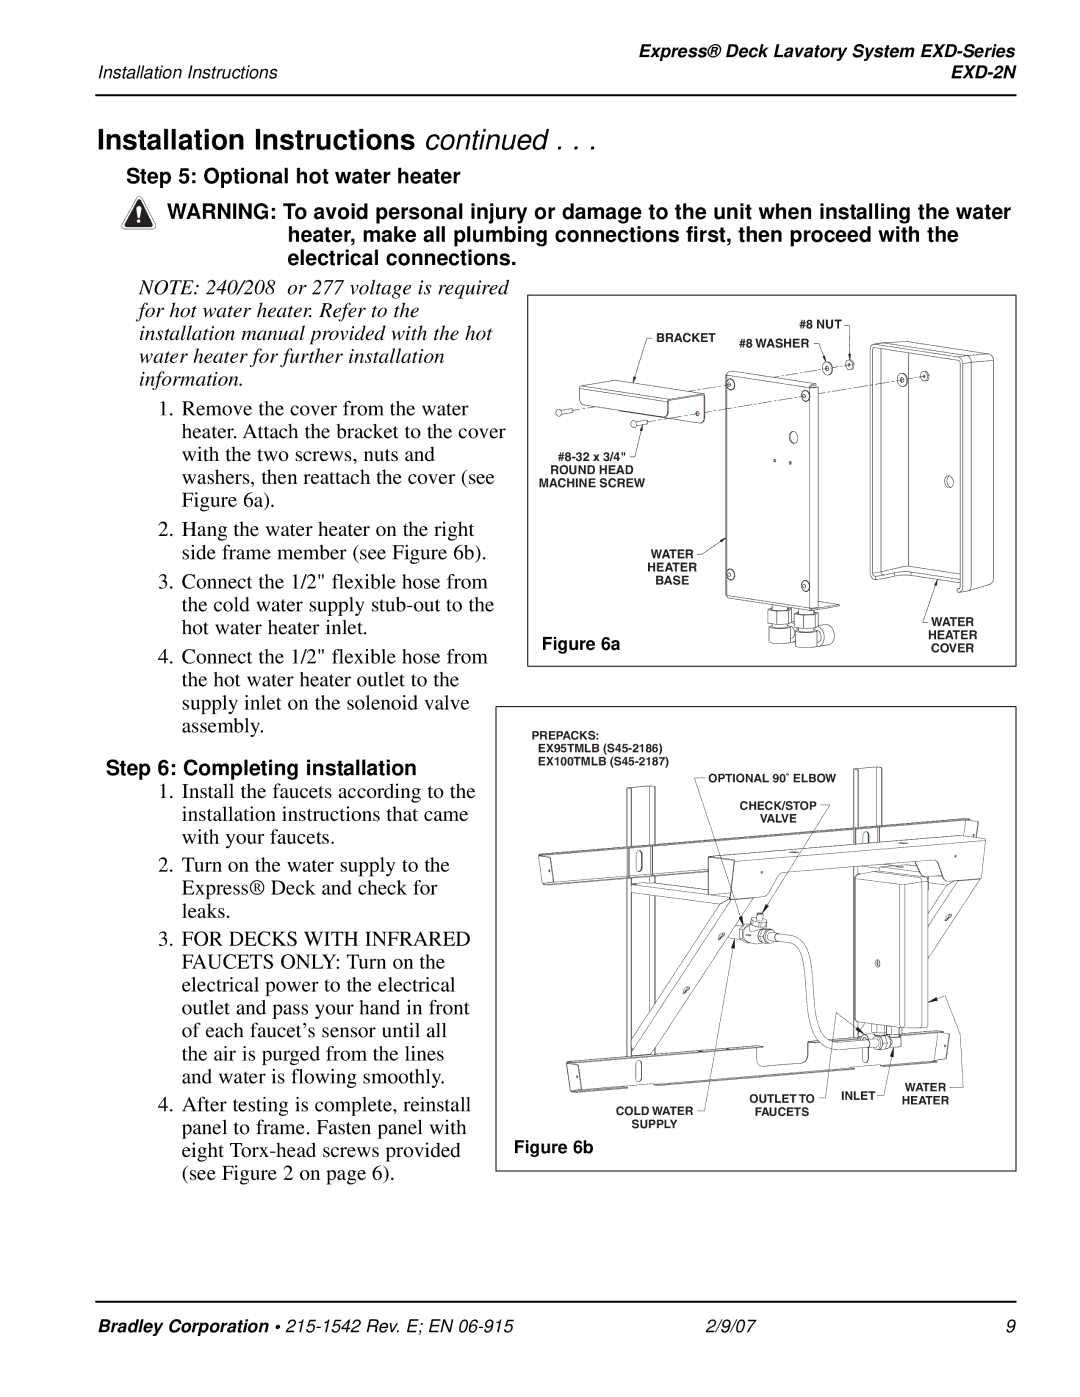
1. Remove the cover from the water |
|
|
|
|
|
heater. Attach the bracket to the cover |
|
|
|
|
|
with the two screws, nuts and |
|
|
|
| |
washers, then reattach the cover (see | MACHINE SCREW |
|
|
|
|
| ROUND HEAD |
|
|
|
|
Figure 6a). |
|
|
|
|
|
2. Hang the water heater on the right |
|
|
|
|
|
side frame member (see Figure 6b). | WATER |
|
|
|
|
3. Connect the 1/2" flexible hose from | HEATER |
|
|
|
|
BASE |
|
|
|
| |
the cold water supply |
|
|
|
| HEATER |
hot water heater inlet. |
|
|
|
| |
|
|
|
|
| WATER |
4. Connect the 1/2" flexible hose from | Figure 6a |
|
|
| COVER |
|
|
|
|
| |
the hot water heater outlet to the |
|
|
|
|
|
supply inlet on the solenoid valve |
|
|
|
|
|
assembly. | PREPACKS: |
|
|
|
|
Step 6: Completing installation | EX95TMLB | OPTIONAL 90˚ ELBOW |
|
| |
EX100TMLB |
|
| |||
|
|
|
|
| |
1. Install the faucets according to the |
|
| CHECK/STOP |
|
|
installation instructions that came |
|
|
|
| |
|
| VALVE |
|
| |
with your faucets. |
|
|
|
|
|
2. Turn on the water supply to the |
|
|
|
|
|
Express® Deck and check for |
|
|
|
|
|
leaks. |
|
|
|
|
|
3. FOR DECKS WITH INFRARED |
|
|
|
|
|
FAUCETS ONLY: Turn on the |
|
|
|
|
|
electrical power to the electrical |
|
|
|
|
|
outlet and pass your hand in front |
|
|
|
|
|
of each faucet’s sensor until all |
|
|
|
|
|
the air is purged from the lines |
|
|
|
|
|
and water is flowing smoothly. |
|
|
| INLET | WATER |
4. After testing is complete, reinstall |
|
| OUTLET TO | ||
COLD WATER |
| HEATER | |||
| FAUCETS |
|
| ||
panel to frame. Fasten panel with | SUPPLY |
|
|
|
|
|
|
|
|
| |
eight | Figure 6b |
|
|
|
|
(see Figure 2 on page 6). |
|
|
|
|
|
Bradley Corporation • | 2/9/07 | 9 |
