120 VAC
LINE IN
SWITCH BOX

MODEL 758

Page 3

INSTALL THE HOUSING (continued)

Existing Construction

CONNECT THE WIRING

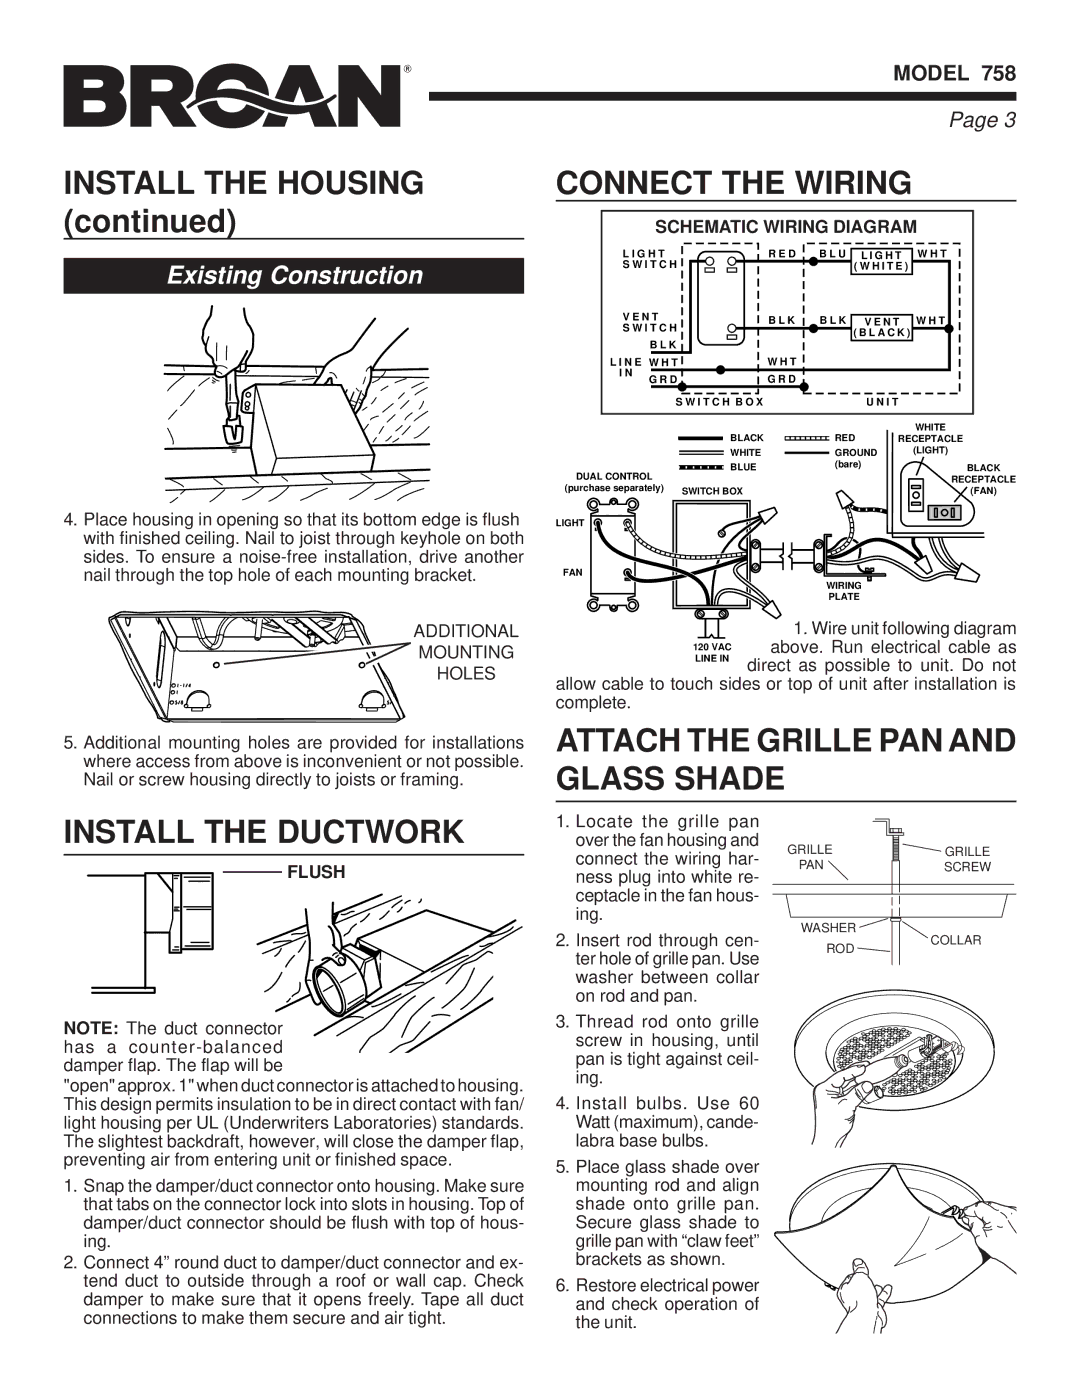
SCHEMATIC WIRING DIAGRAM

L I G H T

R E D

B L U L I G H T W H T

S W I T C H


( W H I T E )

V E N T


B L K

B L K


W H T


V E N T

S W I T C H


( B L A C K )


B L K


W H T


L I N E W H T


I N


G R D

G R D


S W I T C H B O X


U N I T

4.Place housing in opening so that its bottom edge is flush with finished ceiling. Nail to joist through keyhole on both sides. To ensure a noise-free installation, drive another nail through the top hole of each mounting bracket.

DUAL CONTROL

(purchase separately)

LIGHT

FAN

BLACK

RED

WHITE

RECEPTACLE

WHITE

GROUND

(LIGHT)

BLUE

(bare)

BLACK


RECEPTACLE


(FAN)

WIRING

PLATE

ADDITIONAL

MOUNTING

HOLES

5.Additional mounting holes are provided for installations where access from above is inconvenient or not possible. Nail or screw housing directly to joists or framing.

1. Wire unit following diagram above. Run electrical cable as direct as possible to unit. Do not

allow cable to touch sides or top of unit after installation is complete.

ATTACH THE GRILLE PAN AND GLASS SHADE

INSTALL THE DUCTWORK

FLUSH

NOTE: The duct connector has a counter-balanced damper flap. The flap will be

"open" approx. 1" when duct connector is attached to housing. This design permits insulation to be in direct contact with fan/ light housing per UL (Underwriters Laboratories) standards. The slightest backdraft, however, will close the damper flap, preventing air from entering unit or finished space.

1.Snap the damper/duct connector onto housing. Make sure that tabs on the connector lock into slots in housing. Top of damper/duct connector should be flush with top of hous- ing.

2.Connect 4” round duct to damper/duct connector and ex- tend duct to outside through a roof or wall cap. Check damper to make sure that it opens freely. Tape all duct connections to make them secure and air tight.

1.Locate the grille pan over the fan housing and connect the wiring har- ness plug into white re- ceptacle in the fan hous- ing.

2.Insert rod through cen- ter hole of grille pan. Use washer between collar on rod and pan.

3.Thread rod onto grille screw in housing, until pan is tight against ceil- ing.

4.Install bulbs. Use 60 Watt (maximum), cande- labra base bulbs.

5.Place glass shade over mounting rod and align shade onto grille pan. Secure glass shade to grille pan with “claw feet” brackets as shown.

6.Restore electrical power and check operation of the unit.

GRILLE

PAN

WASHER

ROD

GRILLE SCREW

COLLAR

Page 3
Image 3
Broan 758 Connect the Wiring, Attach the Grille PAN and Glass Shade Install the Ductwork, Schematic Wiring Diagram, Flush

758 specifications

The Broan 758 is an impressive range hood that blends style and efficiency, making it a popular choice for homeowners and chefs alike. This appliance is designed to provide excellent ventilation while enhancing the aesthetic appeal of any kitchen. With a sleek design and advanced features, the Broan 758 stands out in both functionality and appearance.

One of the main features of the Broan 758 is its powerful ventilation capability. Equipped with a multi-speed fan, it efficiently removes smoke, steam, and odors from the kitchen, ensuring a clean and comfortable cooking environment. The hood operates quietly, allowing for effective airflow without disturbing conversations or the ambiance of the kitchen.

The Broan 758 incorporates innovative technologies to enhance user experience. It includes a convenient halogen lighting system that illuminates the cooking surface, providing excellent visibility while preparing meals. This energy-efficient lighting creates a warm and inviting atmosphere in the kitchen. Additionally, the range hood features washable grease filters that capture airborne grease, ensuring easy maintenance and optimal performance over time.

Another key characteristic of the Broan 758 is its versatile installation options. It can be mounted as a wall or under-cabinet hood, catering to various kitchen layouts and user preferences. The appliance is constructed from high-quality materials, ensuring durability and longevity while adding a touch of sophistication to the kitchen decor.

The design of the Broan 758 is not only functional but also stylish. With its modern stainless steel finish, it effortlessly complements a wide range of kitchen styles, from contemporary to traditional. The sleek lines and streamlined profile make it a visually appealing addition to any culinary space.

In summary, the Broan 758 is a high-performing range hood that excels in ventilation, lighting, and design. Its powerful multi-speed fan, energy-efficient halogen lights, and washable grease filters make it a practical choice for any kitchen. The versatility of installation and durable construction further enhance its appeal. With the Broan 758, users can enjoy a cleaner kitchen environment without compromising on style or performance, making it a valuable investment for everyday cooking enthusiasts.