MODEL BCR1
RANGE HOOD REMOTE CONTROL
READ AND SAVE THESE INSTRUCTIONS
Your Broan BCR1 remote control is a Radio Frequency (RF) wireless device used to operate the fan, lights, and
Unlike Infrared (IR) remotes, which are the most common, RF remotes are easier to use because they do not require line of sight, so they do not have to be aimed directly at the equipment they are controlling. RF is a very convenient, reliable method to transmit commands without wires for the operation of your compatible range hood. This system will offer exceptional performance in most cases. Although signals will often travel great distances, as well as around and through structures/walls, there are some limitations to the operating range. See troubleshooting guide on page 1 regarding these limitations.
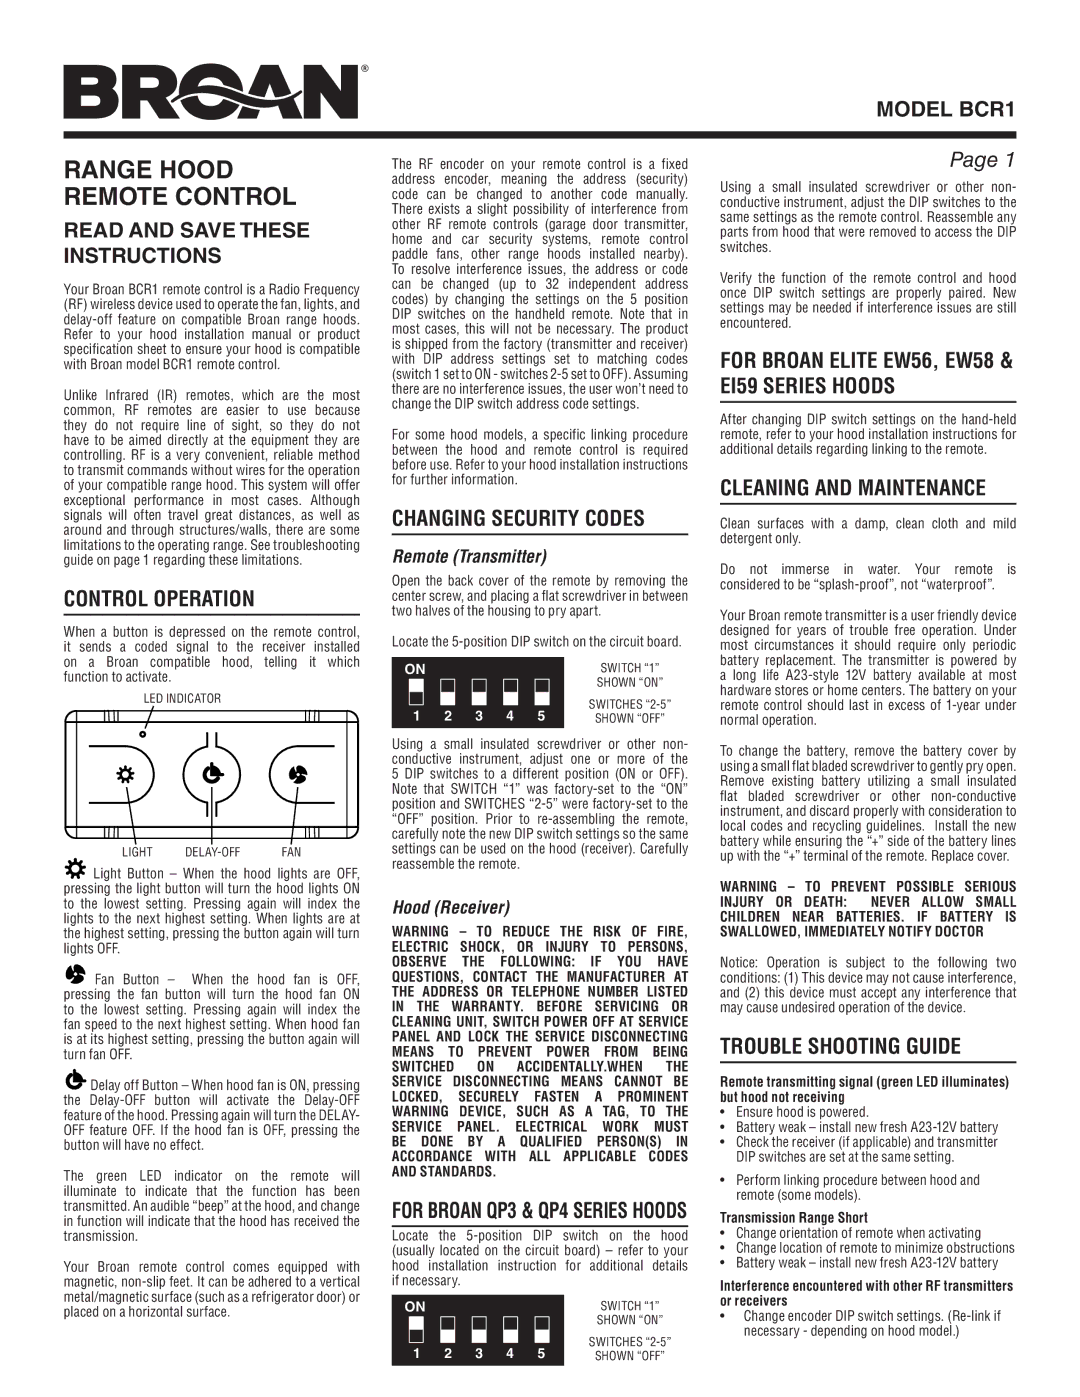
CONTROL OPERATION
When a button is depressed on the remote control, it sends a coded signal to the receiver installed on a Broan compatible hood, telling it which function to activate.
LED INDICATOR
LIGHT | FAN |
![]()
![]()
![]()
![]()
![]() Light Button – When the hood lights are OFF, pressing the light button will turn the hood lights ON to the lowest setting. Pressing again will index the lights to the next highest setting. When lights are at the highest setting, pressing the button again will turn lights OFF.
Light Button – When the hood lights are OFF, pressing the light button will turn the hood lights ON to the lowest setting. Pressing again will index the lights to the next highest setting. When lights are at the highest setting, pressing the button again will turn lights OFF.
![]() Fan Button – When the hood fan is OFF, pressing the fan button will turn the hood fan ON to the lowest setting. Pressing again will index the fan speed to the next highest setting. When hood fan is at its highest setting, pressing the button again will turn fan OFF.
Fan Button – When the hood fan is OFF, pressing the fan button will turn the hood fan ON to the lowest setting. Pressing again will index the fan speed to the next highest setting. When hood fan is at its highest setting, pressing the button again will turn fan OFF.
![]()
![]() Delay off Button – When hood fan is ON, pressing the
Delay off Button – When hood fan is ON, pressing the
The green LED indicator on the remote will illuminate to indicate that the function has been transmitted. An audible “beep” at the hood, and change in function will indicate that the hood has received the transmission.
Your Broan remote control comes equipped with magnetic,
The RF encoder on your remote control is a fixed address encoder, meaning the address (security) code can be changed to another code manually. There exists a slight possibility of interference from other RF remote controls (garage door transmitter, home and car security systems, remote control paddle fans, other range hoods installed nearby). To resolve interference issues, the address or code can be changed (up to 32 independent address codes) by changing the settings on the 5 position DIP switches on the handheld remote. Note that in most cases, this will not be necessary. The product is shipped from the factory (transmitter and receiver) with DIP address settings set to matching codes (switch 1 set to ON - switches
For some hood models, a specific linking procedure between the hood and remote control is required before use. Refer to your hood installation instructions for further information.
CHANGING SECURITY CODES
Remote (Transmitter)
Open the back cover of the remote by removing the center screw, and placing a flat screwdriver in between two halves of the housing to pry apart.
Locate the
ON | SWITCH “1” | ||||||||||
|
|
|
|
|
|
|
|
|
|
| SHOWN “ON” |
|
|
|
|
|
|
|
|
|
|
| SWITCHES |
1 2 3 4 5 |
| ||||||||||
| SHOWN “OFF” | ||||||||||
Using a small insulated screwdriver or other non- conductive instrument, adjust one or more of the 5 DIP switches to a different position (ON or OFF). Note that SWITCH “1” was
Hood (Receiver)
WARNING – TO REDUCE THE RISK OF FIRE, ELECTRIC SHOCK, OR INJURY TO PERSONS, OBSERVE THE FOLLOWING: IF YOU HAVE QUESTIONS, CONTACT THE MANUFACTURER AT THE ADDRESS OR TELEPHONE NUMBER LISTED IN THE WARRANTY. BEFORE SERVICING OR CLEANING UNIT, SWITCH POWER OFF AT SERVICE PANEL AND LOCK THE SERVICE DISCONNECTING MEANS TO PREVENT POWER FROM BEING SWITCHED ON ACCIDENTALLY.WHEN THE SERVICE DISCONNECTING MEANS CANNOT BE LOCKED, SECURELY FASTEN A PROMINENT WARNING DEVICE, SUCH AS A TAG, TO THE SERVICE PANEL. ELECTRICAL WORK MUST BE DONE BY A QUALIFIED PERSON(S) IN ACCORDANCE WITH ALL APPLICABLE CODES AND STANDARDS.
FOR BROAN QP3 & QP4 SERIES HOODS
Locate the
ON | SWITCH “1” | ||||||||||
|
|
|
|
|
|
|
|
|
|
| SHOWN “ON” |
|
|
|
|
|
|
|
|
|
|
| SWITCHES |
1 2 3 4 5 |
| ||||||||||
| SHOWN “OFF” | ||||||||||
Page 1
Using a small insulated screwdriver or other non- conductive instrument, adjust the DIP switches to the same settings as the remote control. Reassemble any parts from hood that were removed to access the DIP switches.
Verify the function of the remote control and hood once DIP switch settings are properly paired. New settings may be needed if interference issues are still encountered.
FOR BROAN ELITE EW56, EW58 &
EI59 SERIES HOODS
After changing DIP switch settings on the
CLEANING AND MAINTENANCE
Clean surfaces with a damp, clean cloth and mild detergent only.
Do not immerse in water. Your remote is considered to be
Your Broan remote transmitter is a user friendly device designed for years of trouble free operation. Under most circumstances it should require only periodic battery replacement. The transmitter is powered by
along life
To change the battery, remove the battery cover by using a small flat bladed screwdriver to gently pry open. Remove existing battery utilizing a small insulated flat bladed screwdriver or other
WARNING – TO PREVENT POSSIBLE SERIOUS INJURY OR DEATH: NEVER ALLOW SMALL CHILDREN NEAR BATTERIES. IF BATTERY IS SWALLOWED, IMMEDIATELY NOTIFY DOCTOR
Notice: Operation is subject to the following two
conditions: (1) This device may not cause interference, and (2) this device must accept any interference that may cause undesired operation of the device.
TROUBLE SHOOTING GUIDE
Remote transmitting signal (green LED illuminates) but hood not receiving
•Ensure hood is powered.
•Battery weak – install new fresh
•Check the receiver (if applicable) and transmitter DIP switches are set at the same setting.
•Perform linking procedure between hood and remote (some models).
Transmission Range Short
•Change orientation of remote when activating
•Change location of remote to minimize obstructions
•Battery weak – install new fresh
Interference encountered with other RF transmitters or receivers
•Change encoder DIP switch settings.