PREPARATION

1.Use the dimensional drawings (Refer to FIGURES 1 - 3) to lay out the range hood’s mounting holes, wiring access and ductwork by marking the cabinet bottom and drywall where applicable.

2.Make cutouts for wiring and ductwork.

3.If the hood is to be ducted, install the ductwork so that is flush to the range hood’s mounting surface.

Refer to FIGURE 1 if the range hood is to be installed with a horizontal discharge.

Refer to FIGURE 2 and FIGURE 3 if the range hood is to be installed with a vertical discharge.

4.Run two-conductor wire (with ground) from a power source to the hood location. Bring approximately 12” of wiring through wiring hole in cabinet.

5.Drill four 3/32” diameter pilot holes at points where mounting holes are marked in cabinet bottom.

6.Insert four (4) mounting screws, leaving approximately ¼” of thread exposed.

7.Remove and retain the mounting screws securing the 3¼” x 10” and 7” duct transitions to the hood. Install the appropriate duct transition as described in the installation section.

INSTALLATION

1.Remove the necessary duct opening and wiring knockout from the range hood.

If the range hood is to be installed as a non-ducted unit, remove the wiring knockout only.

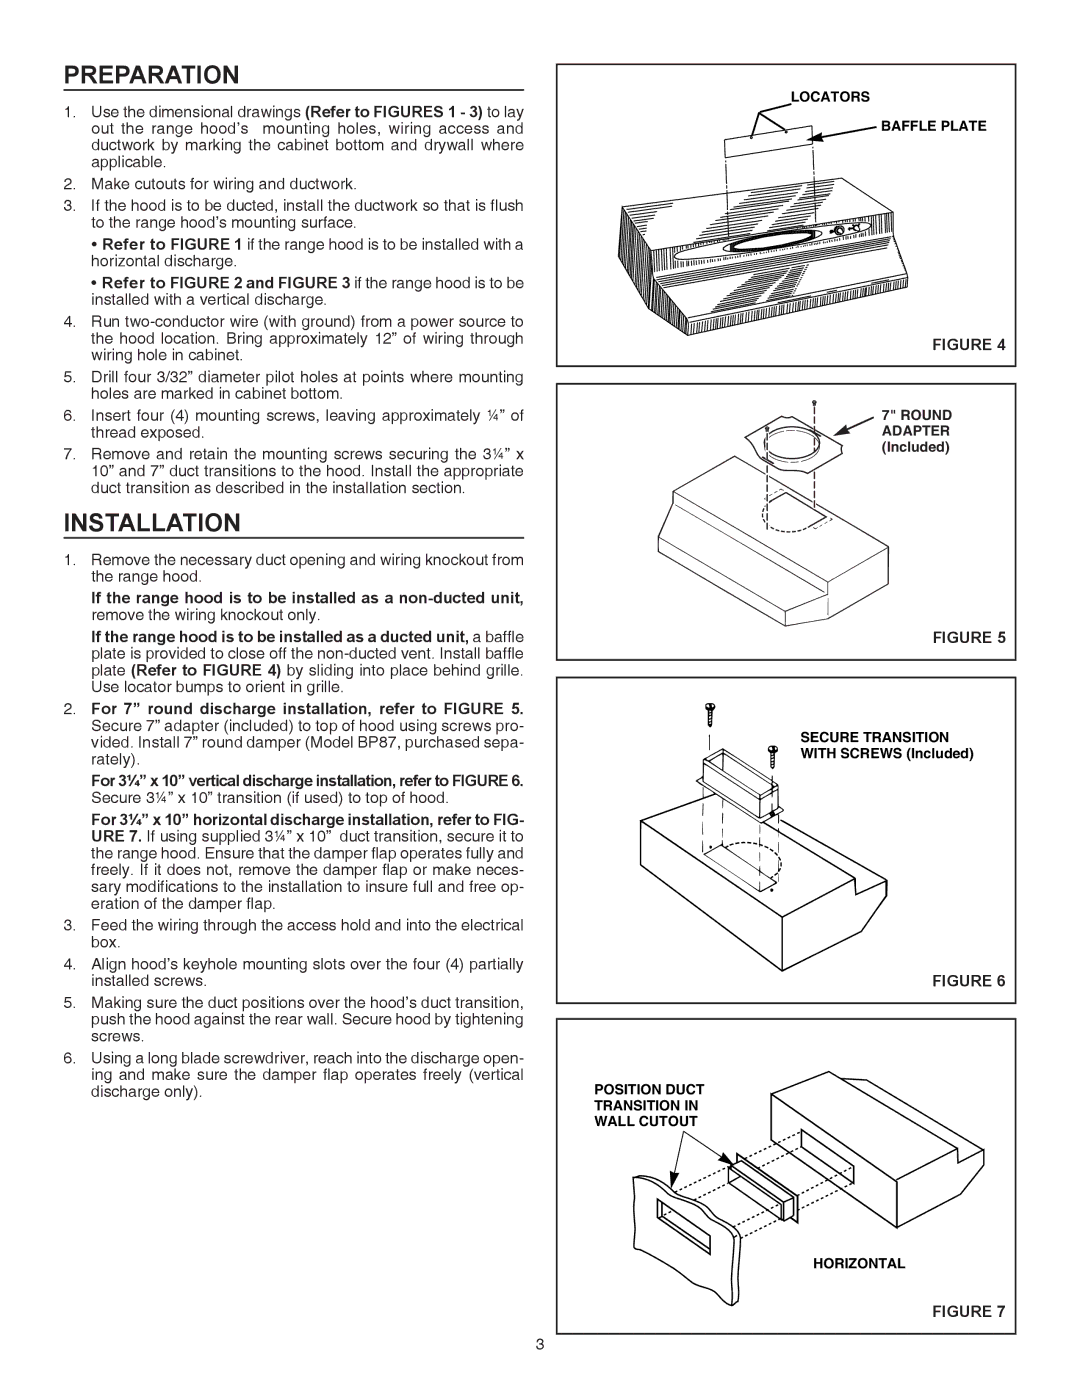
If the range hood is to be installed as a ducted unit, a baffle plate is provided to close off the non-ducted vent. Install baffle plate (Refer to FIGURE 4) by sliding into place behind grille. Use locator bumps to orient in grille.

2.For 7” round discharge installation, refer to FIGURE 5.

Secure 7” adapter (included) to top of hood using screws pro- vided. Install 7” round damper (Model BP87, purchased sepa- rately).

For 3¼” x 10” vertical discharge installation, refer to FIGURE 6.

Secure 3¼” x 10” transition (if used) to top of hood.

For 3¼” x 10” horizontal discharge installation, refer to FIG- URE 7. If using supplied 3¼” x 10” duct transition, secure it to the range hood. Ensure that the damper flap operates fully and freely. If it does not, remove the damper flap or make neces- sary modifications to the installation to insure full and free op- eration of the damper flap.

3.Feed the wiring through the access hold and into the electrical box.

4.Align hood’s keyhole mounting slots over the four (4) partially installed screws.

5.Making sure the duct positions over the hood’s duct transition, push the hood against the rear wall. Secure hood by tightening screws.

6.Using a long blade screwdriver, reach into the discharge open- ing and make sure the damper flap operates freely (vertical discharge only).

3

LOCATORS

BAFFLE PLATE

FIGURE 4

7" ROUND ADAPTER (Included)

FIGURE 5

SECURE TRANSITION

WITH SCREWS (Included)

FIGURE 6

POSITION DUCT

TRANSITION IN

WALL CUTOUT

HORIZONTAL

FIGURE 7

Page 3
Image 3
Broan QT230SS installation instructions Preparation, Installation

QT230SS specifications

The Broan QT230 series, consisting of models QT230WW, QT230BL, and QT230SS, brings a blend of style, functionality, and robust performance to your kitchen or bathroom ventilation needs. Designed with a modern aesthetic, this series features a sleek design that enhances any decor while effectively maintaining air quality.

One of the standout features of the Broan QT230 series is its quiet operation. Equipped with a powerful yet remarkably quiet motor, these units operate at a mere 0.3 sones in low speed, which ensures that your living space remains peaceful, even as unpleasant odors and excess moisture are efficiently eliminated. This is particularly valuable in open-concept living spaces where noise can easily become an issue.

The QT230 series also includes advanced technology that enhances its usability. Each model is designed with multiple speed settings, allowing users to adjust the fan speed according to their ventilation needs. Whether you’re cooking a gourmet meal or just using the bathroom, you can choose the perfect setting to maintain comfort and air quality.

Another impressive characteristic of the Broan QT230 series is its energy efficiency. These models are designed with energy-efficient motors that consume less electricity compared to conventional models, helping you save on energy bills while reducing your carbon footprint. This eco-conscious design is complemented by the effective filtration system, which captures grease and particulates from the air, ensuring your home remains fresh and clean.

Installation is also made easy with the QT230 series. The units come with a versatile design that can be mounted flush, making them suitable for various ceiling types. With easy access to the fan and filter for cleaning and maintenance, they are designed to provide long-lasting performance without hassle.

All three models in the QT230 series feature a stylish design, available in white (QT230WW), black (QT230BL), and stainless steel (QT230SS) finish. This allows homeowners to select the perfect model to match their kitchen or bathroom decor.

In summary, the Broan QT230 series is a remarkable choice for those looking for efficiency, quiet operation, and stylish design in their ventilation systems. With their advanced features and contemporary aesthetics, these range hoods and exhaust fans are ideal for enhancing the functionality and comfort of any home environment.