5000


4500


4000

LEAK IN

3500

SYSTEM

3000


Connect Ground and Power Wires

Connect ground wire to ground connection in control box for safety. Connect power wiring to contactor as shown in Fig. 8.

DISCONNECT

PER N. E. C. AND/OR

LOCAL CODES

2500


MICRONS2000


VACUUM TIGHT

1500


TOO WET

1000


TIGHT

500


DRY SYSTEM


0

1

2

3

4

5

6

7


MINUTES


A95424

FIELD POWER

WIRING

FIELD GROUND

WIRING

CONTACTOR

GROUND

LUG

A91056

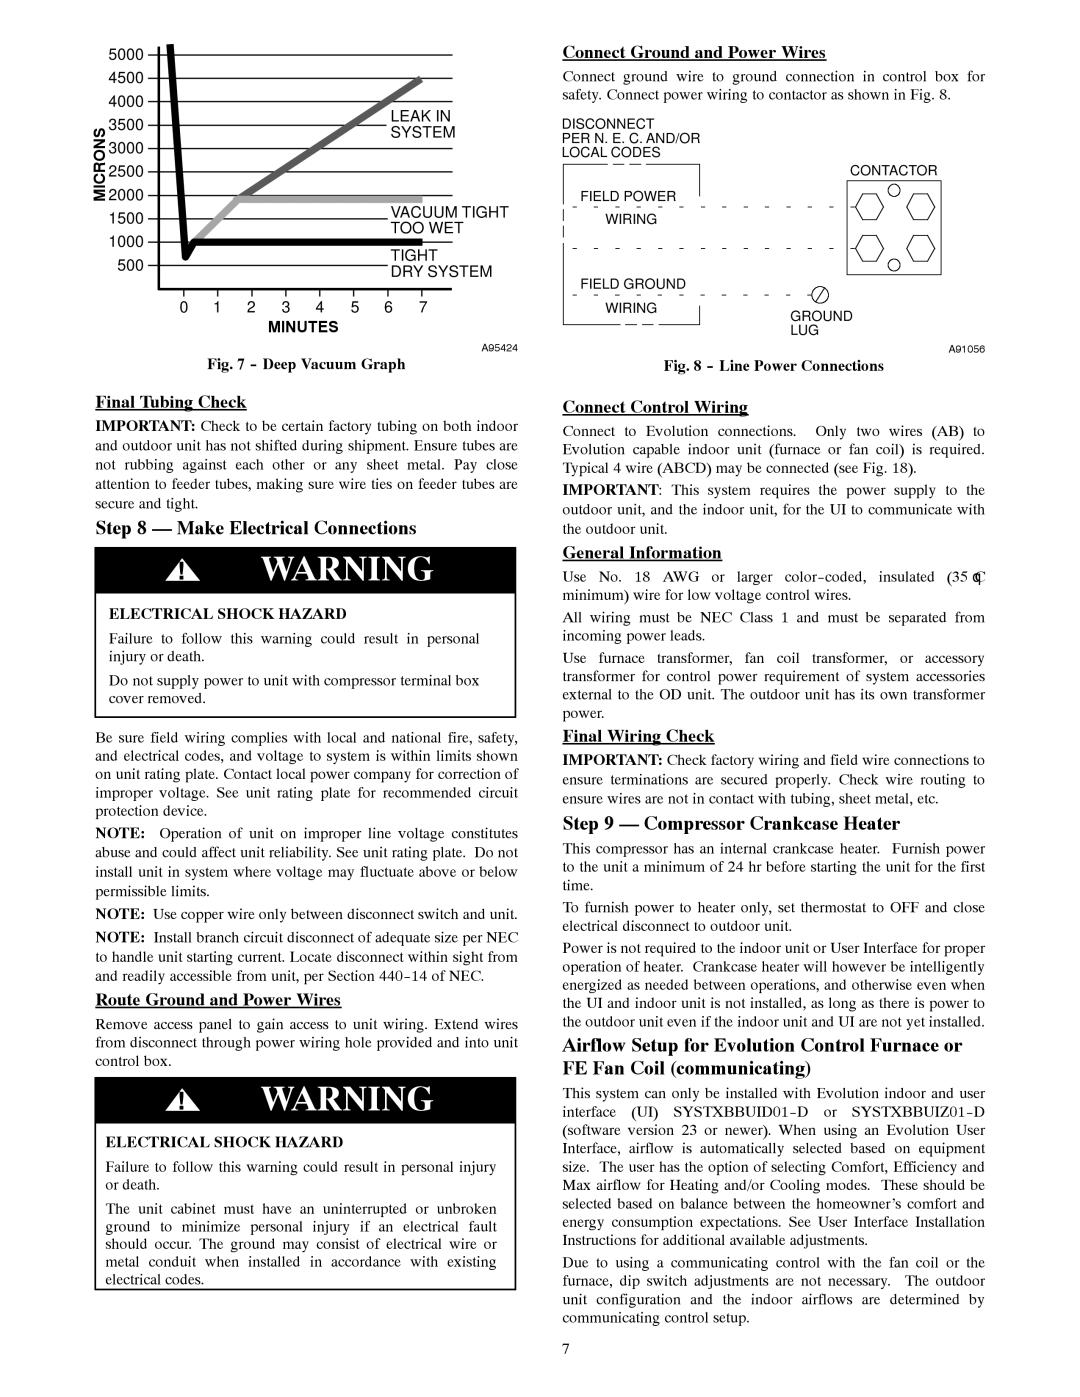
Fig. 7 - Deep Vacuum Graph

Final Tubing Check

IMPORTANT: Check to be certain factory tubing on both indoor and outdoor unit has not shifted during shipment. Ensure tubes are not rubbing against each other or any sheet metal. Pay close attention to feeder tubes, making sure wire ties on feeder tubes are secure and tight.

Step 8 — Make Electrical Connections

!WARNING

ELECTRICAL SHOCK HAZARD

Failure to follow this warning could result in personal injury or death.

Do not supply power to unit with compressor terminal box cover removed.

Be sure field wiring complies with local and national fire, safety, and electrical codes, and voltage to system is within limits shown on unit rating plate. Contact local power company for correction of improper voltage. See unit rating plate for recommended circuit protection device.

NOTE: Operation of unit on improper line voltage constitutes abuse and could affect unit reliability. See unit rating plate. Do not install unit in system where voltage may fluctuate above or below permissible limits.

NOTE: Use copper wire only between disconnect switch and unit.

NOTE: Install branch circuit disconnect of adequate size per NEC to handle unit starting current. Locate disconnect within sight from and readily accessible from unit, per Section 440-14 of NEC.

Route Ground and Power Wires

Remove access panel to gain access to unit wiring. Extend wires from disconnect through power wiring hole provided and into unit control box.

!WARNING

ELECTRICAL SHOCK HAZARD

Failure to follow this warning could result in personal injury or death.

The unit cabinet must have an uninterrupted or unbroken ground to minimize personal injury if an electrical fault should occur. The ground may consist of electrical wire or metal conduit when installed in accordance with existing electrical codes.

Fig. 8 - Line Power Connections

Connect Control Wiring

Connect to Evolution connections. Only two wires (AB) to Evolution capable indoor unit (furnace or fan coil) is required. Typical 4 wire (ABCD) may be connected (see Fig. 18).

IMPORTANT: This system requires the power supply to the outdoor unit, and the indoor unit, for the UI to communicate with the outdoor unit.

General Information

Use No. 18 AWG or larger color-coded, insulated (35°C minimum) wire for low voltage control wires.

All wiring must be NEC Class 1 and must be separated from incoming power leads.

Use furnace transformer, fan coil transformer, or accessory transformer for control power requirement of system accessories external to the OD unit. The outdoor unit has its own transformer power.

Final Wiring Check

IMPORTANT: Check factory wiring and field wire connections to ensure terminations are secured properly. Check wire routing to ensure wires are not in contact with tubing, sheet metal, etc.

Step 9 — Compressor Crankcase Heater

This compressor has an internal crankcase heater. Furnish power to the unit a minimum of 24 hr before starting the unit for the first time.

To furnish power to heater only, set thermostat to OFF and close electrical disconnect to outdoor unit.

Power is not required to the indoor unit or User Interface for proper operation of heater. Crankcase heater will however be intelligently energized as needed between operations, and otherwise even when the UI and indoor unit is not installed, as long as there is power to the outdoor unit even if the indoor unit and UI are not yet installed.

Airflow Setup for Evolution Control Furnace or FE Fan Coil (communicating)

This system can only be installed with Evolution indoor and user interface (UI) SYSTXBBUID01-D or SYSTXBBUIZ01-D (software version 23 or newer). When using an Evolution User Interface, airflow is automatically selected based on equipment size. The user has the option of selecting Comfort, Efficiency and Max airflow for Heating and/or Cooling modes. These should be selected based on balance between the homeowner’s comfort and energy consumption expectations. See User Interface Installation Instructions for additional available adjustments.

Due to using a communicating control with the fan coil or the furnace, dip switch adjustments are not necessary. The outdoor unit configuration and the indoor airflows are determined by communicating control setup.

7

Page 7
Image 7
Bryant 280ANV installation instructions Make Electrical Connections, Compressor Crankcase Heater

280ANV specifications

The Bryant 280ANV is a highly efficient air conditioning unit designed for residential use, providing homeowners with reliable cooling performance while maintaining energy efficiency. One of the standout features of the Bryant 280ANV is its two-stage compressor, which allows for variable speed operation. This means that the unit can adjust its cooling output to match the current demand for indoor comfort, leading to more consistent temperatures and increased energy savings.

The Bryant 280ANV also boasts an impressive SEER (Seasonal Energy Efficiency Ratio) rating, which indicates its energy efficiency. Typically, this model achieves a SEER rating of up to 20, making it a strong contender in the market for those looking to reduce their energy bills without sacrificing comfort. This level of efficiency not only results in lower monthly costs but also contributes to a reduced environmental footprint.

Another key technology featured in the Bryant 280ANV is its advanced, variable-speed blower motor. This motor helps to operate quietly while ensuring optimal airflow throughout the home. The quiet operation of the 280ANV means that it can deliver cooling without disturbing your daily life, making it an excellent choice for bedrooms or other quiet spaces.

The unit is also designed with durability in mind. Its cabinet is constructed from high-quality, weather-resistant materials that protect against harsh outdoor conditions. This ensures longevity and reliable performance over the years. Furthermore, the Bryant 280ANV includes a protected scroll compressor that adds an extra layer of reliability and enhances the unit's overall efficiency.

Installation of the Bryant 280ANV can be completed by a qualified HVAC professional, who can ensure that the system is set up to operate at peak performance. Additional features, such as the built-in Wi-Fi capability, allow homeowners to connect the unit to smart home systems for enhanced control and convenience.

In conclusion, the Bryant 280ANV combines energy efficiency with advanced technology to provide effective cooling solutions for residential spaces. With its two-stage compressor, high SEER rating, quiet operation, and durable construction, it meets the needs of modern homeowners who value comfort, efficiency, and reliability. Overall, the Bryant 280ANV stands out as a quality choice for those seeking a dependable air conditioning system.