TABLE 1—REFRIGERANT CONNECTIONS AND RECOMMENDED LIQUID- AND VAPOR-TUBE DIAMETERS (IN.)

UNIT

LIQUID


VAPOR


VAPOR (LONG LINE)

SIZE

Connection Diameter


Tube Diameter

Connection Diameter


Tube Diameter

Connection Diameter

Tube Diameter

018, 024

3/8


3/8

5/8


5/8

5/8

3/4

030, 036

3/8


3/8

3/4


3/4

3/4

7/8

042, 048

3/8


3/8

7/8


7/8

7/8

1–1/8

060

3/8


3/8

7/8


1–1/8

7/8

1–1/8


NOTES:

1.Tube diameters are for lengths up to 50 ft. For tubing lengths greater than 50 ft, consult Residential Long-Line Application Guideline.

2.Do not apply capillary-tube indoor coils to these units.

For buried-line applications greater than 36 in., consult your local distributor.

If refrigerant tubes or indoor coil are exposed to atmosphere, they must be evacuated to 500 microns to eliminate contamination and moisture in the system.

A.Outdoor Unit Connected to Factory-Approved In- door Unit

Outdoor unit contains correct system-refrigerant charge for opera- tion with indoor unit of same size when connected by 15 ft of field-supplied or factory-accessory tubing. Check refrigerant charge for maximum efficiency.

B. Refrigerant Tubing

WARNING: The unit cabinet must have an uninter- rupted or unbroken ground to minimize personal injury if an electrical fault should occur. The ground may consist of electrical wire or metal conduit when installed in accordance with existing electrical codes. Failure to follow this warning can result in an electric shock, fire, or death.

B. Connect Ground and Power Wires

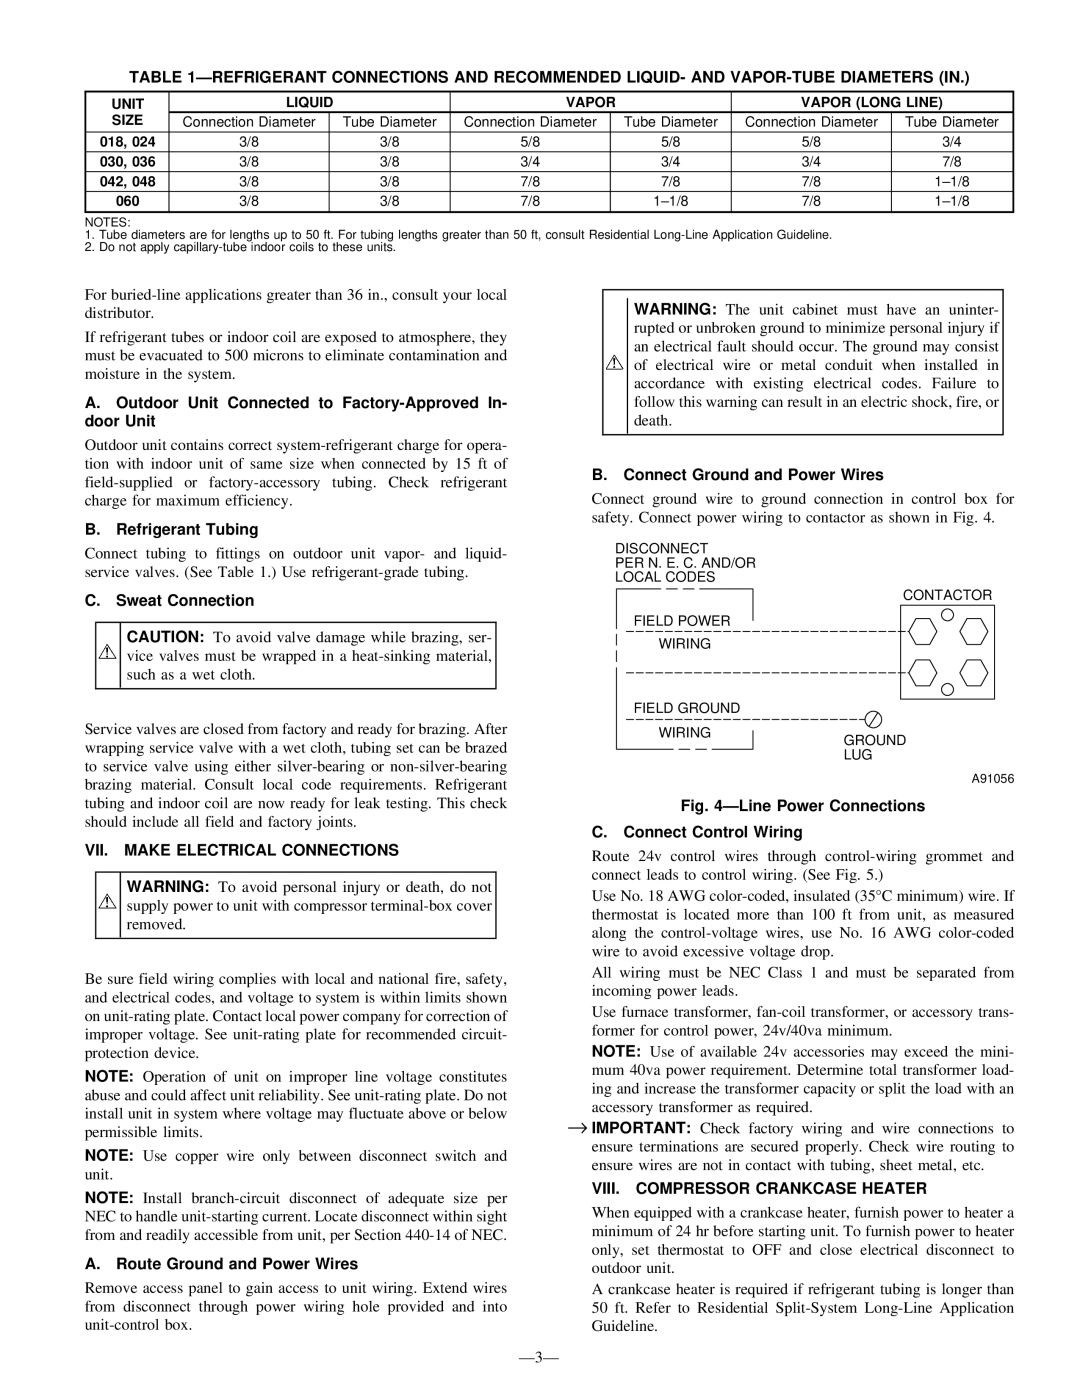
Connect ground wire to ground connection in control box for safety. Connect power wiring to contactor as shown in Fig. 4.

Connect tubing to fittings on outdoor unit vapor- and liquid- service valves. (See Table 1.) Use refrigerant-grade tubing.

C. Sweat Connection

CAUTION: To avoid valve damage while brazing, ser- vice valves must be wrapped in a heat-sinking material, such as a wet cloth.

Service valves are closed from factory and ready for brazing. After wrapping service valve with a wet cloth, tubing set can be brazed to service valve using either silver-bearing or non-silver-bearing brazing material. Consult local code requirements. Refrigerant

DISCONNECT

PER N. E. C. AND/OR LOCAL CODES

FIELD POWER

WIRING

FIELD GROUND

WIRING

CONTACTOR

GROUND

LUG

A91056

tubing and indoor coil are now ready for leak testing. This check should include all field and factory joints.

VII. MAKE ELECTRICAL CONNECTIONS

WARNING: To avoid personal injury or death, do not supply power to unit with compressor terminal-box cover removed.

Be sure field wiring complies with local and national fire, safety, and electrical codes, and voltage to system is within limits shown on unit-rating plate. Contact local power company for correction of improper voltage. See unit-rating plate for recommended circuit- protection device.

NOTE: Operation of unit on improper line voltage constitutes abuse and could affect unit reliability. See unit-rating plate. Do not install unit in system where voltage may fluctuate above or below permissible limits.

NOTE: Use copper wire only between disconnect switch and unit.

NOTE: Install branch-circuit disconnect of adequate size per NEC to handle unit-starting current. Locate disconnect within sight from and readily accessible from unit, per Section 440-14 of NEC.

A. Route Ground and Power Wires

Remove access panel to gain access to unit wiring. Extend wires from disconnect through power wiring hole provided and into unit-control box.

Fig. 4—Line Power Connections

C. Connect Control Wiring

Route 24v control wires through control-wiring grommet and connect leads to control wiring. (See Fig. 5.)

Use No. 18 AWG color-coded, insulated (35°C minimum) wire. If thermostat is located more than 100 ft from unit, as measured along the control-voltage wires, use No. 16 AWG color-coded wire to avoid excessive voltage drop.

All wiring must be NEC Class 1 and must be separated from incoming power leads.

Use furnace transformer, fan-coil transformer, or accessory trans- former for control power, 24v/40va minimum.

NOTE: Use of available 24v accessories may exceed the mini- mum 40va power requirement. Determine total transformer load- ing and increase the transformer capacity or split the load with an accessory transformer as required.

IMPORTANT: Check factory wiring and wire connections to ensure terminations are secured properly. Check wire routing to ensure wires are not in contact with tubing, sheet metal, etc.

VIII. COMPRESSOR CRANKCASE HEATER

When equipped with a crankcase heater, furnish power to heater a minimum of 24 hr before starting unit. To furnish power to heater only, set thermostat to OFF and close electrical disconnect to outdoor unit.

A crankcase heater is required if refrigerant tubing is longer than 50 ft. Refer to Residential Split-System Long-Line Application Guideline.

—3—

Page 3
Image 3
Bryant 597C instruction manual VII. Make Electrical Connections, VIII. Compressor Crankcase Heater

597C specifications

The Bryant 597C is a remarkable two-stage air conditioning and heating system designed to deliver exceptional comfort and energy efficiency for residential spaces. As part of Bryant's Evolution series, the 597C combines advanced technology with reliable performance, making it a top choice for homeowners seeking a versatile HVAC solution.

One of the standout features of the Bryant 597C is its two-stage compressor, which allows the system to operate at both high and low capacities depending on the indoor temperature demands. This capability not only enhances comfort by reducing temperature fluctuations but also improves energy efficiency. The system's modulating fan motor further optimizes airflow, ensuring consistent distribution of conditioned air throughout the home.

The Bryant 597C is equipped with advanced technology, including the Preferred Control System, which allows homeowners to connect the unit to smart thermostats for precise temperature control. This integration not only simplifies operation but also enables users to monitor energy consumption and adjust settings remotely through mobile apps. Moreover, the unit supports variable-speed operation, which enhances overall efficiency and reduces noise levels, ensuring a quieter indoor environment.

In terms of design, the Bryant 597C features a compact and durable cabinet, constructed with galvanized steel and a baked-on powder paint finish that protects against the elements. This thoughtful design not only enhances the unit's longevity but also minimizes maintenance needs. The unit is offered in a range of sizes, making it adaptable to different home layouts and sizes.

Another key characteristic of the Bryant 597C is its efficiency ratings. With a SEER (Seasonal Energy Efficiency Ratio) rating of up to 20 and an HSPF (Heating Season Performance Factor) rating of up to 9.5, this system is highly efficient compared to standard models. This energy-efficient design helps homeowners reduce their utility bills while minimizing their carbon footprint.

In summary, the Bryant 597C is a robust, efficient, and technologically advanced HVAC solution. Its two-stage cooling and heating capabilities, combined with smart technology integration and superior efficiency ratings, make it an outstanding choice for homeowners looking to enhance their indoor comfort while being environmentally conscious. Whether for new construction or retrofitting, the Bryant 597C stands out as a leader in the HVAC market.