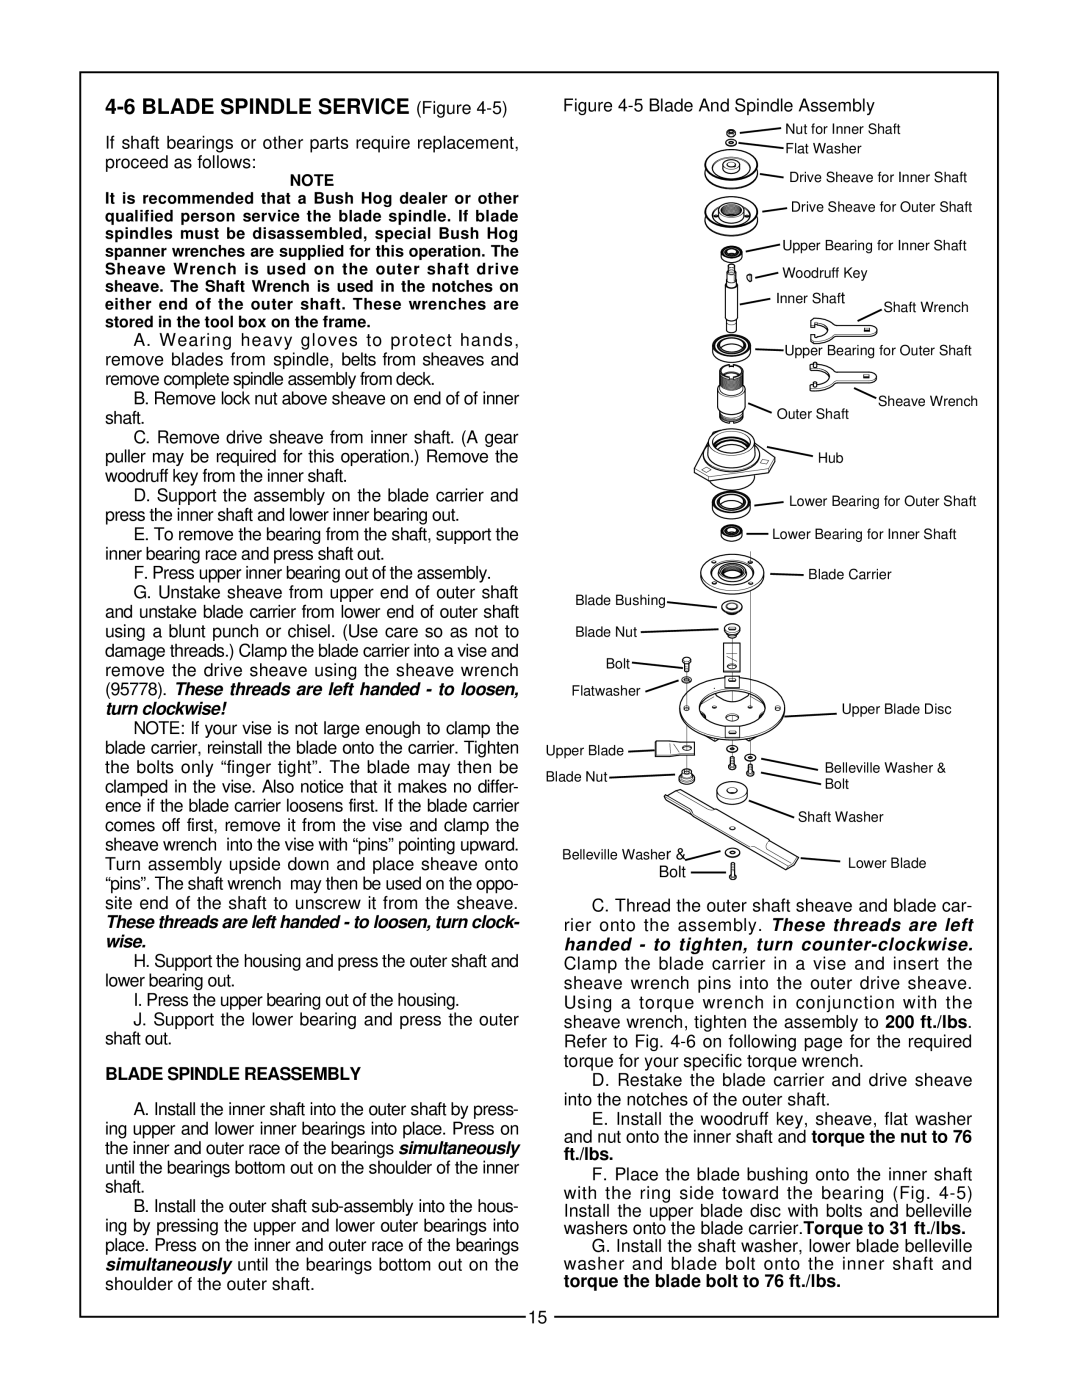
4-6 BLADE SPINDLE SERVICE (Figure 4-5)
Figure 4-5 Blade And Spindle Assembly
If shaft bearings or other parts require replacement, proceed as follows:
NOTE
It is recommended that a Bush Hog dealer or other qualified person service the blade spindle. If blade spindles must be disassembled, special Bush Hog spanner wrenches are supplied for this operation. The Sheave Wrench is used on the outer shaft drive sheave. The Shaft Wrench is used in the notches on either end of the outer shaft. These wrenches are stored in the tool box on the frame.
A. Wearing heavy gloves to protect hands, remove blades from spindle, belts from sheaves and remove complete spindle assembly from deck.
B. Remove lock nut above sheave on end of of inner shaft.
C. Remove drive sheave from inner shaft. (A gear puller may be required for this operation.) Remove the woodruff key from the inner shaft.
D. Support the assembly on the blade carrier and press the inner shaft and lower inner bearing out.
E. To remove the bearing from the shaft, support the inner bearing race and press shaft out.
F. Press upper inner bearing out of the assembly. G. Unstake sheave from upper end of outer shaft
and unstake blade carrier from lower end of outer shaft using a blunt punch or chisel. (Use care so as not to damage threads.) Clamp the blade carrier into a vise and remove the drive sheave using the sheave wrench (95778). These threads are left handed - to loosen,
turn clockwise!
NOTE: If your vise is not large enough to clamp the blade carrier, reinstall the blade onto the carrier. Tighten the bolts only “finger tight”. The blade may then be clamped in the vise. Also notice that it makes no differ- ence if the blade carrier loosens first. If the blade carrier comes off first, remove it from the vise and clamp the sheave wrench into the vise with “pins” pointing upward. Turn assembly upside down and place sheave onto “pins”. The shaft wrench may then be used on the oppo-
Blade Bushing
Blade Nut
Bolt
Flatwasher
Upper Blade
Blade Nut
Belleville Washer &
Bolt
Nut for Inner Shaft
Flat Washer
Drive Sheave for Inner Shaft
Drive Sheave for Outer Shaft
Upper Bearing for Inner Shaft Woodruff Key
Inner Shaft
Shaft Wrench
Upper Bearing for Outer Shaft
Sheave Wrench
Outer Shaft
Hub
Lower Bearing for Outer Shaft
Lower Bearing for Inner Shaft
Blade Carrier
Upper Blade Disc
Belleville Washer &
Bolt
Shaft Washer
Lower Blade
site end of the shaft to unscrew it from the sheave.
These threads are left handed - to loosen, turn clock- wise.
H. Support the housing and press the outer shaft and lower bearing out.
I. Press the upper bearing out of the housing.
J. Support the lower bearing and press the outer shaft out.
BLADE SPINDLE REASSEMBLY
A. Install the inner shaft into the outer shaft by press- ing upper and lower inner bearings into place. Press on the inner and outer race of the bearings simultaneously until the bearings bottom out on the shoulder of the inner shaft.
B. Install the outer shaft
C. Thread the outer shaft sheave and blade car- rier onto the assembly. These threads are left handed - to tighten, turn
D. Restake the blade carrier and drive sheave into the notches of the outer shaft.
E. Install the woodruff key, sheave, flat washer and nut onto the inner shaft and torque the nut to 76 ft./lbs.
F. Place the blade bushing onto the inner shaft with the ring side toward the bearing (Fig.
G. Install the shaft washer, lower blade belleville washer and blade bolt onto the inner shaft and torque the blade bolt to 76 ft./lbs.
15
