GENERAL SAFETY RULES
READ AND FULLY UNDERSTAND ALL INSTRUCTIONS
AND WARNINGS PRIOR TO USING THIS UNIT. YOUR
SAFETY IS MOST IMPORTANT! FAILURE TO COMPLY
WITH PROCEDURES AND SAFE GUARDS MAY WARNING! RESULT IN SERIOUS INJURY OR PROPERTY DAMAGE.
REMEMBER: YOUR PERSONAL SAFETY IS YOUR
RESPONSIBILITY!
ASSEMBLY INSTRUCTIONS
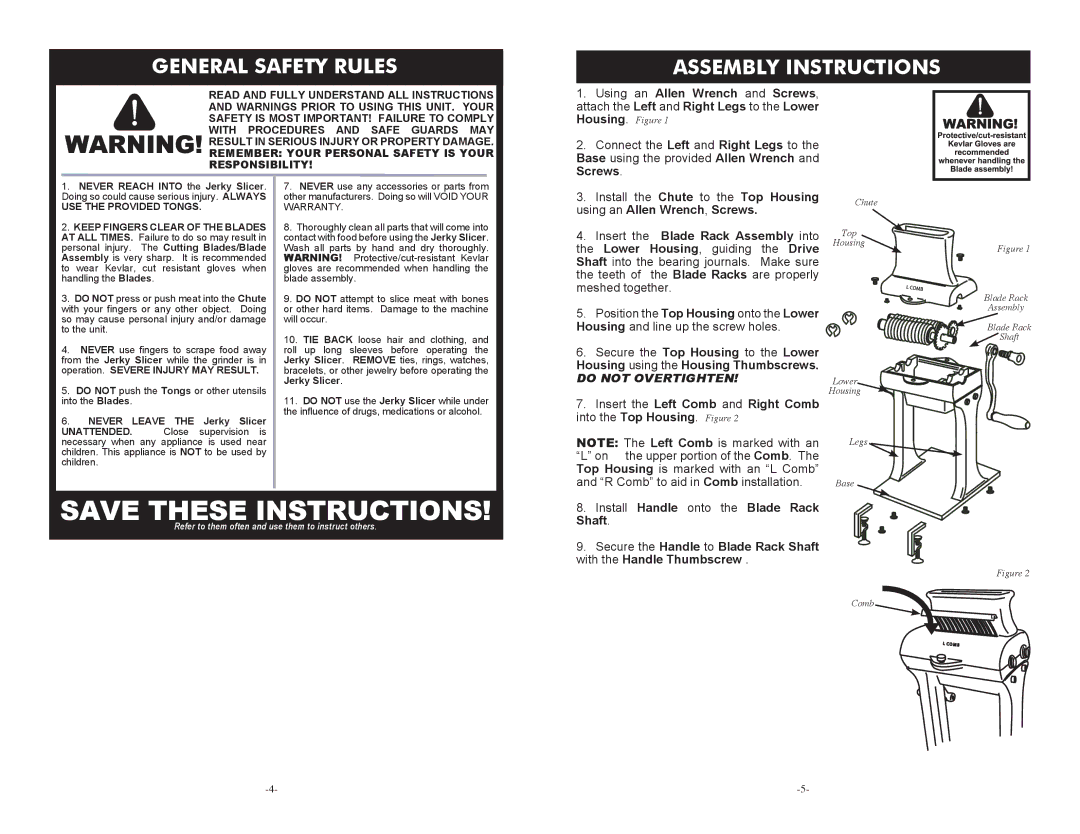
1. Using an Allen Wrench and Screws, |
attach the Left and Right Legs to the Lower |
Housing. Figure 1 |
2. Connect the Left and Right Legs to the |
Base using the provided Allen Wrench and |
Screws. |
1.NEVER REACH INTO the Jerky Slicer. Doing so could cause serious injury. ALWAYS
USE THE PROVIDED TONGS.
2.KEEP FINGERS CLEAR OF THE BLADES AT ALL TIMES. Failure to do so may result in personal injury. The Cutting Blades/Blade Assembly is very sharp. It is recommended to wear Kevlar, cut resistant gloves when handling the Blades.
3.DO NOT press or push meat into the Chute with your fingers or any other object. Doing so may cause personal injury and/or damage to the unit.
4.NEVER use fingers to scrape food away from the Jerky Slicer while the grinder is in operation. SEVERE INJURY MAY RESULT.
5.DO NOT push the Tongs or other utensils into the Blades.
6.NEVER LEAVE THE Jerky Slicer
UNATTENDED. Close supervision is necessary when any appliance is used near children. This appliance is NOT to be used by children.
7.NEVER use any accessories or parts from other manufacturers. Doing so will VOID YOUR WARRANTY.
8.Thoroughly clean all parts that will come into contact with food before using the Jerky Slicer. Wash all parts by hand and dry thoroughly. WARNING!
9.DO NOT attempt to slice meat with bones or other hard items. Damage to the machine will occur.
10.TIE BACK loose hair and clothing, and roll up long sleeves before operating the Jerky Slicer. REMOVE ties, rings, watches, bracelets, or other jewelry before operating the Jerky Slicer.
11.DO NOT use the Jerky Slicer while under the influence of drugs, medications or alcohol.
3. | Install the Chute to the Top Housing | |
using an Allen Wrench, Screws. | ||
4. | Insert the | Blade Rack Assembly into |
the Lower Housing, guiding the Drive | ||
Shaft into the bearing journals. Make sure | ||
the teeth of | the Blade Racks are properly | |
meshed together. | ||
5. | Position the Top Housing onto the Lower | |
Housing and line up the screw holes. | ||
6. | Secure the Top Housing to the Lower | |
Housing using the Housing Thumbscrews. | ||
DO NOT OVERTIGHTEN! | ||
7. | Insert the Left Comb and Right Comb | |
into the Top Housing. Figure 2 | ||
NOTE: The Left Comb is marked with an “L” on the upper portion of the Comb. The Top Housing is marked with an “L Comb” and “R Comb” to aid in Comb installation.
Chute
Top
Housing
Lower
Housing
Legs
Base
Figure 1
Blade Rack
Assembly
Blade Rack ![]() Shaft
Shaft
SAVE THESE INSTRUCTIONS!
Refer to them often and use them to instruct others.
8.Install Handle onto the Blade Rack Shaft.
9.Secure the Handle to Blade Rack Shaft with the Handle Thumbscrew .
Comb
Figure 2