Installation Instructions

Part One

How do I install for ceiling mount?

(for models up to 1500 Watts maximum)

WARNING

Risk of Electrical

Shock. Connect

STEP 1 Mount the Wall Can

The C Series REQUIRES A MINIMUM distance of

6 inches from all adjacent surfaces. However, Cadet RECOMMENDS 12 inches from all adjacent surfaces for longer and cleaner performance. Important:

Do not mount the heater in low-density fiberboard or false ceilings.

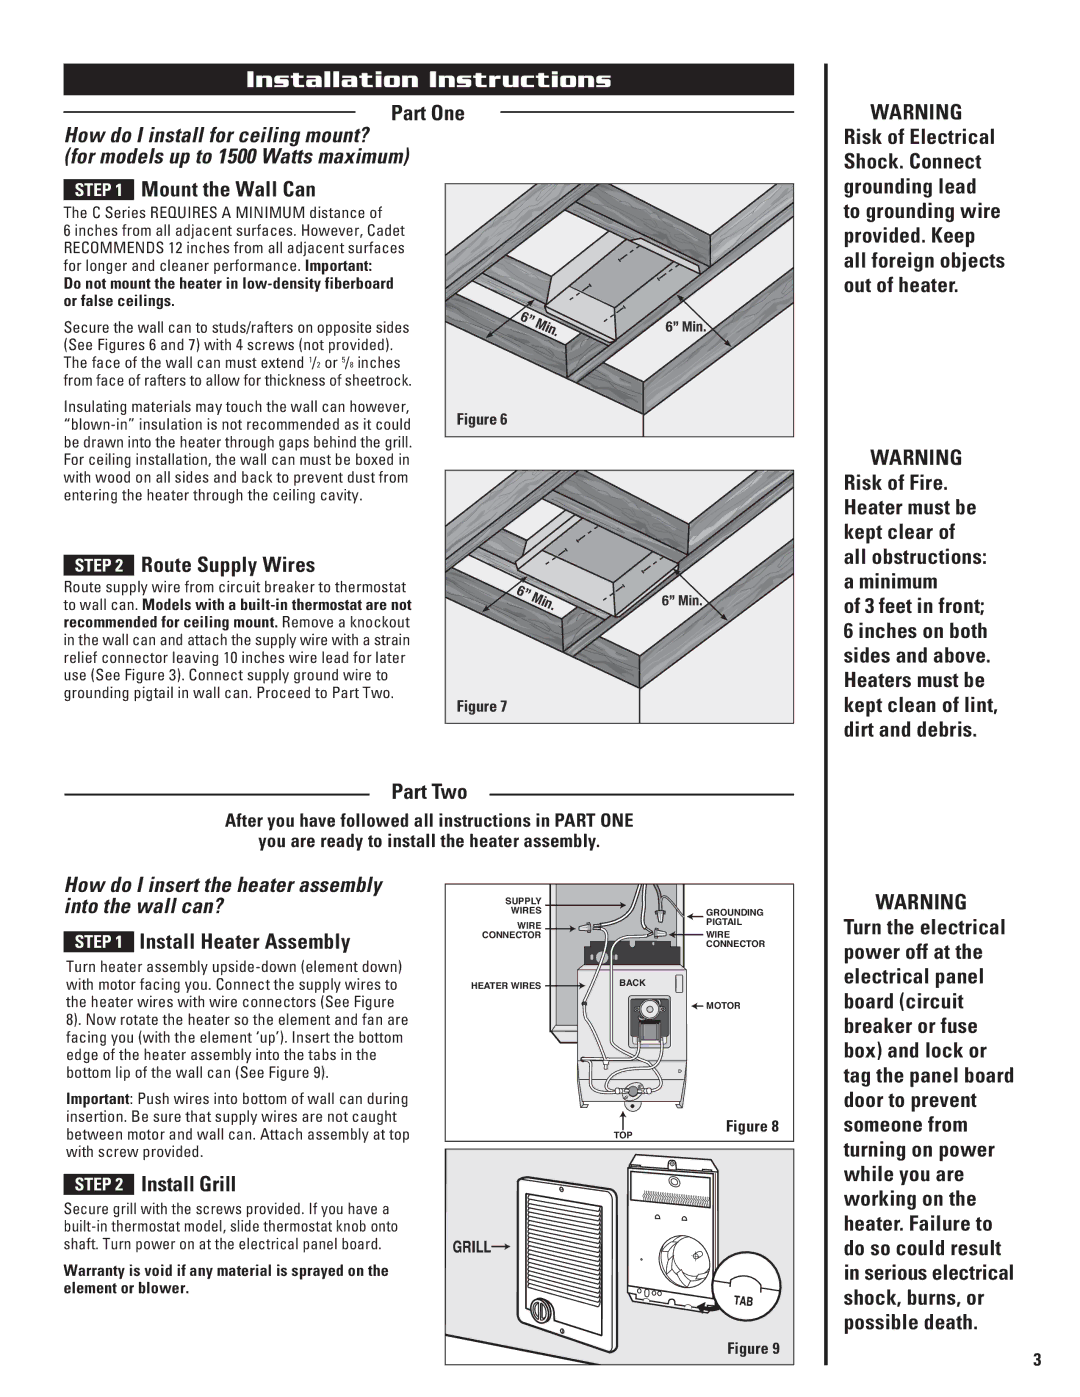
Secure the wall can to studs/rafters on opposite sides (See Figures 6 and 7) with 4 screws (not provided). The face of the wall can must extend 1/2 or 5/8 inches from face of rafters to allow for thickness of sheetrock.

Insulating materials may touch the wall can however, “blown-in” insulation is not recommended as it could be drawn into the heater through gaps behind the grill. For ceiling installation, the wall can must be boxed in with wood on all sides and back to prevent dust from entering the heater through the ceiling cavity.

STEP 2 Route Supply Wires

Route supply wire from circuit breaker to thermostat to wall can. Models with a built-in thermostat are not recommended for ceiling mount. Remove a knockout in the wall can and attach the supply wire with a strain relief connector leaving 10 inches wire lead for later use (See Figure 3). Connect supply ground wire to grounding pigtail in wall can. Proceed to Part Two.

6”

Min.

6” Min.


Figure 6


6”

Min.

6” Min.


Figure 7


grounding lead

to grounding wire provided. Keep all foreign objects out of heater.

WARNING Risk of Fire. Heater must be kept clear of all obstructions: a minimum

of 3 feet in front;

6 inches on both sides and above. Heaters must be kept clean of lint, dirt and debris.

Part Two

After you have followed all instructions in PART ONE

you are ready to install the heater assembly.

How do I insert the heater assembly into the wall can?

STEP 1 Install Heater Assembly

Turn heater assembly upside-down (element down) with motor facing you. Connect the supply wires to the heater wires with wire connectors (See Figure

8). Now rotate the heater so the element and fan are facing you (with the element ‘up’). Insert the bottom edge of the heater assembly into the tabs in the bottom lip of the wall can (See Figure 9).

Important: Push wires into bottom of wall can during insertion. Be sure that supply wires are not caught between motor and wall can. Attach assembly at top with screw provided.

STEP 2 Install Grill

Secure grill with the screws provided. If you have a built-in thermostat model, slide thermostat knob onto shaft. Turn power on at the electrical panel board.

Warranty is void if any material is sprayed on the element or blower.

SUPPLY


WIRES

GROUNDING

WIRE

PIGTAIL

CONNECTOR

WIRE


CONNECTOR

HEATER WIRES

BACK


MOTOR

Figure 8

TOP

Figure 9

WARNING Turn the electrical power off at the electrical panel board (circuit breaker or fuse box) and lock or tag the panel board door to prevent someone from turning on power while you are working on the heater. Failure to do so could result in serious electrical shock, burns, or possible death.

3

Page 3
Image 3
Cadet Risk of Electrical Shock. Connect Mount the Wall Can, Grounding lead, feet in front, Part Two, Install Grill

C specifications

Cadet C is a versatile and advanced unmanned aerial vehicle (UAV) designed for a variety of applications, making it an essential tool in modern aviation and defense scenarios. Its lightweight structure, combined with cutting-edge technologies, allows it to perform a wide range of missions, from surveillance and reconnaissance to search and rescue operations.

One of the standout features of Cadet C is its impressive flight endurance. With a battery life that allows for extended flight times, it can stay airborne for several hours, significantly enhancing its operational capabilities. This is particularly valuable in military applications where long-duration missions are often required, enabling the collection of vital intelligence over extended periods without the need for frequent landings.

The Cadet C is equipped with state-of-the-art sensors and cameras, including high-resolution electro-optical and infrared systems. These sensors provide real-time data and imagery, allowing operators to monitor areas of interest with unparalleled detail and accuracy. The integration of advanced imaging technologies makes the Cadet C an ideal choice for surveillance missions, as it can easily detect and identify targets from significant distances.

In addition to its remarkable imaging capabilities, the Cadet C boasts an advanced navigation system that incorporates GPS and inertial measurement units. This ensures precise positioning and stability during flight, even in challenging weather conditions. The UAV's autonomous flight capabilities further enhance its effectiveness, enabling it to execute predefined missions with minimal human intervention.

Moreover, Cadet C supports various communication technologies, including secure data links that enable seamless transmission of information between the UAV and its operators. This ensures that critical data is relayed in real-time, allowing for informed decision-making during operations.

The Cadet C's design also emphasizes durability and ease of maintenance. Constructed with robust materials, it is built to withstand harsh environments while maintaining optimal performance. Its modular design simplifies repairs and upgrades, ensuring that it remains operational over the long term.

In summary, Cadet C is a cutting-edge UAV that excels in endurance, imaging capabilities, navigation precision, and communication technologies. Its robust design and versatility make it an invaluable asset for military and civilian operations alike, addressing the increasing need for efficient aerial surveillance and reconnaissance solutions. As technology continues to evolve, the potential applications of the Cadet C will likely expand, solidifying its role in the future of unmanned aviation.