Funcionamiento (Cont.)
CORTES DIAGONALES/EN ÁNGULO
•Asegúrese de que la sierra esté desenchufada de la fuente de corriente antes de hacer ajustes a los ángulos de corte.
•La placa base se puede inclinar 45° en ambas direcciones para realizar cortes en ángulo. Estos son valores para 45° y para 90° contra la pieza de trabajo. Para otros ángulos use un graduador para medir (Figura 2).
Hole Cutting
CORTES DE BOLSILLO
Los cortes de bolsillo se hacen en el medio de la pieza de trabajo cuando no pueden cortarse desde un borde. Se pueden comenzar con un orificio pretaladrado o la sierra vertical puede crear un punto de inicio (corte por penetración).
Los cortes por penetración no se recomiendan para materiales más duros como el acero y no se deben usar las hojas de calar para cortes por penetración.
CORTES POR PENETRACIÓN
1.Si el corte en bolsillo es de líneas rectas, no se necesita un orificio pretaladrado.
2.Toque el pie de la sierra sobre la pieza de trabajo dejando la hoja bien por encima del material (Figura 3).
I
0
Figura 3
3.Asegúrese de que el valor orbital esté en 0 y encienda la sierra.
4.Una vez que la sierra alcanza la velocidad máxima, bájela lentamente en la pieza de trabajo.
5.Mantenga ambas manos sobre la sierra mientras esté cortando (Figura 4).
6.Para 90° u otras esquinas en ángulo, corte hasta la esquina luego retroceda antes de redondear la esquina. Una vez que haya cortado el bolsillo, acérquese a la esquina desde la dirección contraria y corte el ángulo.
CORTES EN CÍRCULO
Una guía de corte en círculo puede ayudarlo para cortar círculos. El corte se debe preparar con un orificio pretaladrado o un leve corte por penetración próximo a la línea de corte. Si usa una guía, asegúrese de que cumpla con las instrucciones de la sierra vertical y del fabricante.
Calados
Se pueden realizar trabajos complicados con una sierra vertical usando una hoja de calado. Asegúrese de que la hoja se utilice de acuerdo a las instrucciones del fabricante. Para un mejor control, use la sierra en el valor I con la hoja de calado. Esto ofrece un corte y un manejo más sencillo.
Corte de metales
•Antes de comenzar un corte de metal, coloque el valor orbital correspondiente 0 ó 1.
•Cuando corte piezas de trabajo de metal, sujete el material con abrazaderas y corte cerca del punto de sujeción para reducir la posibilidad de que se tuerza y la vibración.
•Si la hoja comienza a vibrar o a hacer un ruido excesivo, reemplace la hoja con una hoja para cortes en metal que tenga dientes más finos.
•Para metales blandos, la hoja se puede obstruir por lo tanto use una hoja con dientes más gruesos.
•Los conductos, hierro en ángulo
o tuberías se deben sujetar en una prensa de tornillo y cortar lo más cerca posible de la prensa.
•Los metales de hoja delgada deben colocarse entre dos tablas de madera o se deben colocar sobre tablones de madera más gruesos, como madera terciada y el diseño o diagramado se debe poner encima. Esto permite cortar el metal sin problemas y evita el desgarro del material de metal.
•La hoja se puede lubricar para facilitar el corte. Use una barra de cera para corte, si hubiese disponible, y use aceite para corte cuando corte acero.
•La porción expuesta de la barra de la sierra se debe mantener limpia. Elimine frecuentemente los restos de metal usando un paño con aceite. Después de usar, deseche adecuadamente el paño con aceite para evitar riesgos de incendio.
EXTRACCIÓN DEL POLVO
Se pueden realizar operaciones de corte limpias conectando esta herramienta a una aspiradora. Introduzca la manguera de la aspiradora en el orificio de la parte trasera de la herramienta. Baje la tapa para polvo antes de poner la herramienta en funcionamiento.
AVISO
La extracción del polvo no se puede realizar cuando se hacen cortes en diagonal.
Mantenimiento
El servicio de la herramienta debe ser realizado sólo por personal de reparaciones calificado. El servicio
o mantenimiento realizado por personas no calificadas puede provocar riesgo de lesiones.
Limpieza
Limpie el polvo y los desechos de los orificios y contactos eléctricos, soplando con aire comprimido.
Los orificios de ventilación del motor y los interruptores deben mantenerse limpios y libres de materiales extraños. No intente limpiarla introduciendo objetos con punta a través de las aberturas. Mantenga los mangos de las herramientas limpios, secos y libres de aceite o grasa. Use únicamente un jabón suave y un paño húmedo para
General Safety Information (Cont’d.)
TOOL USE AND CARE
!WARNING Do not use tool if switch does not turn it ON or OFF. Any tool that cannot be controlled with the switch is dangerous and must be repaired.
1.This tool must NOT be modified or used for any application other than that for which it was designed.
Do not force the
! CAUTION tool. Use the correct tool for your application. The correct tool will do the job better and safer at the rate for which it is designed.
2. Maintain tools with care. Keep cutting tools sharp and clean. Properly maintained tools with sharp cutting edges are less likely to bind and are easier to control.
3. Check for misalignment or binding of moving parts, breakage of parts, and any other condition that may affect the tool’s operation. If damaged, have the tool serviced before using. Many accidents are caused by poorly maintained tools.
4. Use only accessories that are recommended by the manufacturer for your model. Accessories suitable for one tool may create a risk of injury when used on another tool.
5. Some woods contain preservatives which can be toxic. Take extra care to prevent inhalation and skin contact when working with these materials. Request and follow all safety information available from your material supplier.
6. Store tools out of reach of children and other untrained persons. Tools are dangerous in the hands of untrained users.
CAUSES AND USER PREVENTION OF KICKBACK:
Kickback is a sudden reaction to a pinched, bound or misaligned saw blade, causing an uncontrolled saw to lift up and out of the workpiece toward the operator.
When the blade is pinched or bound tightly by the kerf, or cutting slot, closing down, the blade stalls and the motor reaction drives the unit rapidly back toward the operator.
If the blade becomes twisted or misaligned in the cut, the teeth at the back edge of the blade can dig into the top surface of the wood causing the blade to climb out of the kerf and jump back toward operator.
Kickback is the result of tool misuse and/ or incorrect operating procedures or conditions and can be avoided by taking proper precautions as given below:
1.Maintain a firm grip with both hands on the saw and position your body and arm to allow you to resist kickback forces. Kickback forces can be controlled by the operator, if proper precautions are taken.
2.When blade is binding, or when interrupting a cut for any reason, release the trigger and hold the saw motionless in the material until the blade comes to a complete stop. Never attempt to remove the saw from the work or pull the saw backward while the blade is in motion or kickback may occur. Investigate and take corrective actions to eliminate the cause of blade binding.
3.When restarting a saw in the workpiece, center the saw blade in the kerf, or cut, and check that saw teeth are not engaged into the material. If saw blade is binding, it may walk up or kickback from the workpiece as the saw is restarted.
4.Support large panels to minimize the risk of blade pinching and kickback. Large panels tend to sag under their own weight. Supports must be placed under the panel on both sides, near the line of cut and near the edge of the panel.
5.Do not use dull or damaged blades. Unsharpened or improperly set blades produce narrow kerf causing excessive friction, blade binding and kickback.
6.Blade depth and bevel adjusting locking levers must be tight and secure before making cut. If blade adjustment shifts while cutting, it may cause binding and kickback.
7.Use extra caution when making a “Pocket Cut” into existing walls or other blind areas. The protruding blade may cut objects that can cause kickback.
8.Be cautious of pitchy, knotty, wet or warped stock. These are most likely to create pinching conditions and possible kickback.
Assembly
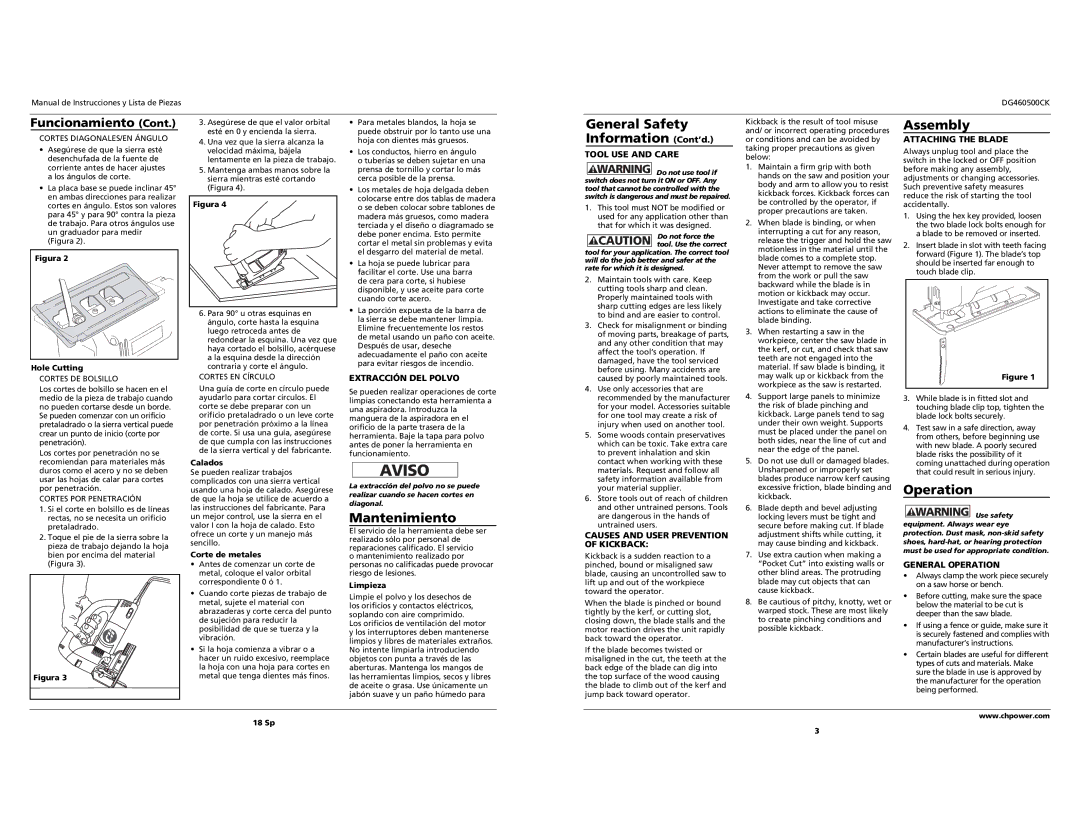
ATTACHING THE BLADE
Always unplug tool and place the switch in the locked or OFF position before making any assembly, adjustments or changing accessories. Such preventive safety measures reduce the risk of starting the tool accidentally.
1.Using the hex key provided, loosen the two blade lock bolts enough for a blade to be removed or inserted.
2.Insert blade in slot with teeth facing forward (Figure 1). The blade’s top should be inserted far enough to touch blade clip.
3.While blade is in fitted slot and touching blade clip top, tighten the blade lock bolts securely.
4.Test saw in a safe direction, away from others, before beginning use with new blade. A poorly secured blade risks the possibility of it coming unattached during operation that could result in serious injury.
Operation
!WARNING Use safety equipment. Always wear eye protection. Dust mask, non-skid safety shoes, hard-hat, or hearing protection must be used for appropriate condition.
GENERAL OPERATION
•Always clamp the work piece securely on a saw horse or bench.
•Before cutting, make sure the space below the material to be cut is deeper than the saw blade.
•If using a fence or guide, make sure it is securely fastened and complies with manufacturer’s instructions.
•Certain blades are useful for different types of cuts and materials. Make sure the blade in use is approved by the manufacturer for the operation being performed.