Manual de Instrucciones | Pistolas Pulverizadores Neumáticas |
Pistolas Pulverizadoras
Operating Instructions | Air Operated Models |
Preparación (Continuación)
PARA AJUSTAR EL PATRON
SISTEMAS DE SIFON
1.Ajuste la presión de aire de la pistola pulverizadora según las recomenda- ciones suministradas con el material que va a rociar. Esta presión general- mente es entre 2,8 - 4,1 bar. Para ajustar la presión de aire oprima el gatillo y abra completamente la per- illa de control de aire (de haberla). Si desea reducir la presión para pintar sólo ciertas áreas, use la perilla de control de aire para reducirla (Vea las Figuras 7 ó 8).
Perilla de
Control de
Perilla de Control de
Patrón
Perilla de Control de Fluído
Figura 9 - Tamaño del Patrón
3. Gire la perilla de control totalmente |
en el mismo sentido de las agujas del |
reloj, para cerrarlo (Vea la Figura 9). |
4. Oprima el gatillo rápidamente mien- |
tras gira la perilla de control en sen- |
tido contrario al de las agujas del |
reloj. Observe el patrón en la pieza |
de prueba y ajuste la perilla de con- |
trol de fluído hasta que obtenga el |
desea reducir la presión para pintar sólo ciertas áreas, use la perilla de control de aire para reducirla (Vea las Figuras 7 ó 8).
2. Seleccione la forma del patrón. Si |
desea cubrir una superficie amplia, |
gire la perilla de control en sentido |
contrario a las agujas del reloj. Si |
desea un patrón circular, gírela en el |
mismo sentido de las agujas del reloj |
(Vea la Figura 9). |
3. Gire la perilla de control de fluído 3 |
veces, en sentido contrario a las agu- |
jas del reloj, para abrirla. |
4. Comience con una presión de 0 bar |
en el tanque y poco a poco gire el |
regulador del tanque hasta alcanzar |
la atomización deseada. |
5. Si el rocío es muy tosco, reduzca la |
Operation
3.The amount of paint being applied can be varied by the speed of the stroke, distance from the surface and adjustment of the fluid control knob.
4.Overlap strokes just enough to
Figure 14
obtain an even coat (See Figure 14). NOTE: Two thin coats of paint will yield better results and have less chance of runs than one heavy layer.
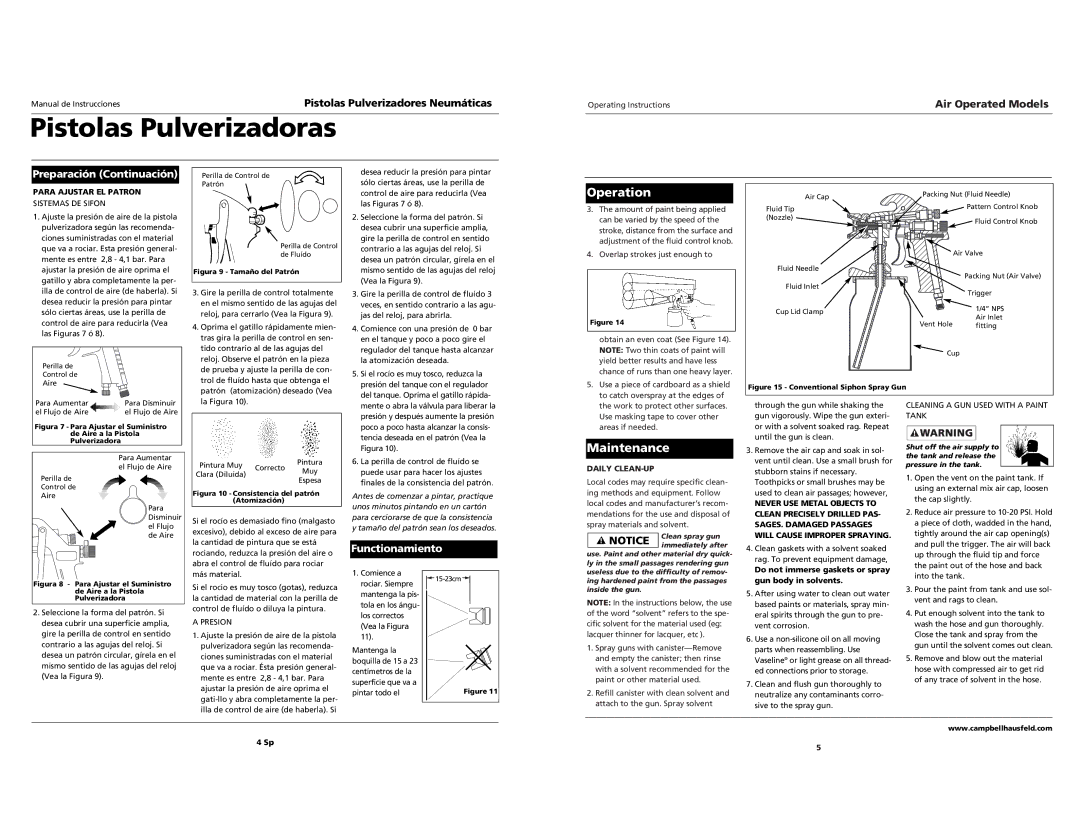
Air Cap
Fluid Tip (Nozzle)
Fluid Needle
Fluid Inlet
Cup Lid Clamp
Packing Nut (Fluid Needle)
Pattern Control Knob
![]() Fluid Control Knob
Fluid Control Knob
Air Valve
Packing Nut (Air Valve)
| Trigger |
| 1/4” NPS |
Vent Hole | Air Inlet |
fitting | |
Cup |
|
Aire
patrón (atomización) deseado (Vea |
presión del tanque con el regulador |
del tanque. Oprima el gatillo rápida- |
5. Use a piece of cardboard as a shield |
to catch overspray at the edges of |
Figure 15 - Conventional Siphon Spray Gun
Para Aumentar | Para Disminuir |
el Flujo de Aire | el Flujo de Aire |
Figura 7 - Para Ajustar el Suministro de Aire a la Pistola Pulverizadora
Para Aumentar |
el Flujo de Aire |
Perilla de |
Control de |
Aire |
Para |
Disminuir |
el Flujo |
de Aire |
la Figura 10). |
Pintura Muy | Correcto | Pintura | |
Muy | |||
Clara (Diluida) | |||
| |||
| Espesa | ||
|
|
Figura 10 - Consistencia del patrón (Atomización)
Si el rocío es demasiado fino (malgasto excesivo), debido al exceso de aire para la cantidad de pintura que se está rociando, reduzca la presión del aire o abra el control de fluído para rociar
mente o abra la válvula para liberar la |
presión y después aumente la presión |
poco a poco hasta alcanzar la consis- |
tencia deseada en el patrón (Vea la |
Figura 10). |
6. La perilla de control de fluído se |
puede usar para hacer los ajustes |
finales de la consistencia del patrón. |
Antes de comenzar a pintar, practique unos minutos pintando en un cartón para cerciorarse de que la consistencia y tamaño del patrón sean los deseados.
Functionamiento
the work to protect other surfaces. |
Use masking tape to cover other |
areas if needed. |
Maintenance
DAILY CLEAN-UP
Local codes may require specific clean- ing methods and equipment. Follow local codes and manufacturer’s recom- mendations for the use and disposal of spray materials and solvent.
Clean spray gun immediately after
use. Paint and other material dry quick- ly in the small passages rendering gun
through the gun while shaking the gun vigorously. Wipe the gun exteri- or with a solvent soaked rag. Repeat until the gun is clean.
3. Remove the air cap and soak in sol- |
vent until clean. Use a small brush for |
stubborn stains if necessary. |
Toothpicks or small brushes may be |
used to clean air passages; however, |
NEVER USE METAL OBJECTS TO |
CLEAN PRECISELY DRILLED PAS- |
SAGES. DAMAGED PASSAGES |
WILL CAUSE IMPROPER SPRAYING. |
4. Clean gaskets with a solvent soaked |
rag. To prevent equipment damage, |
Do not immerse gaskets or spray |
CLEANING A GUN USED WITH A PAINT TANK
Shut off the air supply to the tank and release the pressure in the tank.
1. Open the vent on the paint tank. If |
using an external mix air cap, loosen |
the cap slightly. |
2. Reduce air pressure to |
a piece of cloth, wadded in the hand, |
tightly around the air cap opening(s) |
and pull the trigger. The air will back |
up through the fluid tip and force |
the paint out of the hose and back |
Figura 8 - Para Ajustar el Suministro |
de Aire a la Pistola |
Pulverizadora |
2.Seleccione la forma del patrón. Si desea cubrir una superficie amplia, gire la perilla de control en sentido contrario a las agujas del reloj. Si desea un patrón circular, gírela en el mismo sentido de las agujas del reloj (Vea la Figura 9).
más material.
Si el rocio es muy tosco (gotas), reduzca la cantidad de material con la perilla de control de fluído o diluya la pintura.
A PRESION
1.Ajuste la presión de aire de la pistola pulverizadora según las recomenda- ciones suministradas con el material que va a rociar. Ésta presión general- mente es entre 2,8 - 4,1 bar. Para ajustar la presión de aire oprima el
1.Comience a rociar. Siempre mantenga la pis- tola en los ángu- los correctos (Vea la Figura 11).
Mantenga la boquilla de 15 a 23 centímetros de la superficie que va a pintar todo el
Figure 11 |
useless due to the difficulty of remov- ing hardened paint from the passages inside the gun.
NOTE: In the instructions below, the use of the word “solvent” refers to the spe- cific solvent for the material used (eg: lacquer thinner for lacquer, etc ).
1.Spray guns with
2.Refill canister with clean solvent and attach to the gun. Spray solvent
gun body in solvents. |
5. After using water to clean out water |
based paints or materials, spray min- |
eral spirits through the gun to pre- |
vent corrosion. |
6. Use a |
parts when reassembling. Use |
Vaseline® or light grease on all thread- |
ed connections prior to storage. |
7. Clean and flush gun thoroughly to |
neutralize any contaminants corro- |
sive to the spray gun. |
into the tank. |
3. Pour the paint from tank and use sol- |
vent and rags to clean. |
4. Put enough solvent into the tank to |
wash the hose and gun thoroughly. |
Close the tank and spray from the |
gun until the solvent comes out clean. |
5. Remove and blow out the material |
hose with compressed air to get rid |
of any trace of solvent in the hose. |
www.campbellhausfeld.com
4 Sp
5