Pistola Pulverización de Uso General
Model KBS530
Preparacion (Continuación)
presión generalmente es entre 2,07bar - 3,45 bar.
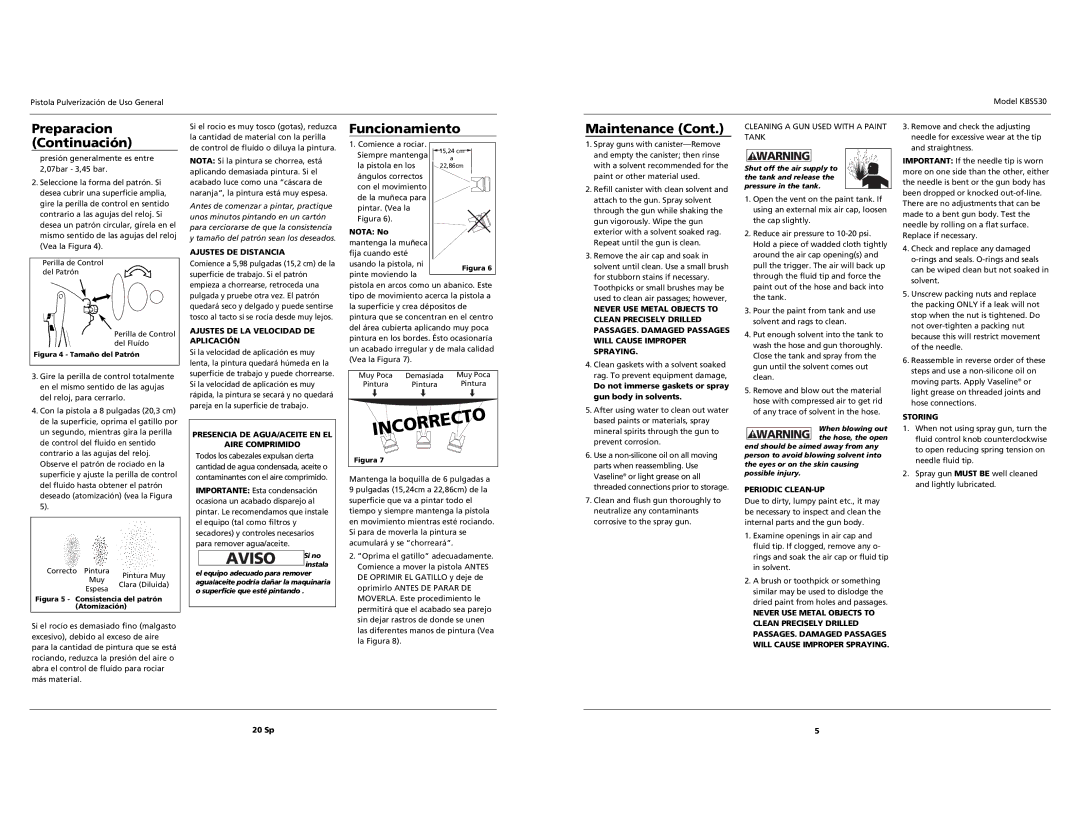
2.Seleccione la forma del patrón. Si desea cubrir una superficie amplia, gire la perilla de control en sentido contrario a las agujas del reloj. Si desea un patrón circular, gírela en el mismo sentido de las agujas del reloj (Vea la Figura 4).
Perilla de Control del Patrón
Perilla de Control del Fluído
Figura 4 - Tamaño del Patrón
3.Gire la perilla de control totalmente en el mismo sentido de las agujas del reloj, para cerrarlo.
4.Con la pistola a 8 pulgadas (20,3 cm) de la superficie, oprima el gatillo por un segundo, mientras gira la perilla de control del fluido en sentido contrario a las agujas del reloj. Observe el patrón de rociado en la superficie y ajuste la perilla de control del fluido hasta obtener el patrón deseado (atomización) (vea la Figura 5).
Correcto Pintura
Si el rocio es muy tosco (gotas), reduzca la cantidad de material con la perilla de control de fluído o diluya la pintura.
NOTA: Si la pintura se chorrea, está aplicando demasiada pintura. Si el acabado luce como una “cáscara de naranja”, la pintura está muy espesa.
Antes de comenzar a pintar, practique unos minutos pintando en un cartón para cerciorarse de que la consistencia y tamaño del patrón sean los deseados.
AJUSTES DE DISTANCIA
Comience a 5,98 pulgadas (15,2 cm) de la superficie de trabajo. Si el patrón empieza a chorrearse, retroceda una pulgada y pruebe otra vez. El patrón quedará seco y delgado y puede sentirse tosco al tacto si se rocía desde muy lejos.
AJUSTES DE LA VELOCIDAD DE APLICACIÓN
Si la velocidad de aplicación es muy lenta, la pintura quedará húmeda en la superficie de trabajo y puede chorrearse. Si la velocidad de aplicación es muy rápida, la pintura se secará y no quedará pareja en la superficie de trabajo.
PRESENCIA DE AGUA/ACEITE EN EL
AIRE COMPRIMIDO
Todos los cabezales expulsan cierta cantidad de agua condensada, aceite o contaminantes con el aire comprimido.
IMPORTANTE: Esta condensación ocasiona un acabado disparejo al pintar. Le recomendamos que instale el equipo (tal como filtros y secadores) y controles necesarios para remover agua/aceite.
AVISO Si no
instala
el equipo adecuado para remover
Funcionamiento
1. Comience a rociar. |
|
|
|
|
Siempre mantenga | 1 | 5,24 cm |
| |
| a | |||
la pistola en los |
| |||
22,86cm | ||||
ángulos correctos |
|
|
| |
con el movimiento |
|
|
| |
de la muñeca para |
|
|
| |
pintar. (Vea la |
|
|
| |
Figura 6). |
|
|
| |
NOTA: No
mantenga la muñeca fija cuando esté usando la pistola, ni pinte moviendo la
pistola en arcos como un abanico. Este tipo de movimiento acerca la pistola a la superficie y crea dépositos de pintura que se concentran en el centro del área cubierta aplicando muy poca pintura en los bordes. Ésto ocasionaría un acabado irregular y de mala calidad (Vea la Figura 7).
Muy Poca | Demasiada | Muy Poca |
Pintura | Pintura | Pintura |
Figura 7
Mantenga la boquilla de 6 pulgadas a 9 pulgadas (15,24cm a 22,86cm) de la superficie que va a pintar todo el tiempo y siempre mantenga la pistola en movimiento mientras esté rociando. Si para de moverla la pintura se acumulará y se “chorreará”.
2. “Oprima el gatillo” adecuadamente. |
Comience a mover la pistola ANTES |
Maintenance (Cont.)
1.Spray guns with
2.Refill canister with clean solvent and attach to the gun. Spray solvent through the gun while shaking the gun vigorously. Wipe the gun exterior with a solvent soaked rag. Repeat until the gun is clean.
3.Remove the air cap and soak in solvent until clean. Use a small brush for stubborn stains if necessary. Toothpicks or small brushes may be used to clean air passages; however,
NEVER USE METAL OBJECTS TO CLEAN PRECISELY DRILLED PASSAGES. DAMAGED PASSAGES WILL CAUSE IMPROPER SPRAYING.
4.Clean gaskets with a solvent soaked rag. To prevent equipment damage,
Do not immerse gaskets or spray gun body in solvents.
5.After using water to clean out water based paints or materials, spray mineral spirits through the gun to prevent corrosion.
6.Use a
7.Clean and flush gun thoroughly to neutralize any contaminants corrosive to the spray gun.
CLEANING A GUN USED WITH A PAINT TANK
!WARNING
Shut off the air supply to the tank and release the pressure in the tank.
1.Open the vent on the paint tank. If using an external mix air cap, loosen the cap slightly.
2.Reduce air pressure to
3.Pour the paint from tank and use solvent and rags to clean.
4.Put enough solvent into the tank to wash the hose and gun thoroughly. Close the tank and spray from the gun until the solvent comes out clean.
5.Remove and blow out the material hose with compressed air to get rid of any trace of solvent in the hose.
When blowing out ! WARNING the hose, the open
end should be aimed away from any person to avoid blowing solvent into the eyes or on the skin causing possible injury.
PERIODIC CLEAN-UP
Due to dirty, lumpy paint etc., it may be necessary to inspect and clean the internal parts and the gun body.
1. Examine openings in air cap and |
fluid tip. If clogged, remove any o- |
rings and soak the air cap or fluid tip |
in solvent. |
3.Remove and check the adjusting needle for excessive wear at the tip and straightness.
IMPORTANT: If the needle tip is worn more on one side than the other, either the needle is bent or the gun body has been dropped or knocked
4.Check and replace any damaged
5.Unscrew packing nuts and replace the packing ONLY if a leak will not stop when the nut is tightened. Do not
6.Reassemble in reverse order of these steps and use a
STORING
1.When not using spray gun, turn the fluid control knob counterclockwise to open reducing spring tension on needle fluid tip.
2.Spray gun MUST BE well cleaned and lightly lubricated.
Muy
Pintura Muy
DE OPRIMIR EL GATILLO y deje de |
2. A brush or toothpick or something |
Espesa
Clara (Diluida)
agua/aceite podría dañar la maquinaria o superficie que esté pintando .
oprimirlo ANTES DE PARAR DE |
similar may be used to dislodge the |
Figura 5 - Consistencia del patrón (Atomización)
Si el rocío es demasiado fino (malgasto excesivo), debido al exceso de aire para la cantidad de pintura que se está rociando, reduzca la presión del aire o abra el control de fluído para rociar más material.
MOVERLA. Este procedimiento le |
permitirá que el acabado sea parejo |
sin dejar rastros de donde se unen |
las diferentes manos de pintura (Vea |
la Figura 8). |
dried paint from holes and passages. |
NEVER USE METAL OBJECTS TO |
CLEAN PRECISELY DRILLED |
PASSAGES. DAMAGED PASSAGES |
WILL CAUSE IMPROPER SPRAYING. |
20 Sp | 5 |